August trip 2011
Back from a 2.5 week trip into the southern interior of BC. It was a bit of a rush to get the van ready for the trip, the last week or so of camperization was a mixture of success and compromise. I did not get the upper bunk installed in time, I hit a few snags that I will write about later. To add to the pre-trip frenzy, the day before we left I noticed the front outer CV boot on the driver’s side was ripped. Fortunately the local VW dealer had boots in stock, so the night before we left I put on a new one. It was a fairly straightforward job; jack up and support the van, remove wheel,undo the axle nut, undo the sway bar drop link on that side, remove the 2 socket head bolts holding the ball joint to the upper A-arm, let the spindle swing out, undo the inner CV joint, wrestle the axle out (tight), pull the inner CV joint off, pull the ripped outer boot off the free axle end, clean and repack joint, install new boot…. yadda yadda.
Next day we left, wife, son, 2 large dogs, and a borrowed canoe (my 18′ cedar canvas canoe was too heavy for the stop gap rack I had installed on rear of van). Here is the van at the Swartz Bay ferry terminal. It really does look like a Westy now, doesn’t it? And to my eyes, it looks a lot better than the other RVs in the line up.

On the mainland we headed east to Hope and then on to Manning Park. It has been a tradition with us to stop for a few nights in this park. While the campsites at Lightning Lake can be busy, it only takes a little bit of effort to get away from the other campers. The air is clear and with the elevation (+4000 ft) the nights are cool. I really recommend stopping here and exploring. Here is our campsite.


A black bear was around and it wandered through our campsite one evening (luckily our dogs were out on a walk with my wife) and again the next day it passed behind our site, this time the dogs did raise the alarm. Of course the camera was not handy. We did some canoeing in Lightning Lake, and I portaged the canoe to the next lake (Strike?) and we did some more exploring.

There is a trail around all of the lakes, I took the dogs for a look.

Plenty of Devil’s Club.

Next day I took the dogs on a hike up the Skyline Trail which leads from Lightning Lake up onto a ridge in the alpine. The trail goes through an old burned out area and the alpine flowers were still in bloom, and there were patches of snow around.

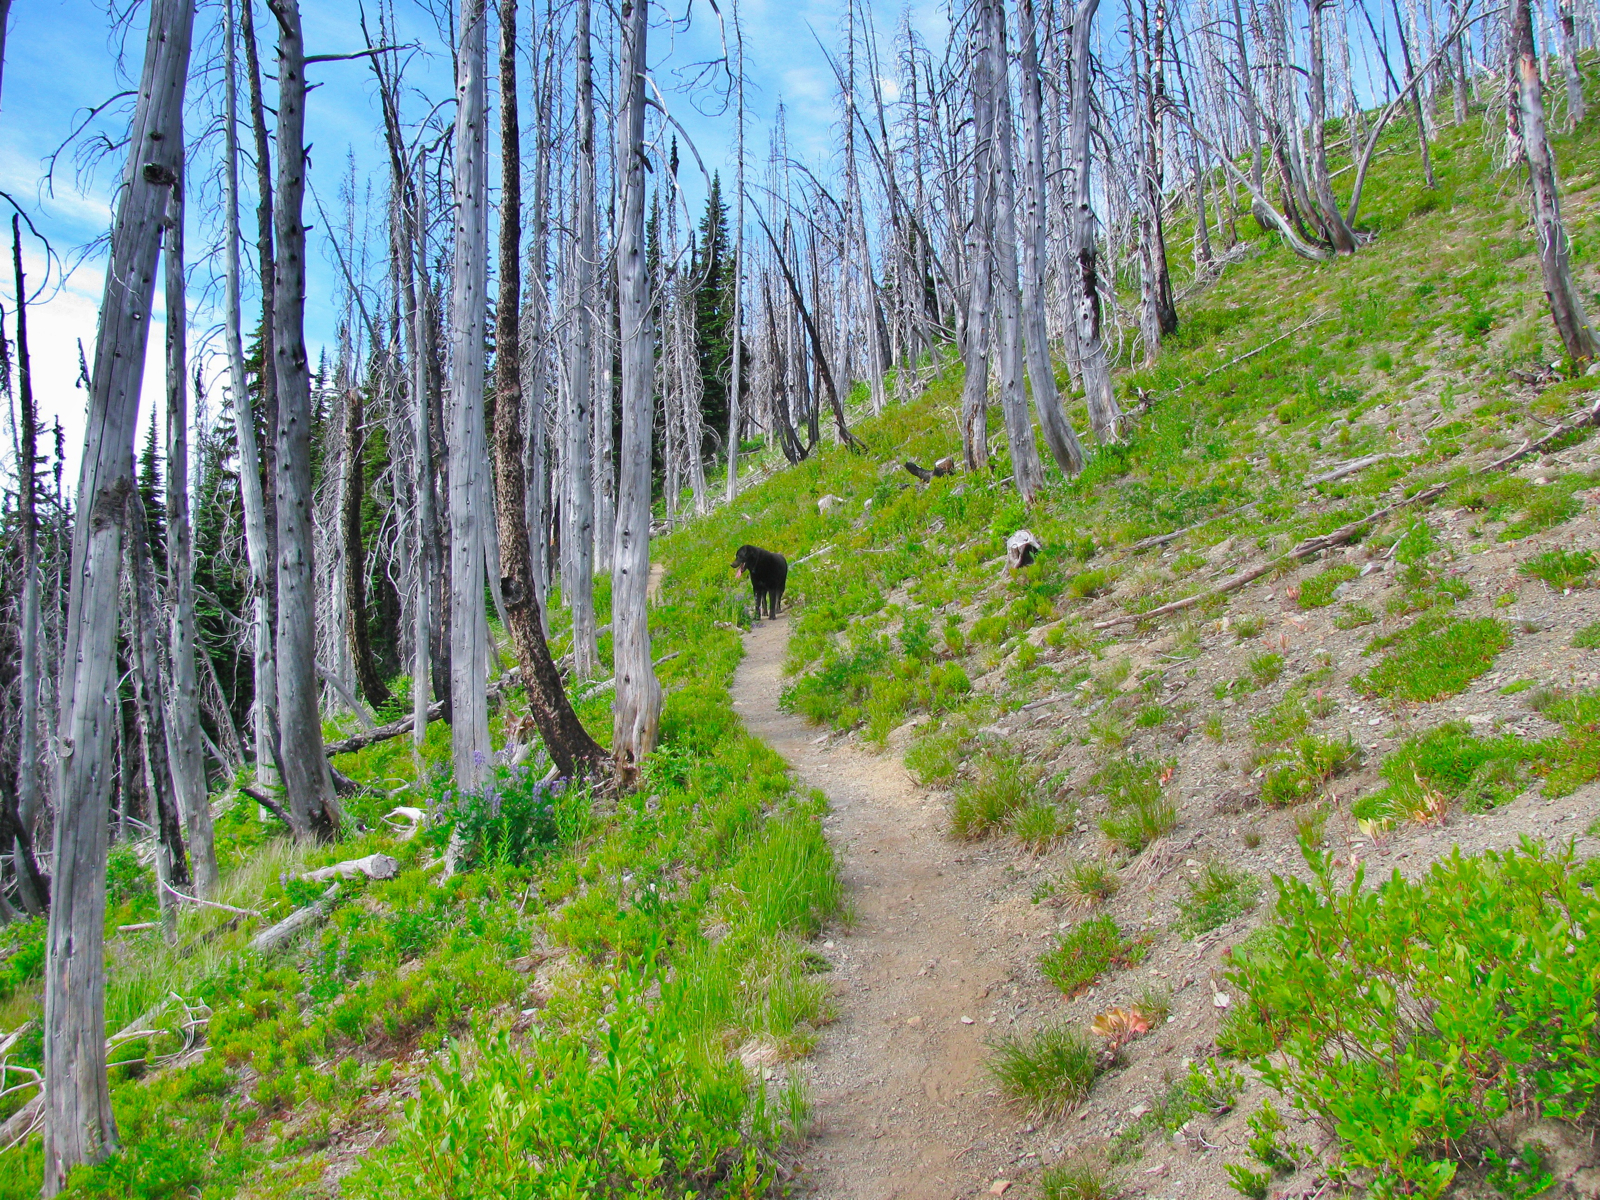


Then on the last day my wife and son paddled the canoe from the campsite over to the day use area where we loaded it on to the van. You can make out the burned trees on the Skyline Trail at the top of the ridge in the background. We met an older German (Berlin) couple at the park who were taking 2 months in a rented RV to tour BC. Nice folk and they really enjoyed Manning Park.

Then it was on east to Princeton, and from Princeton, north towards Merrit. The countryside is much drier now. Yup, that’s a nice maroon Vanagon Westy heading this way.

We were heading to Kentucky-Alleyne Provincial Park. It’s a busy and popular park and we started going there when our son was young, so we went back for old time’s sake. The lakes are kettle lakes, with no real water in flow apart from snow melt, and the lake level has been dropping for the last 10 years. So now the lake shore is about 30 metres further out than when we first went there. When we arrived, we could not get a lakeside camping spot, so the first night was back up on a site on a ridge between the lakes.

A lot of the impressive Ponderosa pines have been killed by the pine beetle epidemic. Next day we moved to a lakefront site and did some relaxing.

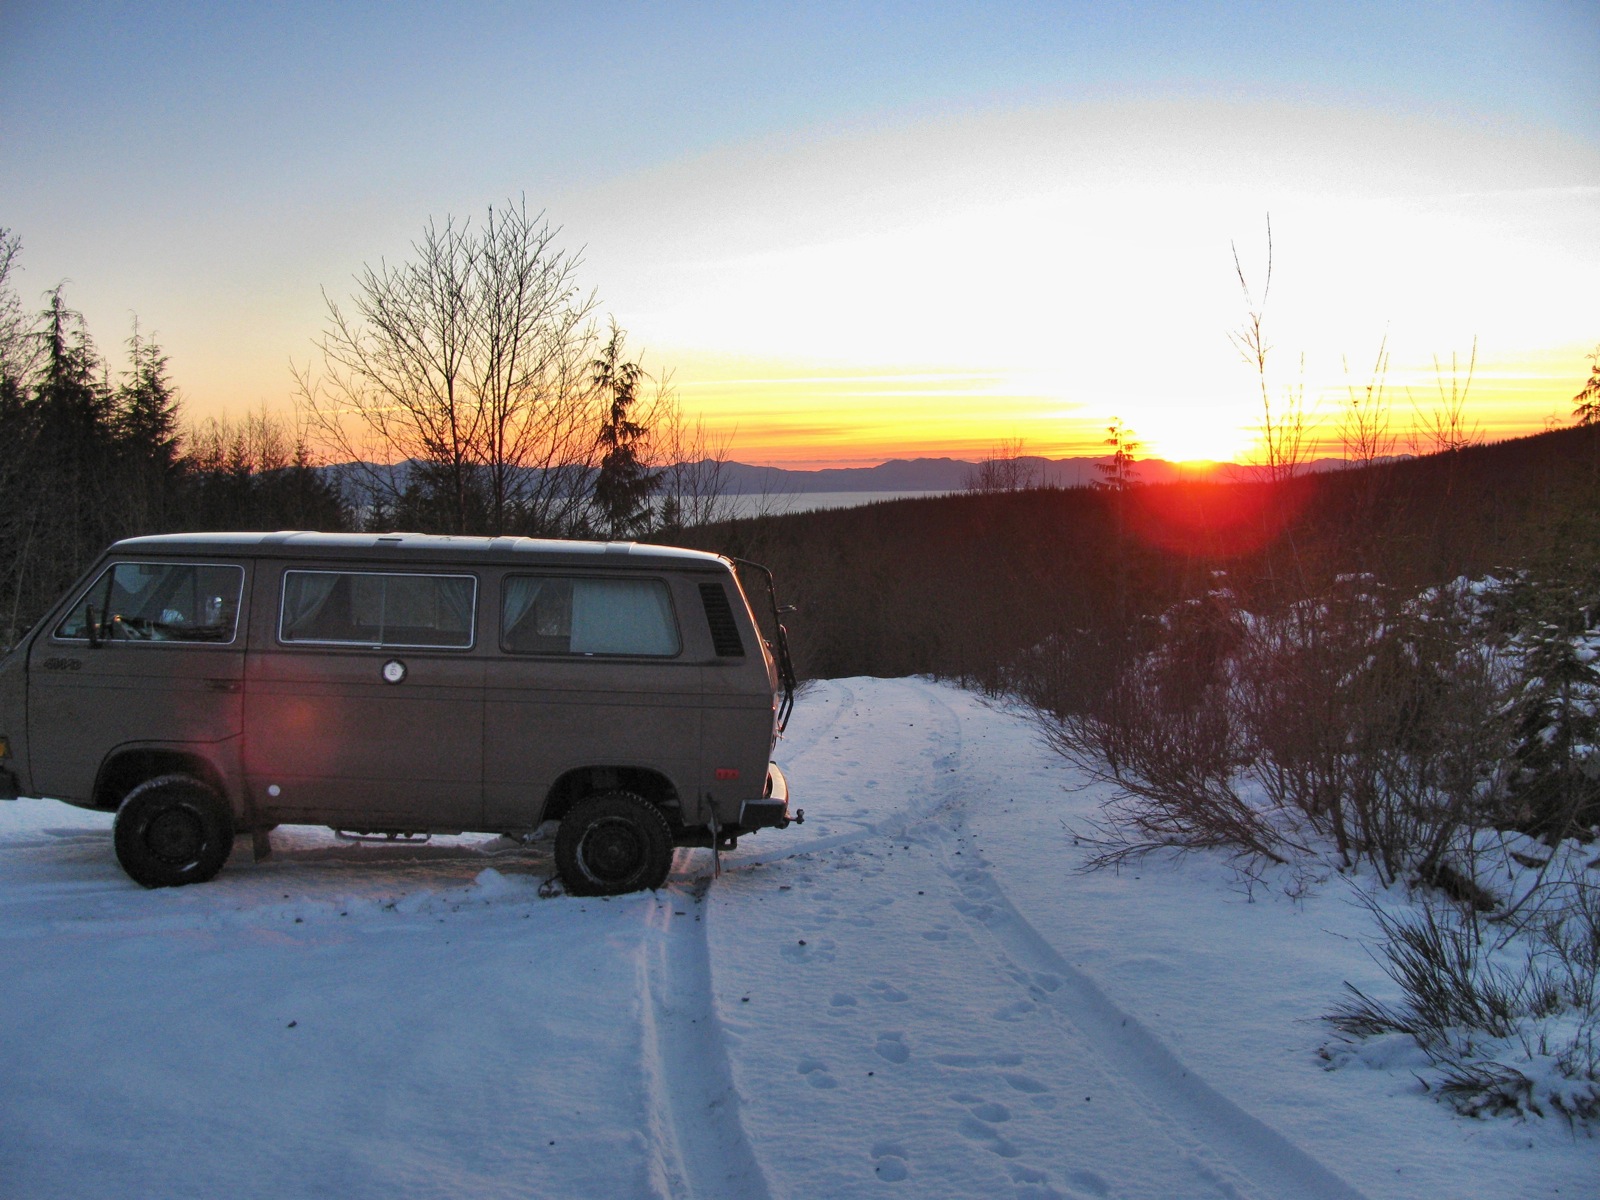
We ended up spending a few days here, with one trip into Merrit for supplies. Then it was on north to Kamloops and then further north following the North Thompson River to Little Fort. West from Little Fort (and up a 10 km 8% hill which forced the van down to 2nd gear, the old engine is tired but it did not over heat) to Bridge Lake, then south on logging roads to Scot Lake. There is a Forest Service campsite here and it is another one of those places we first camped at when my son was a toddler. We did not stay at the campsite proper, but up on a hill about 200 meters west, over looking the lake.


Compare the last picture with this one taken a few years ago when we were using the old faithful ’82 Westy.

We stayed here for 6 days, fishing, exploring, canoeing, reading. Sandhill cranes were calling, but we only saw some when a couple flew over one evening, coyotes were about, making noise and exciting the dogs, most of the Lodgepole pines around were killed by the Pine Beetle, but lots of new pines were coming up. The Spruce trees (and of course the Aspens) were mostly unaffected.

Here you can see the tell tale pitch extrusions from the beetle affected trees.


And another picture of the van, the cloudy day when we left. I have to say, coming from the damp coast, the climate around Scot Lake was wonderful. The air was clear, the sun hot (30-33 C ) and the nights cool (2 C at 7 am). There was absolutely no dew on the ground or the van in the mornings, something I found amazing.

I had my gold pan with me and one day I thought I’d see what was in the coarse sand by the side of the lake. I struck iron! I can reveal the secrets behind panning for iron, send me $9.95 and I will detail the simple but clever method to extract gram quantities of this amazing metal 🙂

I couldn’t resist taking a picture of one of my tires. Good old Michelin Agilis 81, crap in mud or snow, but great for the dry and they are a very tough and durable tire.

Another goofy pic which led my son to declare me a “doofus hipster wannabe”, making a simple pasta sauce with shallots, garlic, sun dried tomato sauce and pimenton, and the computer.

We left Scot Lake the way we arrived, back south to Kamloops then east to Armstrong to visit friends. Then back west again, passing this nice collection.


Back through Kamloops and instead of heading south there (Coquilhalla Hwy) I decided to head on west to Cache Creek and head down the Fraser Canyon. I like the stretch of road between Kamloops and Cache Creek, and sometimes you see things of interest.


In the Fraser canyon we were held up for an hour by a tandem trailer that had spilled its load of lumber. I don’t know if anyone was hurt, a helicopter did fly off from the scene.

Was another chance to take a picture of the van.

And the CPR railway was on one side of the river, the CN on the other side (lots of history here). A few model trains passed by during the hold up 🙂

Then it was a mad dash to the coast and the ferry. The delay caused us to miss the 9 pm ferry to the island, and there was no 10 pm sailing… so we took the 10:45 pm sailing to Nanaimo (further up the island from where we live) and drove down the island to home, arriving at about 2:30 am.
The van ran great throughout the trip with one exception. We had about 1.5 hrs of bucking and hesitation driving south from Scot Lake. A fresh fill up of gas solved that. Previous fill up of fuel was with 10% ethanol blend, I wonder if that had anything to do with it?
Vanagon – pop top assist struts installed
Posted by albell in vanagon, vanagon mods on August 13, 2011
Believe me, I have been working on the westy conversion project, but slow progress and some failed experiments stopped me from posting more. This morning I got the pop top canvas bottom strip attached (lots of little screws) to the roof and before I finish off the upper bunk I thought I’d install the home made pop top assist struts I made a while back. Pretty straightforward install, the roof attachment is a stainless bolt and fender washers tightened up to the fibgerglass, then a nylon washer, the top of the strut, another nylon washer, and a nylock nut. Having the canvas yet to be installed made locating and drilling the hole in the pop top even easier. These were old rear hatch struts, and were still quite hard to compress, and I wondered if it would be too much assist. But as it turns out, it is perfect.


Vanagon – extra sink in a Westy
Posted by albell in vanagon, vanagon mods on August 13, 2011
A friend sent these pics a while back.


Vanagon – pop top on!
Posted by albell in vanagon, vanagon mods on August 5, 2011
Finally! Not sitting quite right, especially on the passenger side where it looks like it has to come forward about 1/2″, and also sit down on the rear about 1/4″. I’m optimistic I can get it sitting right.

Vanagon – Westy upper bunk refinishing
Posted by albell in vanagon, vanagon mods on August 1, 2011
I installed and bolted down the wardrobe and upper cabinet to see how they interacted with the plywood liner. It all looks good and I took a break from that chore and set about cleaning up the upper bunk bed platforms. The plywood looked really manky, the paper had come off years ago and the glue residue had become stained and ugly. It was a real chore to remove the glue, I curse the engineer that specified glue that did not stick to the paper/vinyl coating but did did stick tenaciously to the plywood. I tried a few methods but the best was a sharp paint scraper followed by a random orbit sander (40 grit paper) then hand sanding with finer grit paper.
The big section that is bolted to the roof is really not visible when the sleeping pad is in place, but I still wanted it cleaned up and sealed with something. Again I turned to Sikkens Cetol 1. Following pics are self explanatory.


Both sides were finished. But I only some of the fold out section done. This section will be cut in half and additional hinges installed so it can be folded back over the rear section and clear the pop top. There is decreased headroom with the bed platform on top of the roof compared to the stock westy roof where the upper bunk rear section doubles as a ceiling. But more on that later when I get to it. The fold out section has a galvanized steel U-section edge on one end (held on by screws which also hold on snaps for the bunk pad), and a T-section vinyl moulding on the other end.

Unbelievably dirty eh?

And the scraping, one side…

then the other.

Another one of those unsatisfying days, very little actually installed in the van, but I can almost see the end of the project.
Vanagon – pop top hole trimming part three
Posted by albell in vanagon, vanagon mods on July 31, 2011
Not really much to show from the last couple of day’s work. What I have managed to do is fit the rear plywood headliner. This took many fitting and cutting iterations and the final result could have been arrived at sooner. I had a close fit in mind, but that was hard – wrestling and torturing the plywood into place, doesn’t like to bend in 2 planes at once – so the final result is more of a relaxed fit meaning I have to do more edge treatment. The following pics show the headliner in place but you can see it sags a little and I have clamps holding it in a curve at the front. Both issues will be dealt with by some wood battens, as yet to be designed 🙂
The rear wardrobe is not secured in these pics, but you can see how there will be a bit of a gap between the top of it and the headliner.


I also drilled and tapped (5 x 0.8 mm) the aluminum angle that support the door valence and the kitchen troughs. The stock westy uses sheet metal screws but seeing as the angle is 1/8″ thick, I needed to use machine screws. These are scavenged screws shown, if I get around to it I’ll buy some shiny new ones.

I used the wiring for the rear, driver’s side interior light to power the fluorescent light that is mounted to the underside of the trough. The trough was a bit tricky to install, the hidden ledger strip was a pain to position.
Doesn’t seem like I did much does it? The headliner was the time eater, applying the finish and cutting to shape. I did spend some time pondering the modified hinges for the fold out upper bunk, that is going to be fun as is figuring out how to finish those exposed curves in roof.
Leave you with a picture of the passenger’s side light on the front headliner. Makes a big difference having a light there, no, really it does.

Edit: Ed, if you are reading this, I’m waiting for more updates on your syncro project.
Twist drill, oh really?
Posted by albell in metalworking on July 31, 2011
Last Christmas I was given one of those big sets of incredibly cheap drill and screwdriver bit sets from my neighbour. I hadn’t touched the set until yesterday when I could not find the 5/32″ bits I was using the day before. I grabbed one of the cheap “titanium nitride coated HSS” bits from its plastic box and used it to drill out 3 pop rivets. I say 3, for that is all it managed to do. Wasn’t much to ask was it? The bit dulled quickly and became bent. I looked again at the bit, didn’t seem right to me, what do you think? A less cheap uncoated bit beside it just incase you forget what a regular bit looks like 🙂

Vanagon – pop top hole trimming part two
Posted by albell in vanagon, vanagon mods on July 29, 2011
Past couple of days has been one step forward, two steps back. First problem was when I glued on some 1/4″ closed cell foam to the backside of the front headliner (for a bit of sound and thermal insulation) and then discovering that doing that had changed the arc that the panel springs into when installed. The result was slight bit of wavyness at the rear edge of the headliner, and a tiny bit at the front. I could have planed off a smidgen from each side of the panel but I’ve decided to see how it works out once all the screws are in place – the rear screws are in and that has helped, the front screws that also hold on the front window curtain are yet to to be installed. I wired in a passenger side light, tapping power and grounds from the driver’s side unit. The rear edge of the headliner was exposed and lay below the aluminum channel that I had screwed in place on the front edge of the cut out hole. I couldn’t find a satisfactory way of finishing that edge so I decided to make a new aluminum piece out of aluminum angle instead of channel. I should have done this from the start, the vertical leg of the angle mimics the turned down edge in the stock westy. Bending the angle was not as easy as the smaller (and thinner) channel, and the end result shows some dents from the bending jig. Here are some shots during test fittings.


That stock westy flex moulding works out fine.

Still have to marry it to the corners

The slider door valence is secured by the hidden angled brackets, but still need to be screwed down on the aluminum angle and to the roof at the very front. I’ve not done that yet as I am still not sure about how to hide the exposed roof edge at the front corner.

Here is a shot of the mid to rear part of that valence in the van. Obvious that I haven’t got the rear headliner installed yet.

Vanagon – pop top hole trimming part one
Posted by albell in vanagon, vanagon mods on July 26, 2011
Trying various ways to trim, and somewhat strengthen, the edges of the sheet metal roof exposed by the pop top hole. Along each side there has to be a ledge to support both the bed and the pop top lifting assembly. At the front edge, you have to install the pop top latch (and support it) as well as merging the wooden headliner to the cut edge. At the rear edge, not much has to be done, just cover that metal edge. I’ll begin with the front edge. I decided to use some aluminum, U-shaped, to span that edge. I bent it to match the roof curve with a very rudimentary jig in the vice. Here it is practicing on a scrap bit. You squeeze a bit then move on a little, etc.

Of course I practiced with the U channel in the wrong orientation then proceeded to do the real bit the same way. Grr, had to straighten it out and re-do. But I got it done, drilled holes for some stainless sheet metal screws and a cut out around the latch. The plywood headliner comes to the rear edge of this channel, and I think will be gussied up with some edge moulding stuff, or something.


The latch has a backing plate, but whereas in the stock westy roof that backing plate lies in an area supported on one side by the crossmember flange, and on the other side by the turned down hole edge, on my van I don’t have the turned down edge and the crossmember flange is spaced away from the roof by about 1/4″. So I installed a 1/4″ thick bit of aluminum, the same shape as the backing plate, in that space. I didn’t take a picture of that but here is a shot of the backing plate (you can see the gap between the roof and the crossmember flange here). Well you can see a bit of that spacer in the pic below, and I should mention that the holes drilled through the roof are elongated side to side for latch adjustment. The latch plate itself has holes elongated front to rear.

You can see that with that intermediate plate the bolts just barely come through the backing plate.
Now some trial fits with the kitchen trough and the door valence. Door valence first.

See how I have to come up with some sort of trim and support for the corner? Same sort of thing with the trough (trough end cap is not in place).

Now onto the sides, I had to form a bit of aluminum angle to bridge the space between the box section and the roof. It was “just” a case of some cold forging.

Bending the angle to less than 90 degrees stretched the metal where I hammered, so the piece came out slightly curved. No big deal, it will pull back into shape when installed. I had to form a little hump to conform to the roof moulding.

Then clamped into place for trial fit.

The crudely shaped portion over the roof moulding.

This angle will be pop riveted into bot the box section and the roof. Another aluminum angle will be pop riveted to the vertical part of this to provide the support base for the pop top lifting assembly and the bed extension support. More on that later.
Thanks
Posted by albell in vanagon, vanagon mods on July 25, 2011
I’ve been remiss not to thank all those who have commented and encouraged me with the pop top conversion project. At times I’m somewhat paralyzed with doubt and indecision during the process, and as I am pretty well working alone (my own choice I guess, I’m pig-headed) the feedback I get either in the comments here or by email have been very much appreciated.
I’m looking forward to doing this again, but with headroom.
Vanagon – mucking around after the pop top hole was cut
Posted by albell in vanagon, vanagon mods on July 24, 2011
Not as much progress as I would have liked today. Was warm for these parts, 27 C or so (yeah, not hot), and I mostly got a suntan on the back of my neck as I mulled over how to treat the cut opening. I am heading to copy what bquip did in this samba thread, but probably won’t laminate plywood for the ends as he did. I’m leaning more to aluminum all round. First thing I did was put on another coat of Sikkens Cetol 1 on the front headliner, this time with fine steel wool followed by a rub with a dry rag. Skipping ahead to the end of the day, the finish was dry and I rubbed on some wax and did a test fit.

The slight buckle at the front will be eliminated when I screw the headliner to the metal above the windscreen. These screws have double duty, they also attach snaps for the front curtain. Boy the picture sure shows up the flaws in the finish. I added a hole on the passenger side for another light. The rear sides are shown next. Actually these pics were taken when I did a first trial fit before the headliner was finished.


The exposed edges of the wood will be covered by trim moulding. I trimmed the roof a bit more on the sides so the roof was flush with the box section. I experimented with bending some aluminum angle to see how well I could match the angle between the roof and the box section. Just as bquip did, I will pop rivet the angle onto the roof and box section then attach another bit of angle to act as support for pop top lifting assembly and the fold out portion of the bed.


I’ll also have to form that angle so it conforms the the ridge on the roof skin (foreground in above pic). Those ledger strips I attached continue on to the rear of the van. I installed them even though I have the later model door valence and kitchen trough which hides the area above the strip (it is exposed on the earlier model westies). I did it so that I could try springing a plywood headliner in the rear. I’m not sure it will work easily, a test with a narrow bit of scrap shows that the wardrobe end interferes with the plywood. I’ll have to do some cutting of the headliner to make it fit. The plywood fits at the rear, shown here.


But not so well at this point.

But I think I can make it work. Edit – I’m an idiot, I just realised that the “valences” (trough on kitchen side, and the one on the door side) will interfere on both sides. I think then I will fit the headliner into the gap between the roof and the box section, trimming at the forward end to fit around the cross member.
Giant Burdock
Last fall I threw some Giant Burdock burrs down on the front garden. It may seem crazy, but I like the plants but I won’t let them spread. The flower stalks haven’t appeared yet but the leaves are huge. Edit – I didn’t know this, “Burdock has the little known yet precise designation monocarpic herb. This means a seedling grows for a varying period of years, usually two to four, until its root has stored enough energy to produce a flower stem. The plant dies only after flowering. In a shady, dry location Burdock must wait a long time. Rich soil, well-bathed in sunshine, lets Burdock send up its huge flower stem in its second year of growth. Other monocarpic herbs are Angelica and Giant Hogweed.” More info here.

Vanagon – cutting the big hole in the roof
Posted by albell in vanagon, vanagon mods on July 23, 2011
After all my dithering, I finally did it, I cut the big hole in the roof of my ’86 syncro. But before we get to that I had to finish the plywood headliner for the front section of the van. Yesterday I gave it one coat of Sikkens Cetol 1, an oil/varnish finish. Today I traced out and cut it to shape. Then I rubbed it down with fine steel wool and applied another coat of Sikken (this time with a rag, as if applying tung oil). Sorry about the pics, they don’t show the colour right. Notice I cut out holes for lights on both sides.


Change to a metal cutting blade and put some tape on the shoe of the saw to protect the roof paint.

Then drill a hole in the roof.

And start cutting.

“There is a crack in everything that’s how the sun gets in”

Onward and around and hey presto!

Phew! The cut was pretty good, even distances to the box sections on each side and looking good front and rear.


I can get the rest of that degraded sticky foam out now. In the westy roof, the box section (which double as air ducts) is welded to the roof between the cross members, in the passenger van it is not, and the gap is “sealed” with that foam.

Detail of the rear transverse cut.

And the front transverse cut. The pop top latch placed there just to see what was what.

Then I pop riveted in place the ledger strips that holds the front headliner in place. You can see how it sits over the welded in fabric headliner attachment strip. It’s a short one on the passenger side and stops partway along and above the door upper track. It lies at a slight angle.

And on the driver’s side the strip is longer. In the westy, the strip holds up a narrow bit of headliner between the kitchen trough and the downturned edge of the roof opening.

You can see I trapped the remaining headliner up behind the strip. I’ll probably trim it to the upper edge of the strip. Directly below that strip is another one which helps hold in the kitchen trough. That one goes on tomorrow. Looking at the pics now makes me think I should use some strips of headliner to cover the old strip up front (if that makes any sense).
Vanagon – front headliner gone
Posted by albell in vanagon, vanagon mods on July 22, 2011
The other day when I was mounting the luggage rack I ripped the headliner beyond where it could be wrapped over the “soon to be cut” edge of the main pop top hole. I hummed and hawed, and finally decided to ditch the headliner and do what the factory did and put in a wooden headliner. I have my old westy headliner and I could have used that (I had covered it in fabric back in 2000 when I did a make-over on the old van), but I decided to make a new one and go with a warm wood look.
The local lumber yard had 1/8″ baltic birch in 5′ X 5′ sheets, so I went with that. The width of the headliner is greater than 48″ and I think the length needed is a bit more than 48″ also, so a standard sized sheet of plywood is not convenient. I bought some brush on clear lacquer and tried it one one side. It was ok, but the pale finish which I thought would look “clean” had a raw feel. So I used some Sikkens oil/varnish coating that I had in the barn. That gave the birch a very homey old style look, so good bye eurolook and hello log cabin. Here are the uncut panels with one coat on.

I attacked that awful insulation above the old headliner with a scraper and a vacuum cleaner.

This vintage Nilfisk is quiet and its exhaust is clean.

In the westy, the wooden headliner is held on to the side of the roof by bent ledger strips riveted to the body. The fabric headliner in the passenger van is held in place by a different type of ledger strip spot welded to the body in pretty well the same place. It never ends does it? Just like renovating an old house, surprises await. I’ll take pics of this when I put the wooden headliner in place.
Vanagon – luggage rack on
Posted by albell in vanagon, vanagon mods on July 20, 2011
It wasn’t making a template using my ’82 westy as source…

Nor was it drilling all the holes…

The side brackets went on smoothly (note, I used dum-dum mastic under all the brackets and on the heads of the bolts).

And it wasn’t the dogs, either getting under foot or acting sullen as in this pic…

It was the driver’s side front bracket that took me an hour to attach. One hole was slightly out of line, ended up drilling it a tad larger.

It is a bit of a stretch to reach the front bolts with the headliner in, and I wanted to keep the front headliner intact back to where the main pop top hole will be cut, but my frustration (it was hot in there!) and my leaning in ripped the fekkin liner. Looks like I will be putting in a board type headliner there sooner than I had planned.

But the bugger is on, and it looks ok. The brackets lined up quite well with the holes in the rack, and only one of the holes at the rear of the rack (where the double rubber washers go) was out of alignment about 3 mm.

Vanagon – removing the headliner before cutting the roof
Posted by albell in vanagon, vanagon mods on July 18, 2011
I cut into the headliner in the area where the roof will be cut out. I had to remove 2 wire supports and some of the glued on insulation. I should have worn a dust mask, the fibrous insulation is a bit dusty. Be sure to leave a good amount of uncut headliner at the perimeter so you have lots to play with when finishing the cut edges of the hole. Looks like I am going to make that hole tomorrow.


Vanagon – pop top hinge install – making holes
Posted by albell in vanagon, vanagon mods on July 18, 2011
I marked out the hole locations on the roof and drilled them. Made the holes oversize a bit, about 3/8″ diameter. I admit to dicking around and procrastinating with this pop top install project, but now that I have actually removed a little metal from the roof I’m committed.

Then I hammered down the metal where the hinge sits, just a little bit so that the hinge sits vertical by itself. I did a nicer job on the left side than the right which was my first attempt. I scratched the paint on that side and had to use some touch up paint. Added insult to injury was the paint spattering.


I thought that installing the threaded backing plates would be a pain, but it turned out to be very easily. I used double sided tape to stick on a bit of aluminum flashing to the backing plate so that I could maneuver the plate up inside. I could stand on a box outside looking through the drilled holes and reach around in the van to move the plate into position. I had the notion that I could squirt some caulk in the drilled holes so that the plate could be stuck onto the inside surface of the roof, but as it turned out the plate wedged in tight and doesn’t move out of position.


Ok, so next step is to go over the big hole dimensions and then… cut it out.
Vanagon stock wheel and tires
German pdf listing the stock wheels sizes and tire specifications from the factory for 2wd, syncro, and 16″ syncro.
Vanagon – pop top hinge install – layout
Posted by albell in vanagon, vanagon mods on July 16, 2011
Slowly, I’m getting ready to cut a hole in the top of my syncro and put on a westy pop top roof. I’ve linked to the basic idea in a previous post. I’m fussing over where the rear hinge is attached. This Samba thread has some good info. I copied the hinge bolt locations from the roof of my ’82 Westy and used a plexiglass template to transfer the hole locations.

This where the holes transfer on the right hand side.

And some rough measurements.


The measurements are within a millimetre or two of what was posted on the Samba. I’m still unresolved whether to flatten out the hinge area, but I am leaning that way.
Vanagon – pop top assist struts
Posted by albell in vanagon, vanagon mods on July 12, 2011
“Jack Bombay” makes a great kit for attaching gas charged struts to the pop top lifting mechanism to help lift the top. I have helped install 2 of his kits onto friends vans, and I recommend buying the kit from him. But, a friend gave me 4 ball end attachment bits and I had some old but still fairly strong rear hatch struts, therefore to save face I had a go at making my own set up. All I can say is if you don’t have a welder, then it is really not worthwhile doing it. I made mine from stainless steel angle, hacksaw, grinder, belt sander, files, and sweat.
Below is one on the rear hinge. There is a black steel strip underneath the hinge base (barely visible) which is the tapped backing plate I will be using when I attach the hinges to the roof of my syncro. I have not angled the tab where the ball end is screwed on, Jack Bombay’s kit has it angled towards the tent a few degrees, I forgot to do it until I saw this picture. But the lack of angle does not seem to make any difference. Get the idea that I was tired of this little project?

More pics, showing the pop top end of the struts. These struts do not have a ball at that end, so I am using a bolt, nuts and washer arrangement. I hope there will be enough lateral play in the set up so that it won’t bind (was no need to worry, worked perfectly).


That’s a roll of “dum-dum”, a butyl based non-hardening mastic that I will use to seal bolt penetrations in the steel roof, and on the underside of the pop top canvas lower securing track where it goes over the raised portions of the roof.
Vanagon – pop top insulation
Posted by albell in vanagon, vanagon mods on July 12, 2011
Well I’ve finished my experiment with trying a new kind of pop top ceiling treatment. An earlier post showed how I had stripped the old worn flocking off the ceiling and I had the idea of attaching a closed cell foam ceiling treatment. I did not want to glue the foam directly to the top, but rather have it removable. What I ended up with is not what I had envisioned, but isn’t that often the case?
I attached (screws every 20cm) some 1/2″ X 1/2″ aluminum box section to the sides of the top, that moulding that the canvas attaches to. This will be to support steel straps across the ceiling that the foam is glued to. The also will serve as a wiring chase.

Here is a shot of the aluminum box tubing at the front, same thing is happening on the sides and rear.

The difficult decision was how to treat the skylight, latch, and pop top strut attachment points. I decided to cut generous openings in the foam and then cover the exposed ceiling with the same polyester fabric I used to cover the foam.

I used 3M 77 spray adhesive to glue the fabric to the ceiling and the foam. It wasn’t 100% effective, I have some spots were the fabric did not adhere. It is probably user error. The fabric was glued to the foam, and the steel straps to the the other side of the foam. I used some velcro to hold the areas around the cut outs, you can see how the “pad” is not tight to the top in the pic, it is better with the velcro.

After a couple of days, more wrinkles appeared, grrr. The aluminum section on the left hand side is not attached in the following pic.

Well live and learn. I’m really tempted to glue on some tan short pile indoor/outdoor carpet to the roof and only use the foam pad in winter. Oh, and another curve was thrown my way with this project, the foam expands and contracts with heat a lot more than I imagined. It meant that the pad could not be closely fitted and probably contributes to the wrinkling.
Biggish BBQ
Concrete blocks and scrap stainless.

ATA – VIH Sikorsky S-61
Posted by albell in aircraft, around the airport on July 4, 2011
Engines just fired up. You can see some snow still on the hills (probably just north of the Koksilah valley) below the climbing Dash-8.

Finally feels like summer
Pat Bay, late evening July 3.

A use for that handle
Handle in previous post used as part of this prop. Crude but works.

Interesting handle
I was making a prop for one of my son’s plays today and I needed a short handle. I rummaged around the file drawer for an old leather covered handle that almost worked as a file handle. It had some sort of “nut” pushed deep inside that never really gripped the tang of the file.

I used a screw to pull the “nut” out, but what’s this?

An old .303 cartridge.

I wonder what the story is behind the handle.
Vanagon syncro – transmission oil change with complications – Solved!
Posted by albell in syncro, syncro specific repairs on July 1, 2011
A week and four (!) attempts later I finally have the leak fixed. It’s a tale of woe and I guess you could say blindness on my part. When I re-installed the cover plate and noticed the drip at one of the lower cover bolts I assumed the leak was coming from a poor seal at the plate. So I drained the oil and left the cover plate off overnight. Next day I cleaned the mating surfaces well with brake cleaner and used Permatex grey RTV on the sealing surface. Filled the transmission and it still leaked, a small drip at one of the cover plate lower bolts. Now I was peeved. Emails to Daryl at AA Transaxle gave me some confidence, he suggested that I make sure that the cover plate was flat and that the 6 mm socket head bolt under the cover plate was good and tight. So once again I drained the transmission (cover plate off again) overnight. Next day I set about making sure the cover plate sealing surface was flat. I tried flat filing but even with the file loaded with chalk, aluminum filings would ball up and scratch the surface.

So I switched to lapping the cover on a bit of granite using a couple of grades of carborundum grit and WD40 as a lube.
Coarse grit:


Finer grit:


You can see a few larger scratches, must have had some coarse grit carried over. But that doesn’t really matter in this situation, what I wanted was the the cover plate sealing surface to be flat.

Back at the transmission I removed the old silicone sealant which what I thought was squeeze out from the original install of the cover plate, right adjacent to the cover plate hole rear side. This was where I was blind, I should have thought more about why there was so much clear silicone there. I also carefully filed what I thought were slight ridges around the bolt holes on the cover plate sealing surface. Here is an example (you might guess that I was grasping at straws here):

Filed:

As another example of me being gormless, I even smeared some RTV on the area where I removed the old silicone caulk on the case seam. Why did I not put more on and further up the seam? I don’t know.

Cover plate was caulked and put into place.

I was generous with the caulk – well that’s what I have been told 🙂
I let the stuff cure for about 5 hours before I filled the transmission with oil. Can you guess what happened? Yes, still a little drip. Chagrin does not adequately describe my feelings at this point. I went under the van and looked carefully and I noticed oil seeping out from the top edge of the little it of RTV I smeared on the case joint (pictured above). If I put a corner of a rag on that spot the drip at the lower bolt would stop. Why had I not noticed this before. More info from Daryl and a sinking feeling that I might have to pull the transmission and reseal the case joint. But I decided to make one more attempt. Again, an overnight drain of the oil and this time I scrubbed and degreased the case joint all along the side of the cover plate hole. I bought some of the expensive RTV sealant, “The Right Stuff”, it had a few good recommendations and is a fast curing goop.
Picture here of the cleaned area (cover plate sealing surface was later cleaned of the old grey Permatex):

I also gave that socket head bolt another bit of twist. Then I smeared on sealant over the case joint, and on the cover plate sealing surface, not very pretty:

I let the stuff cure for a few hours then refilled the transmission and went into town on errands. I was not optimistic about success, but I’ll be dammed if the damn thing is now sealed tight! One day later and it is still dry. I’ve come to the conclusion that the original silicone caulk that I removed from the case joint area was put on to stop a leak. I bet it was done when the transmission was rebuilt.
I learned a few things from this fiasco. Apart from being more observant I discovered that when putting on the skid bars/plate on the syncro, install the bolts loosely until all are in place, before tightening. That makes it so much easier. I also found that my Snap-On transmission wrench (17 mm hex) was awkward to use on the fill plug (but very good on the drain plug) so I cut a section off my 17 mm allen key and used the short bit on a 17 mm socket, and even better, on my 17 mm ratcheting spanner.


Vanagon syncro – transmission oil change with complications
Posted by albell in syncro, syncro specific repairs on June 24, 2011
A very brief overview of a transmission oil change in my ’86 syncro. I had not changed the oil since I bought this van almost 2 years ago and I noticed a very slight oil leak/seep at the bottom edge of the reverse gear cover plate. I figured it would be worthwhile when I had the chance to drain the oil and look at the cover plate. I bought some regular run of the mill 80/90 wt gear oil with the idea that I would put in the fancy gear oil later after I fixed the cover plate leak. As it turned out, this was a smart move.
The oil fill port is on the right hand side of the van just above the shift linkage rear bushing. The drain port is near the rear near the midline. Important to first see if you can unscrew the fill port before trying the drain port. To get at the fill port easily I found it best to remove the rear skid plate/bars; 2 X 17 mm nuts and bolts at the engine carrier bar, 2 X 17 mm bolts and 2 X 17 mm nuts and bolts at the forward end of bars( actually there is a 15 mm nut on the upper left hand skid bar mount), and to detach the shift linkage rear bushing housing; 2 X 13 mm nuts and bolts.
Kinda silly picture of skid plate out.

Oh, I should mention the tools I used to remove the drain and fill plugs. A 17 mm allen key, and a nice Snap-On tool with 17 mm hex. I needed the allen key to help the Snap-On tool at the fill plug, there was not enough space to fully swing the wrench (you know what I mean).

And more obvious advice: clean out the hex recess in the plugs with dental pick, toothpick, compressed air, whatever. Ya gotta have the wrench make a good fit. I squirted penetrant/rust buster on the plugs, more out of habit than expecting that the damn stuff actually does anything. Next pictures shows the fill plug (shift linkage still up in place) and the wrench in in the plug, riveting story eh?


Thankfully the fill port plug unscrewed with no problem. Next, on to the drain plug. The wet spot is the penetrant fluid stain.

It too came out with no trouble. The magnetic plug had a bit of fuzz on it, but I think this is a pretty normal coif.

While the transmission drained, I removed the weeping cover plate. It seemed to be leaking at the bottom edge.

Plate off, evidence of silicone caulk as a sealant.

Close up of the bottom corner that I suspected the leak was coming from. No smoking gun that I can see, minor scratches, almost a crack like line there though, no?

At this point I was advised by my son that I need to drive him to some sort of “date”, grrr. I should have let the transmission drain overnight and degrease the mating surface of the cover plate before applying rtv silicone and re-assembling (as per Daryl of AA transmission’s advice). So I slapped on the the silicone and the plate, and set about filling the transmission. I made a fill hose with some pvc tubing and a funnel.

All filled and the skid plate back on, the shift linkage re-installed, and the damn cover plate leaks more than before. So, tomorrow I’ll do it all over, this time properly letting the cover plate area drain and be de-greased. Daryl also advised flat filling the cover plate flange to make sure it is flat.

ATA – father’s day trip to BC aviation museum
Posted by albell in aircraft, around the airport on June 19, 2011
My son and I spent some time at the museum today. Here are some random pictures – Vickers Viscount, Douglas A26 Invader, Luscombe Silveraire, Pietenpool 1933, Willys Jeep, Allison V-12, Sikorsky S-55, super DC-3, aircraft tug.
Do I have to say again that the B.C. Aviation Museum is one of the best museums around here?


