Archive for June, 2013
Vanagon – darned Dansk
Posted by albell in vanagon, vanagon mods on June 26, 2013
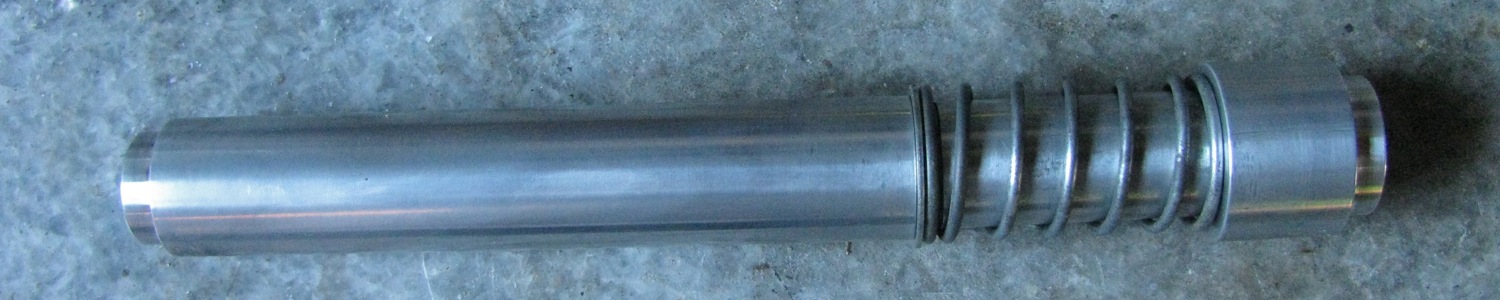
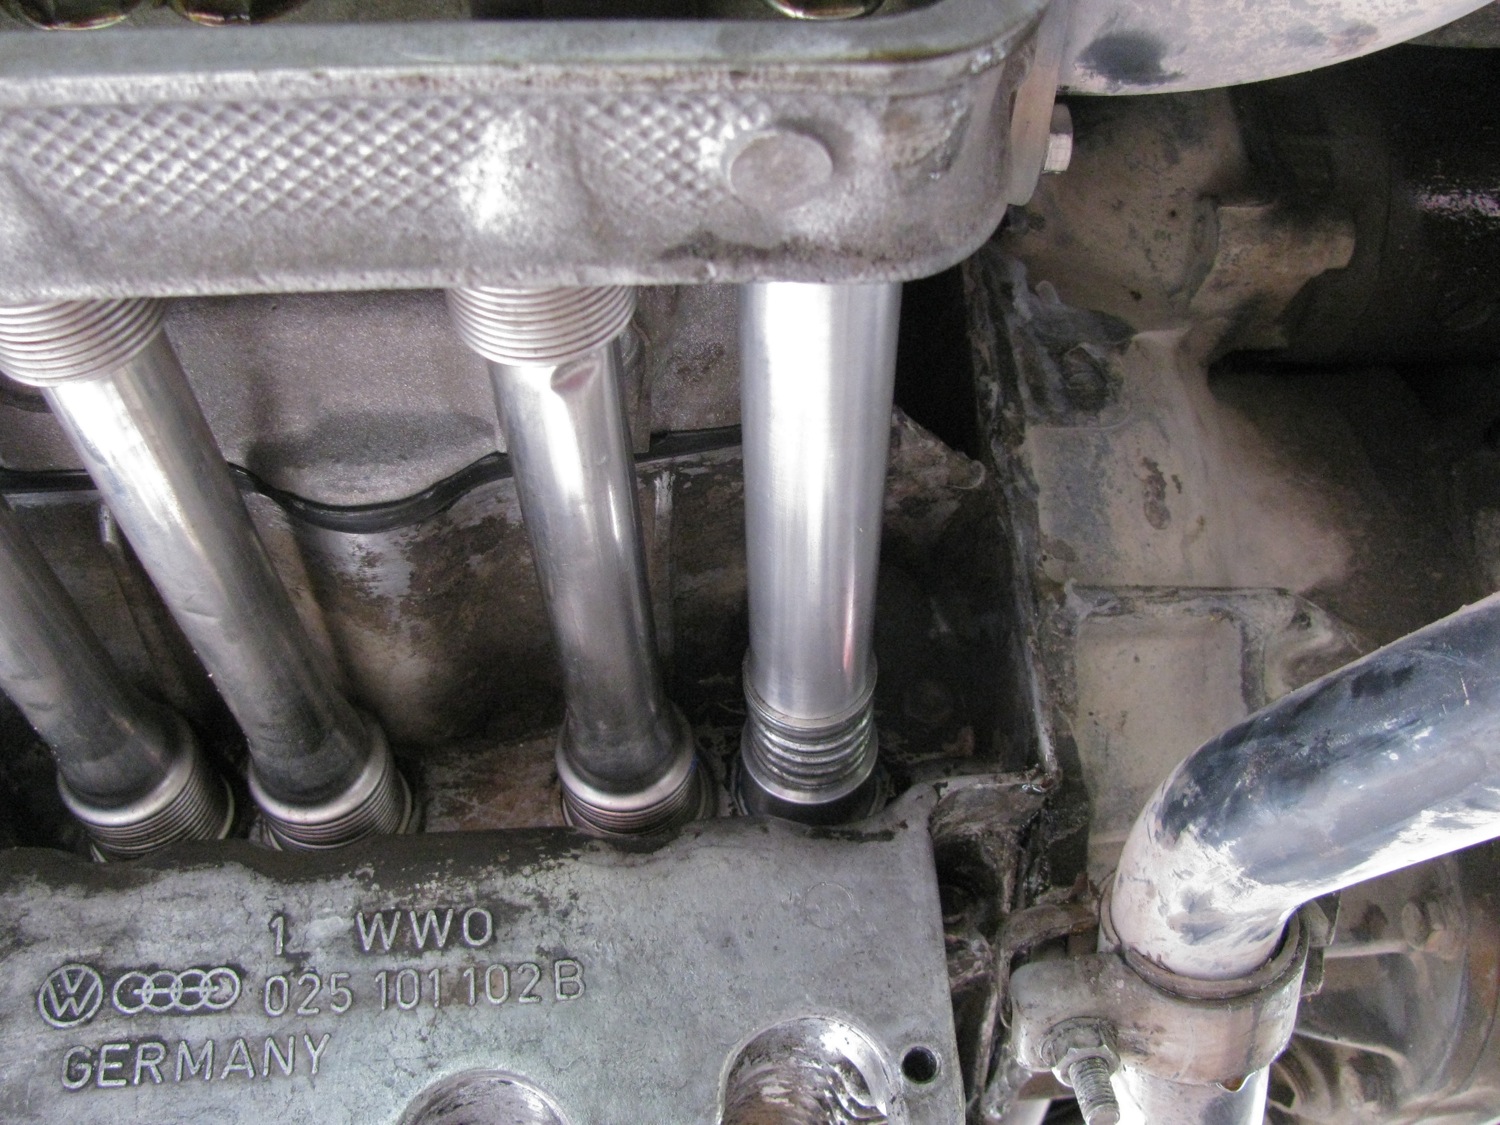
I had 2 niggling problems after the head R&R. One was a pushrod tube oil leak. Seemed to be on the case end of #1 cylinder exhaust valve pushrod tube. I don’t know why it leaked, perhaps I did not expand that tube far enough when I installed the heads? Or maybe there was some dirt on the sealing surface. I did install the seals “dry”, no sealant. So to fix this leak I pulled off the rocker arm assembly on that head, pulled the pushrod from that tube, and removed the tube (large tinsnips – collapsed the rube enough for it to fall out.). I cleaned up one of the spring loaded pushrod tubes that were originally on this engine and installed it, this time with a smear of Hylomar Universal Blue non-setting sealant.

The other problem, and this one had me worried, was a scraping, rattling noise coming from the engine or transmission. You couldn’t hear it if you were standing back at the engine and revving it, it only started when the engine was warm and the van moving. Clutch in or out, or in neutral, when I was driving and revved the engine this noise was there.
I could get it to happen when parked, if I had the parking brake on hard and slowly let the clutch out in 1st gear.
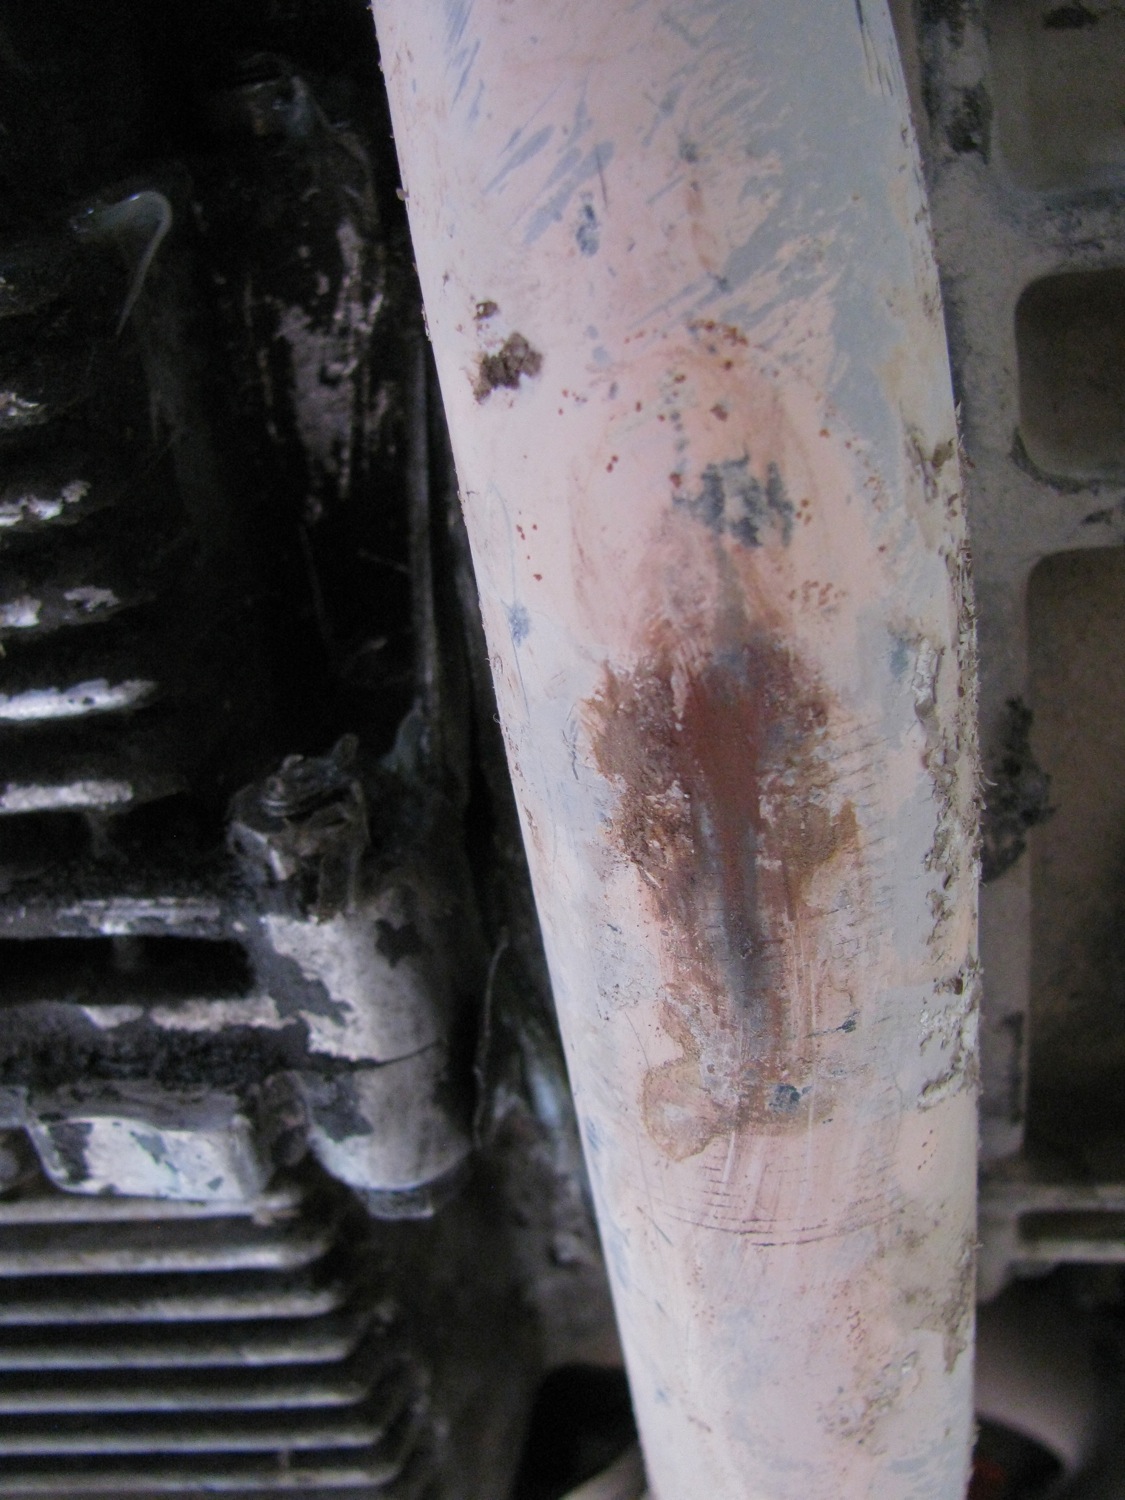
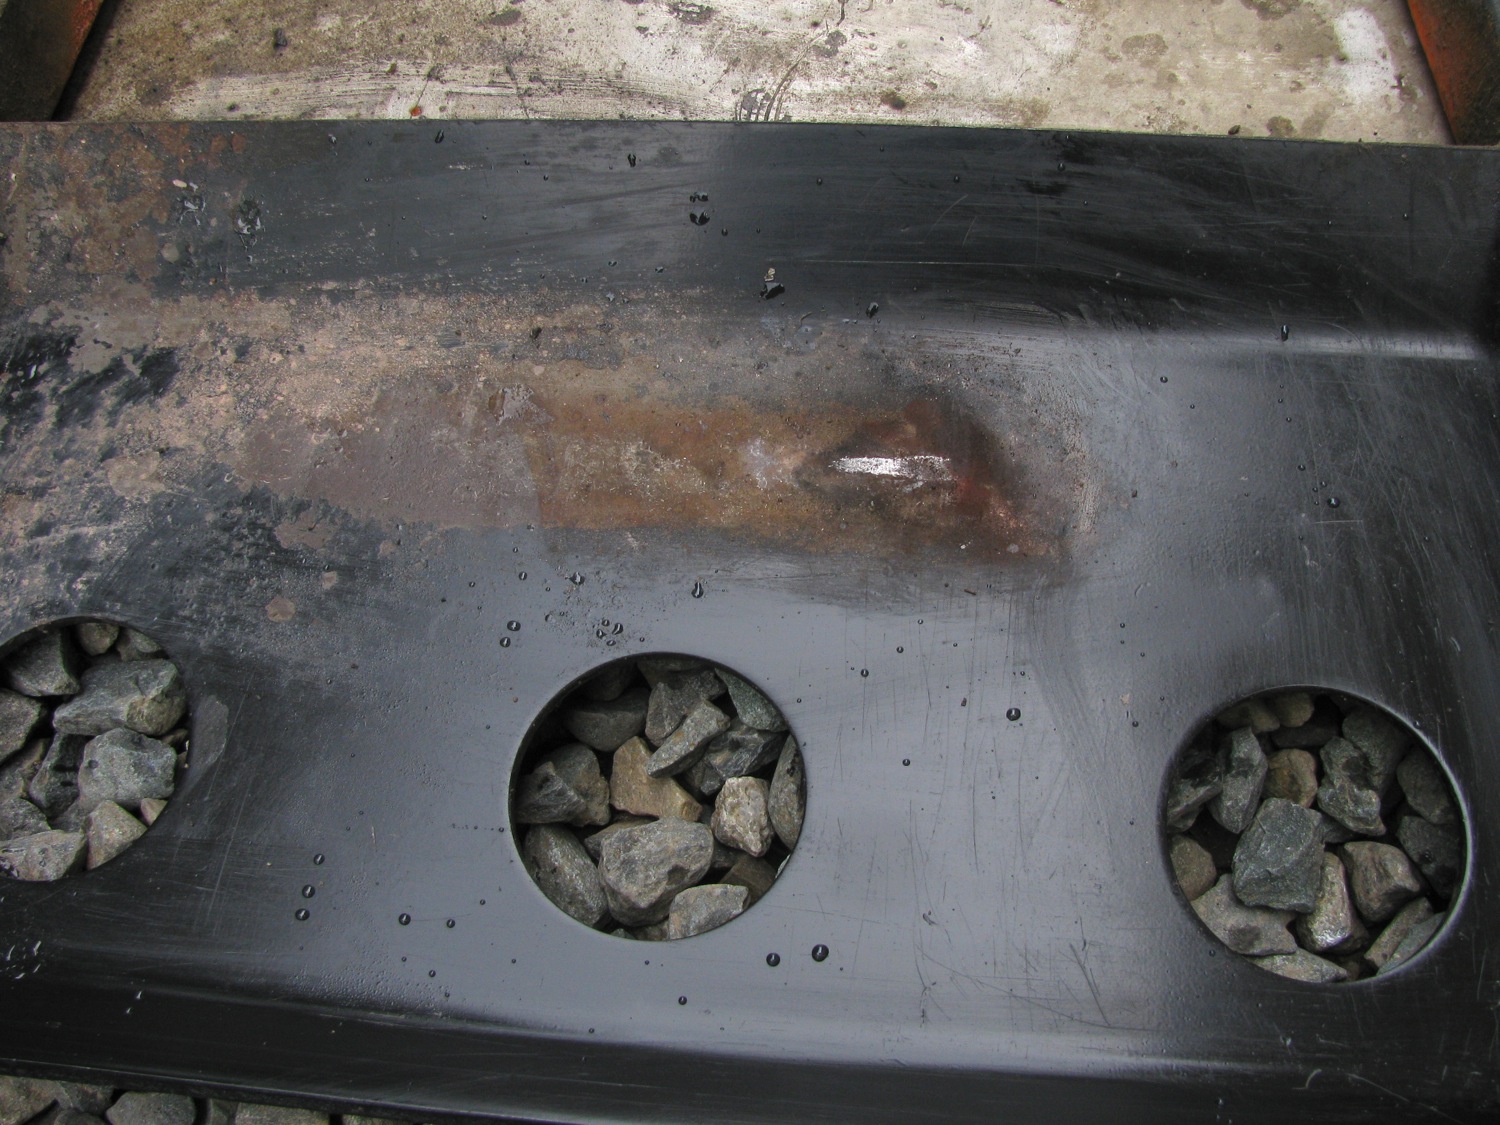
It really sounded like something was rubbing against something else. My rational side was leaning towards an exhaust pipe problem, my irrational side was making up all kinds of horrible scenarios. Well, it turned out to be the forward exhaust pipe hitting the skid plate where the pipe crosses under the engine. I’m going to blame the exhaust maker, Dansk, for this. My skid plate was not bent or damaged in that area. I think the pipe was just not bent correctly. I took a heavy hammer to the skid plate and bashed out some clearance.
Vanagon – auxiliary fuse panel schematic update
Posted by albell in vanagon, vanagon mods on June 24, 2013
I have a confession to make. When I wired up that switch to shut off the door activated cabin lights it did not affect the additional lights (LED strips) I installed in the footwells and the step protector. Had me puzzled for a while, I thought I had connected those lights to the map light feed which I thought was the same feed that the other lights were on . The Bentley wiring diagrams didn’t help until I looked at the “after 1990” pages. Turns out that the map light gets its power from a different feed (but still protected by #3 fuse). So in order to be able to switch off those lights independently of the door switches I would either have to intercept the power feed or simply intercept the power going to #3 fuse.
This post describes how I feed the circuits on #3 fuse from my auxiliary battery. And in this post you can see how I subsequently powered the radio with its own feed. So all that was being powered on #3 fused circuit was the map light, my footlights, glove compartment light, and the cig. lighter. Easy to see that putting a switch on that circuit would do the trick. But wait you say, won’t you want to have the cig. lighter powered all the time so that you can plug in a USB charger or something? Well, yes, I suppose. I’ll see how it works out. I’m wanting to add more power points in the van, the cig. lighter may become redundant.
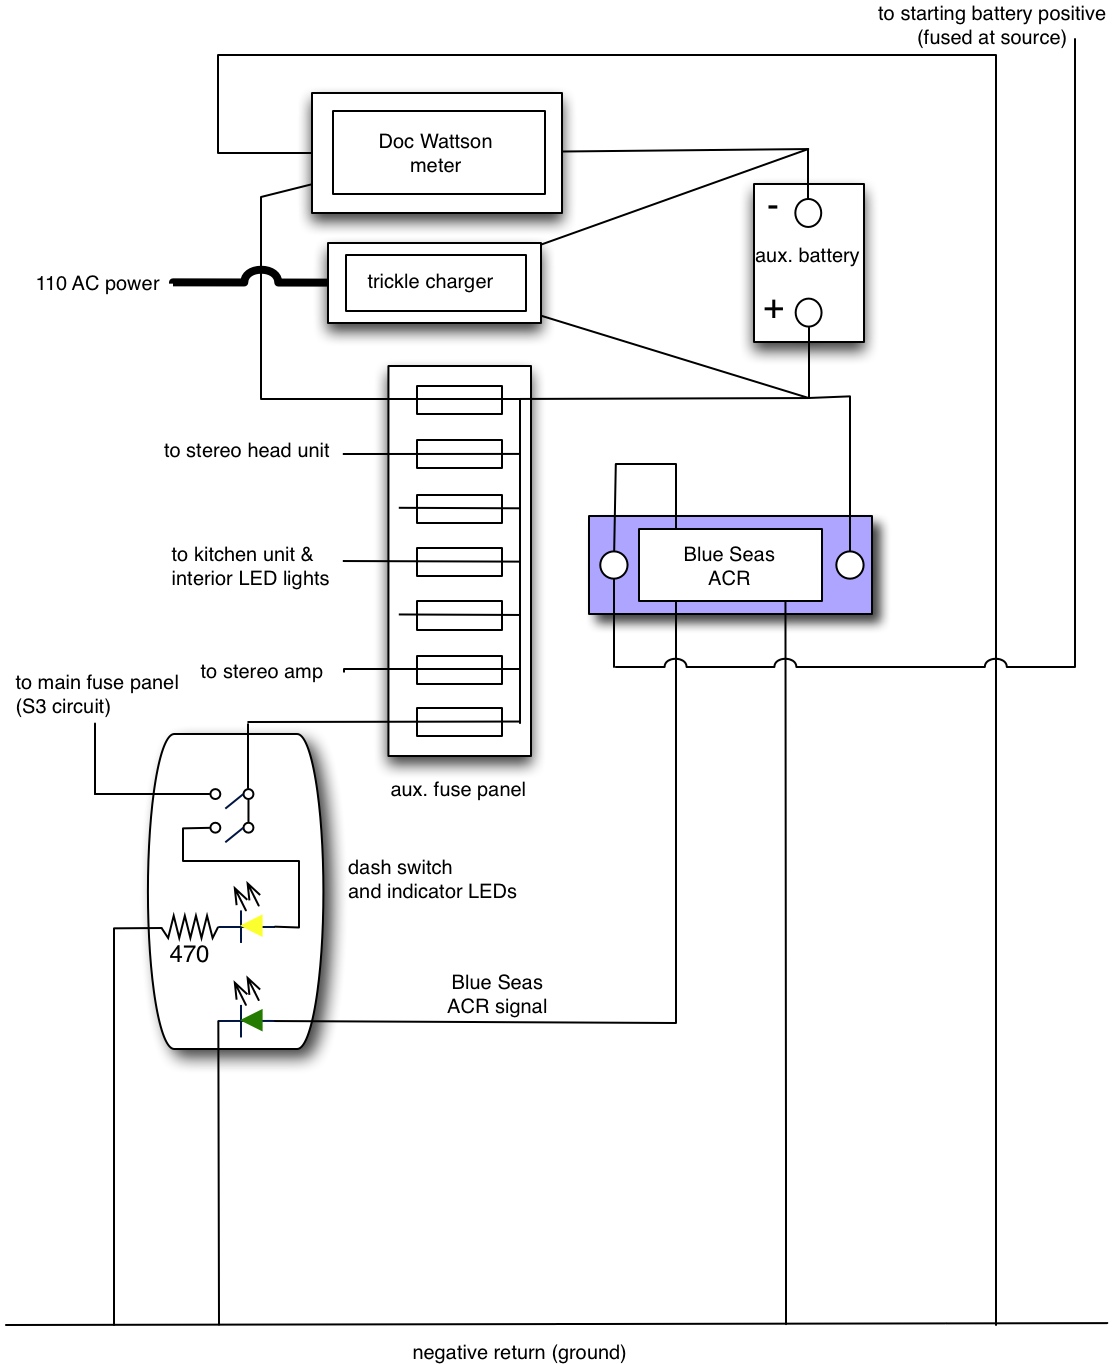
I went ahead and rewired the switch. Here is the updated schematic.
Addendum: cutting power to #3 fuse circuit also cuts power to the dash clock. I can live with that, I have plans to hard wire the dash cluster due to a very deteriorated instrument foil.
Vanagon – sliding window felt and interior light switch
Posted by albell in vanagon, vanagon mods on June 21, 2013
A couple of small things. First off is replacing the window felt in the sliding windows. You can only get at the horizontal felt with the window in the van. But if the entire window is out, then the frame can be spread and the sliding portion removed and you can get at the vertical felt seal. I found some felt seal at a local RV supply store, and I think that auto glass outfits can supply it too. I looked in the hardware store at some patio door felt seal but it wasn’t quite the right size. You might have better luck.
So open your window and at the forward end pull out the rubber seal a little, just so that you can get better access to the seal. Grab the seal and slip it out, little by little as it has to make a sharp turn out to get past the window frame. My old seal was very worn and brittle, kept breaking as I pulled it out. The new seal goes in the way the old seal came out. It is easier than it looks.
The new seal is so much fluffier than the old one and the window initially did not slide very easily. But after a day the felt compresses a bit and sliding is easier.
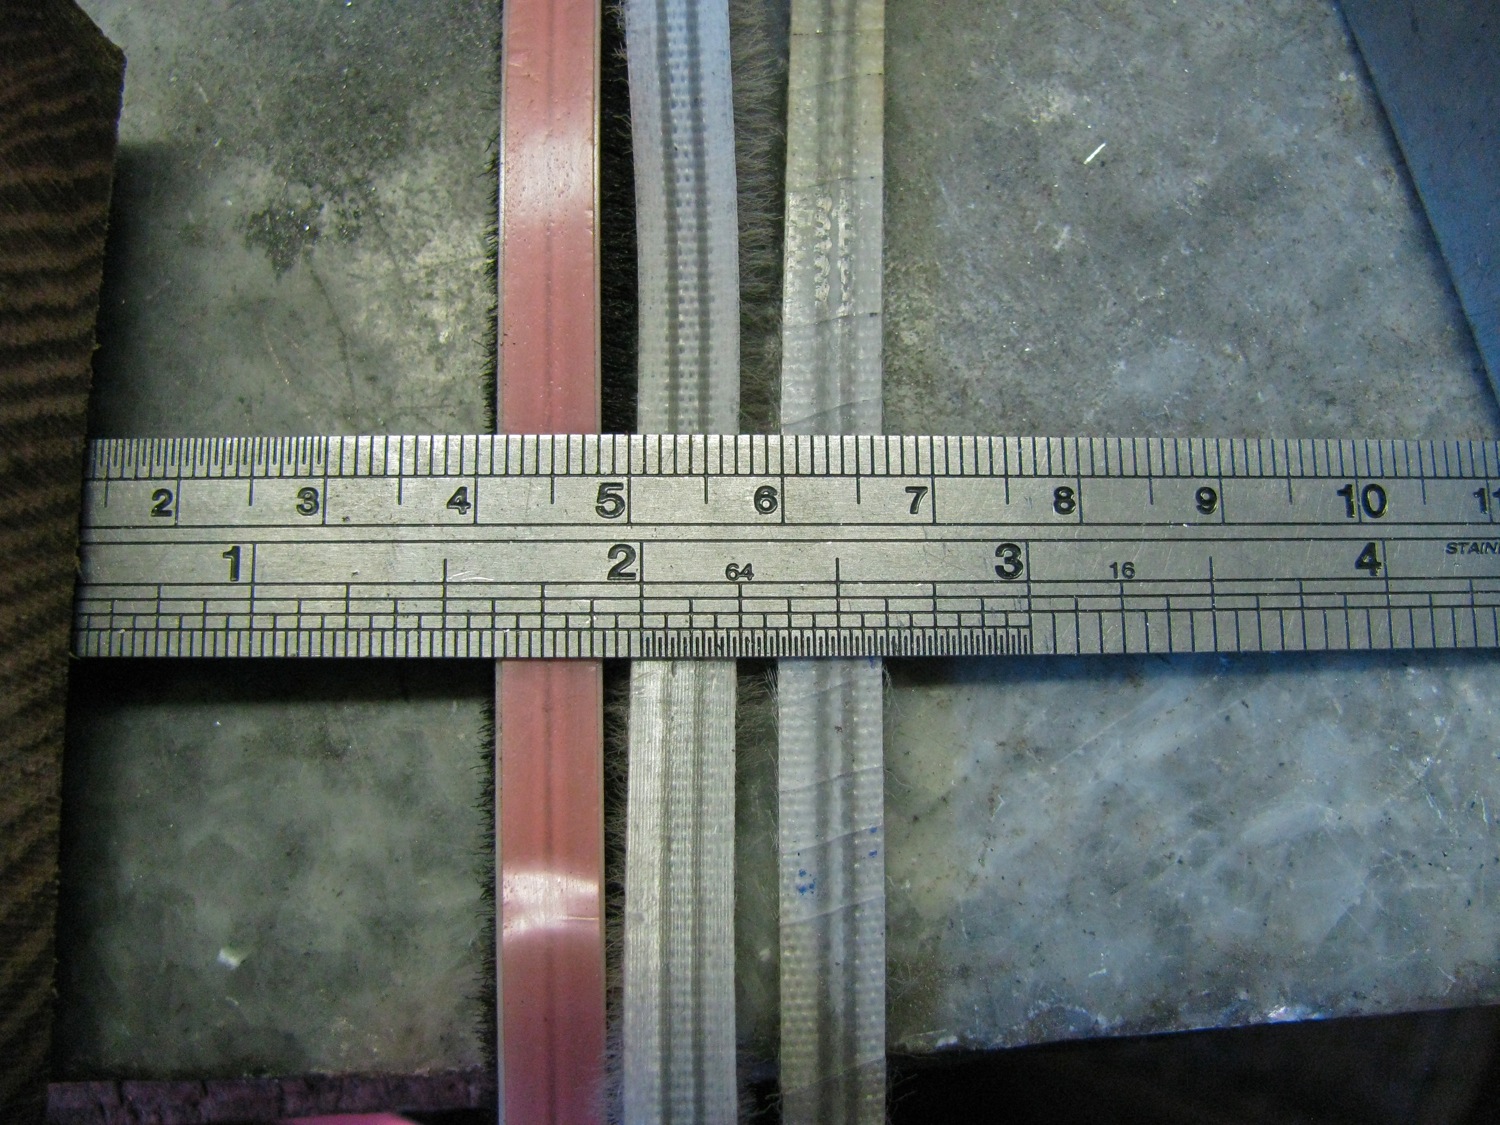
Picture time. Three felt seals: on the left is the new seal (yeah, not the same colour), middle is a bit of what looks like unused original seal (lord knows where I got it), and on the right is the old seal.

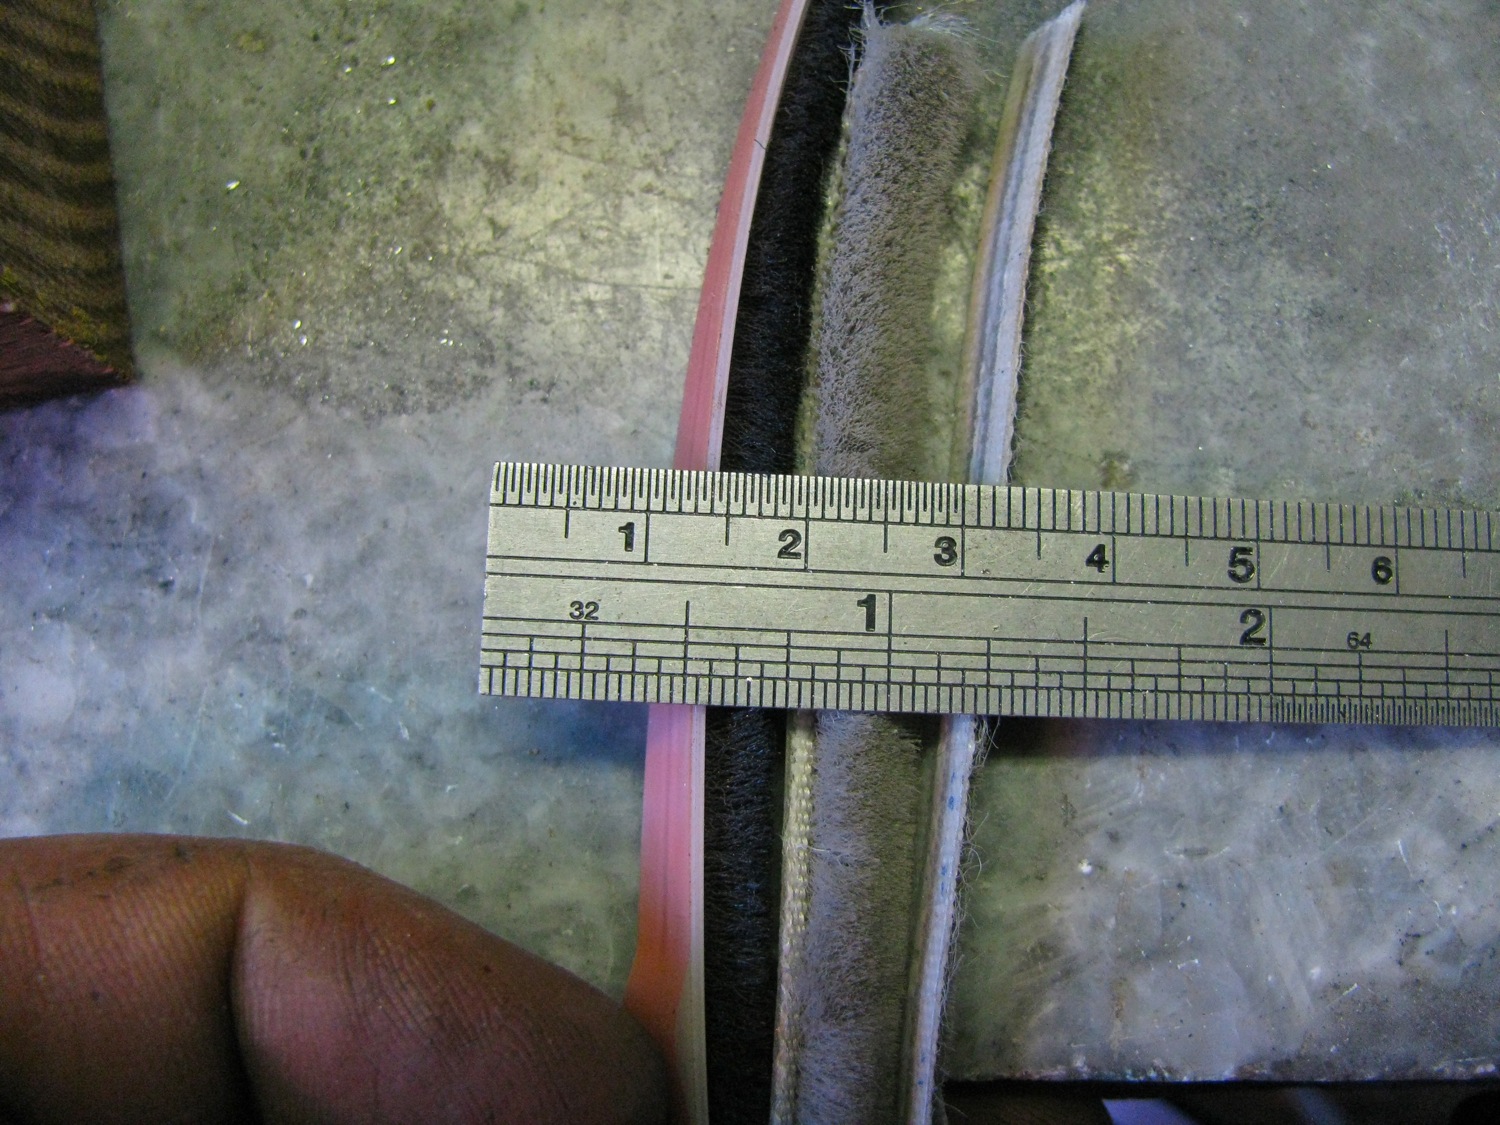
Back side. And yes, the new dark seal has an peel off backing, adhesive under. I din’t have any problem installing it with backing on.
An attempt at a side shot. The old seal is very worn out.
Installed. The dark colour is not that bad.

Next up is a silly little mod. My van was originally a 7 passenger tin top and so it has interior/cabin light switches on all doors, including the hatch. Factory Westies do not have door switches on the sliding door and the rear hatch. So what you say? Well, when you are camping, and you have the sliding door open then the interior/cabin lights are on whether you want them on or not. Kinda silly during the day, and not really needed at night if you have added lighting on a different circuit. Of course you can turn off each individual light, or you can find some of those door switches that have the little notch in the plunger so you can have the plunger stay depressed, but jings, where’s the fun in that?
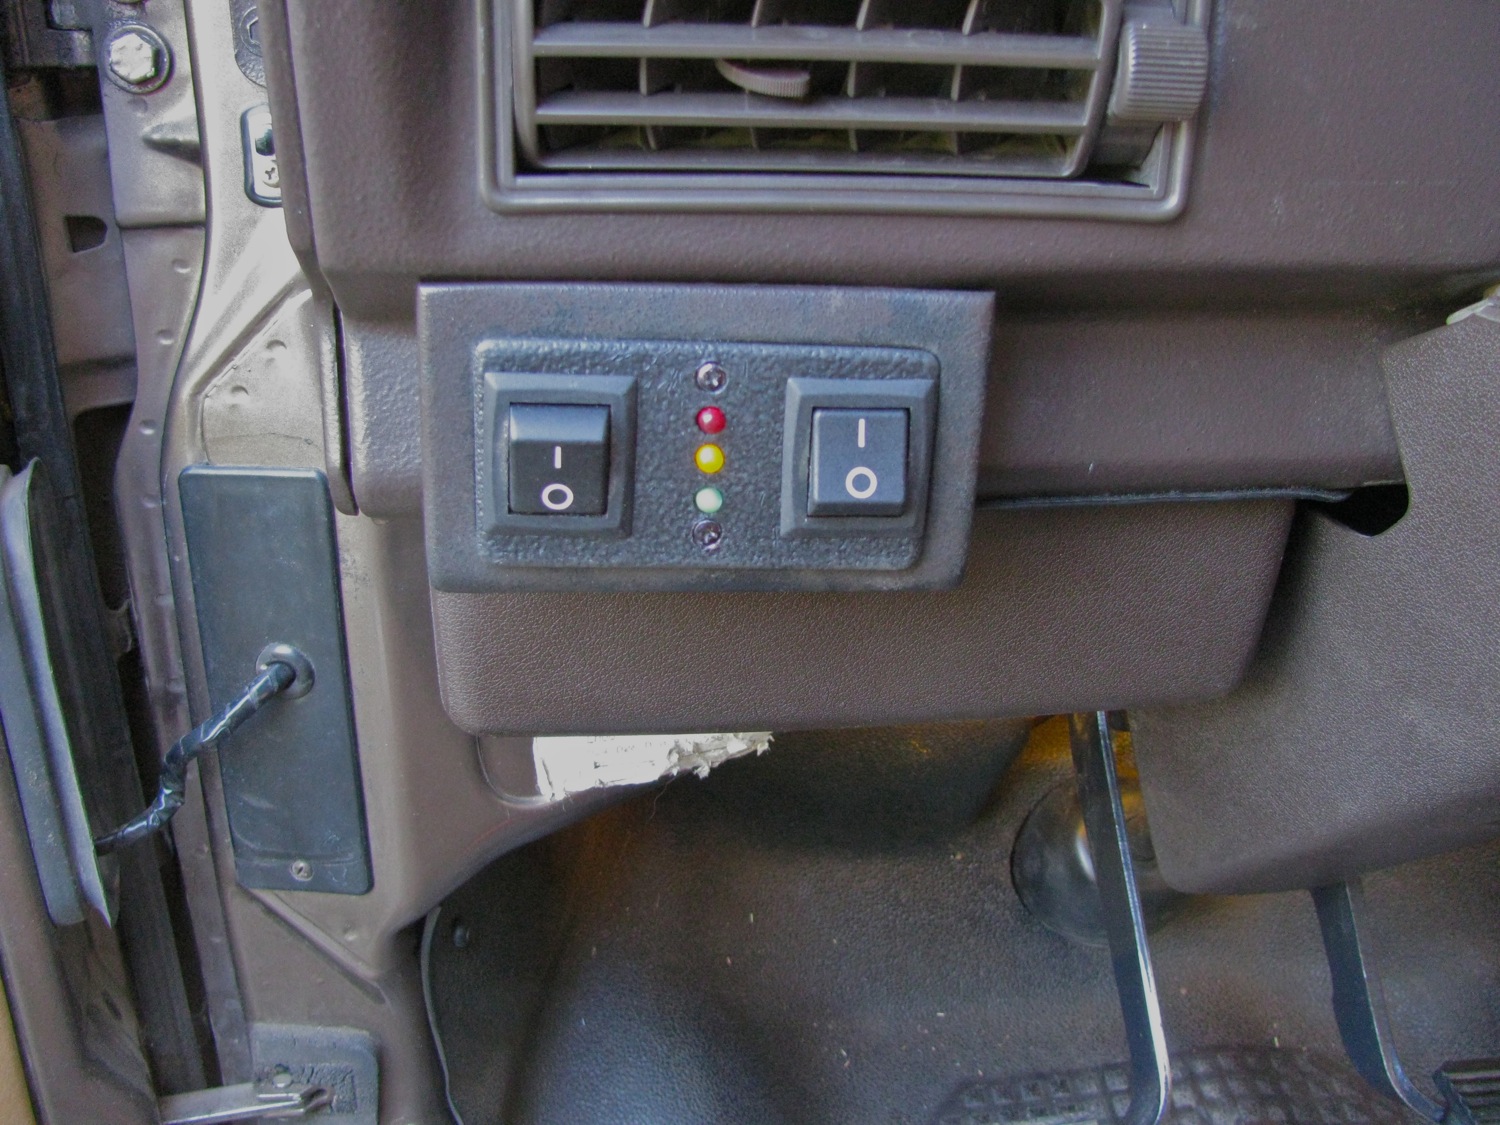
So one evening I made a little switch plate to fit where my old Webasto BBW46 control panel was (I gave up on the heater, removed all the plumbing during the head replacement job). I didn’t use the sexiest of switches, but they are what I had. I used two just because one switch looked silly. And the two switches left an awkward space between them, so I added some LEDs.
So what I did with the wiring was to intercept the power wire to the interior lights (on my van it comes out out panel from B12 connection, then splits at connector T2c. That power feed also supplies radio and make-up mirror light. I did not have to worry about power to radio, I’m supplying it another way. Ok, I cut that power feed and connected it across on of the new switches. Just for fun I wired in the amber LED to light up when switch is closed. So to turn off all the door switched lights I just have to flip one switch.
The green LED is connected to my Blue Seas ACR and lights up when the main and auxiliary batteries are combined. The red LED is still waiting for a use, as is the other switch.
Vanagon – Q and D head replacement – catch up and conclusion?
So the deed is done, but the doer not quite undone. It turned out to be more of a chore than I bargained for. Let me see if I can relate what happened from the time took the engine off the stand to how things are today.
The engine had to be removed from the stand to get the clutch and flywheel on. I decided to replace the main oil seal there. This pic shows two used seals on top row, lower left is a seal I bought before I bought the Victor Reinz gasket kit, and the lower right is the seal that came with the kit.
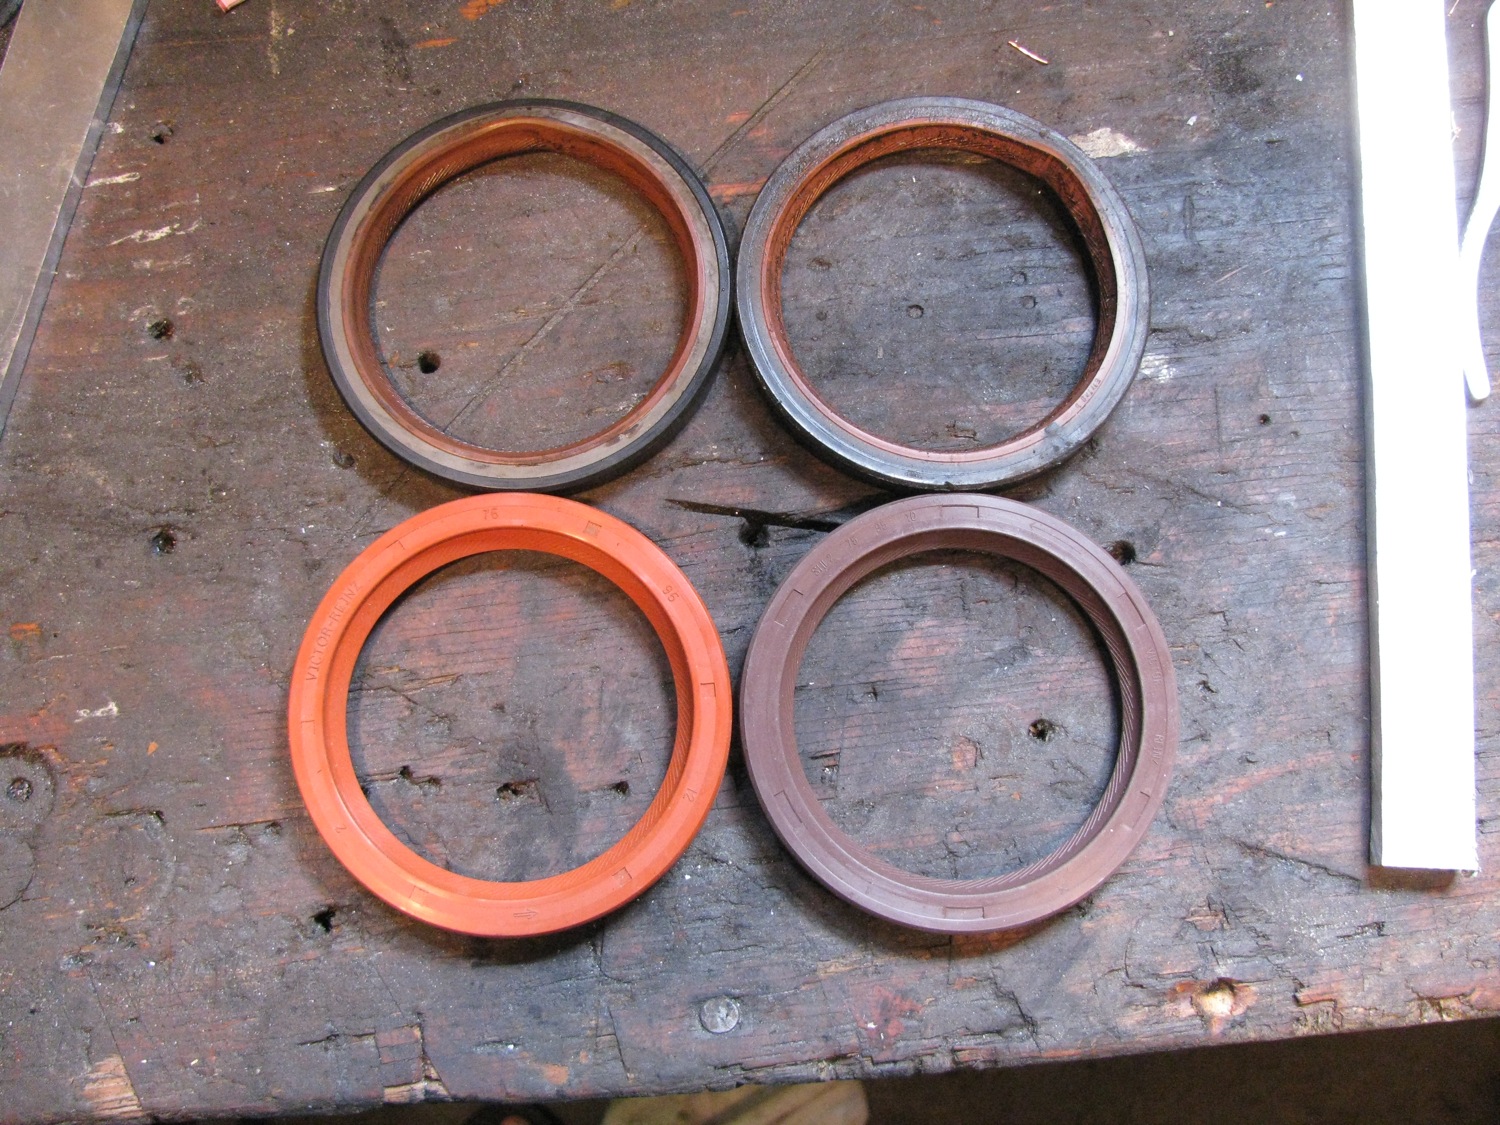
Side view, from left to right, the 2 used seals, the kit seal, and the bought on its own seal.

I decided to use the larger seal. Before installing I de-burred the case.

Not quite all the way in, should be recessed a little more. One of the old seals was used between hammer and new seal. Pilot bearing got some moly grease.
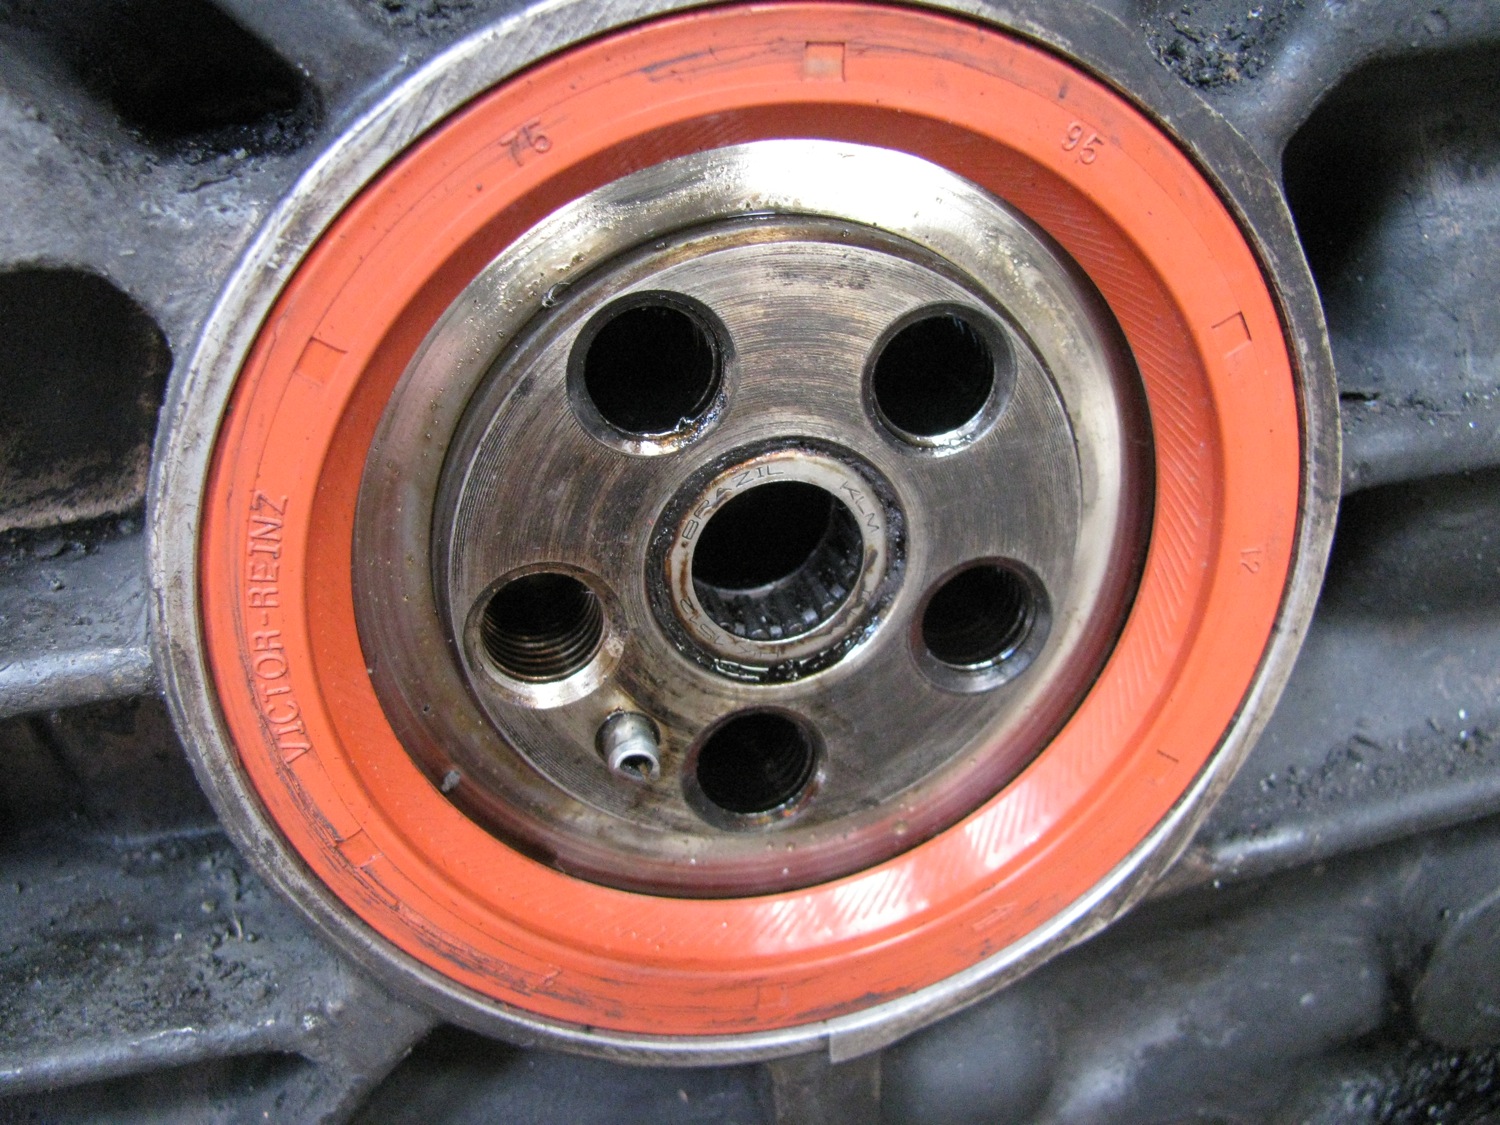
I didn’t forget to install new felt ring and new O-ring in flywheel (I used the clutch install tool to form and settle the felt seal in place a little nicer than what you see in the pic.
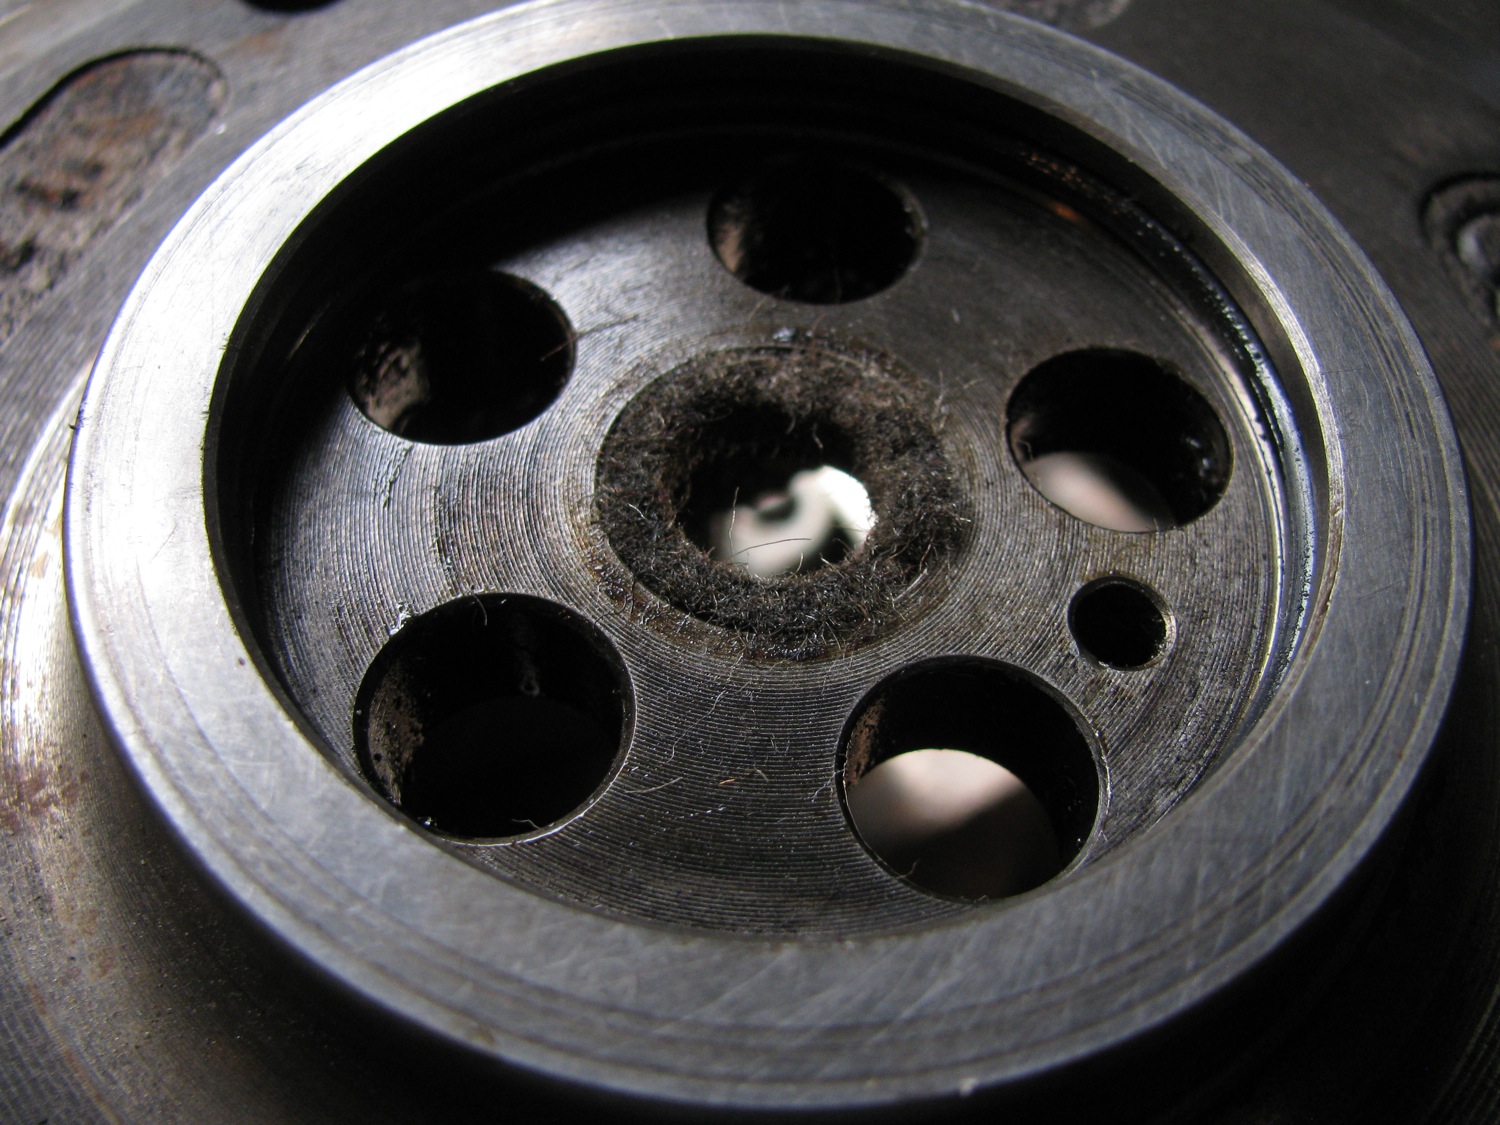
i installed the flywheel and tightened the bolts. There is no nice way to say this, I fucked up. What happened was the thrust bearing (which sits behind the thin shims behind the seal) had fallen out of its recess and jammed as I tightened up the flywheel bolts. It smooshed over the the edge of its recess. When I figured out what had happened I was scunnered. I used a series of bearing scrapers to carefully cut away the smooshed part of the case, trying to not damage the flat section where the thrust washer sits. I checked the crankshaft endplay a few times and used a combo of shims to get at an endplay of 0.005″. Was the best I could do. So it was the thinner of the 2 new oil seals I finally ended up using (the thicker one destroyed during removal to fix thrust bearing).
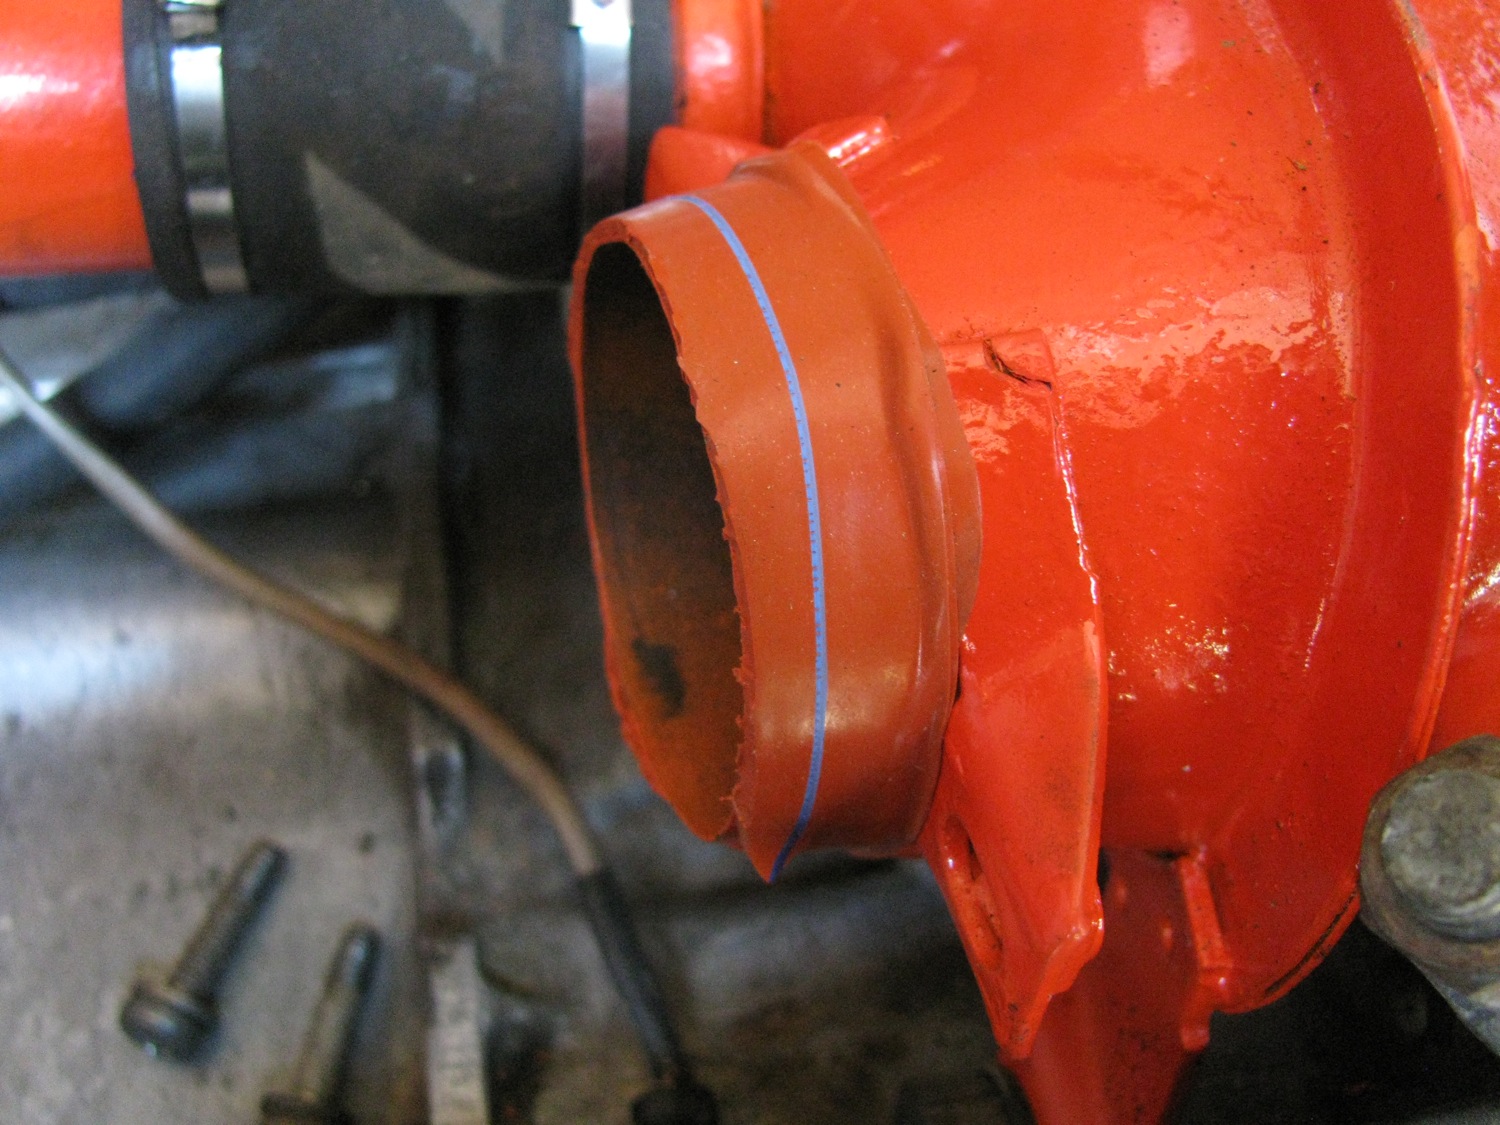
Okay, after a little self flagellation I got back at it. The connection between the throttle body and the intake plenum needs a special gasket. A truncated cone affair and my old one was really torn up. Seems to be NLA, but I think a replacement is on the way to me (right Bill?) and in the meantime I wrapped some silicone repair tape around the plenum “spigot”. Turned out to be, well at least it appears to be, a fairly good fix.

Getting the engine mated to the transmission took me an entire morning. I had the transmission on a bottle jack so I could move it up and down, and the engine was on a hoist. Still it was difficult for me to get things connected. I finally got it on, and the joint sealed with silicone (one of those syncro things).
All the electrical, fuel, and coolant connections made. Engine filled with oil and coolant. Coil power feed removed and engine turned over. No oil pressure. None. Cranking and cranking, even a 10 second run with coil connected. No pressure. This job was killing me. Of course it turned out to be a rookie mistake by me. I should have packed a little grease in the oil pump to help it pull some prime. I got the pump primed by removing the oil filter and cranking until oil came out. Filter back on and then cranking.. pressure!
But not much pressure really. Cold idle was 25 psi, cold max pressure was 60 psi. When hot, oil pressure was close to zero, max was 25 psi. With oil temp >80C, and at 2000 rpm, oil pressure was 25 psi. What the heck could be going on? I’m going to make a long story short. I removed skid plate and then got at the pressure relief valve. Took it out and measured the spring. From the Samba I found out that a new spring is 62 point something mm long. My spring was 59 mm long. So I made a spacer.

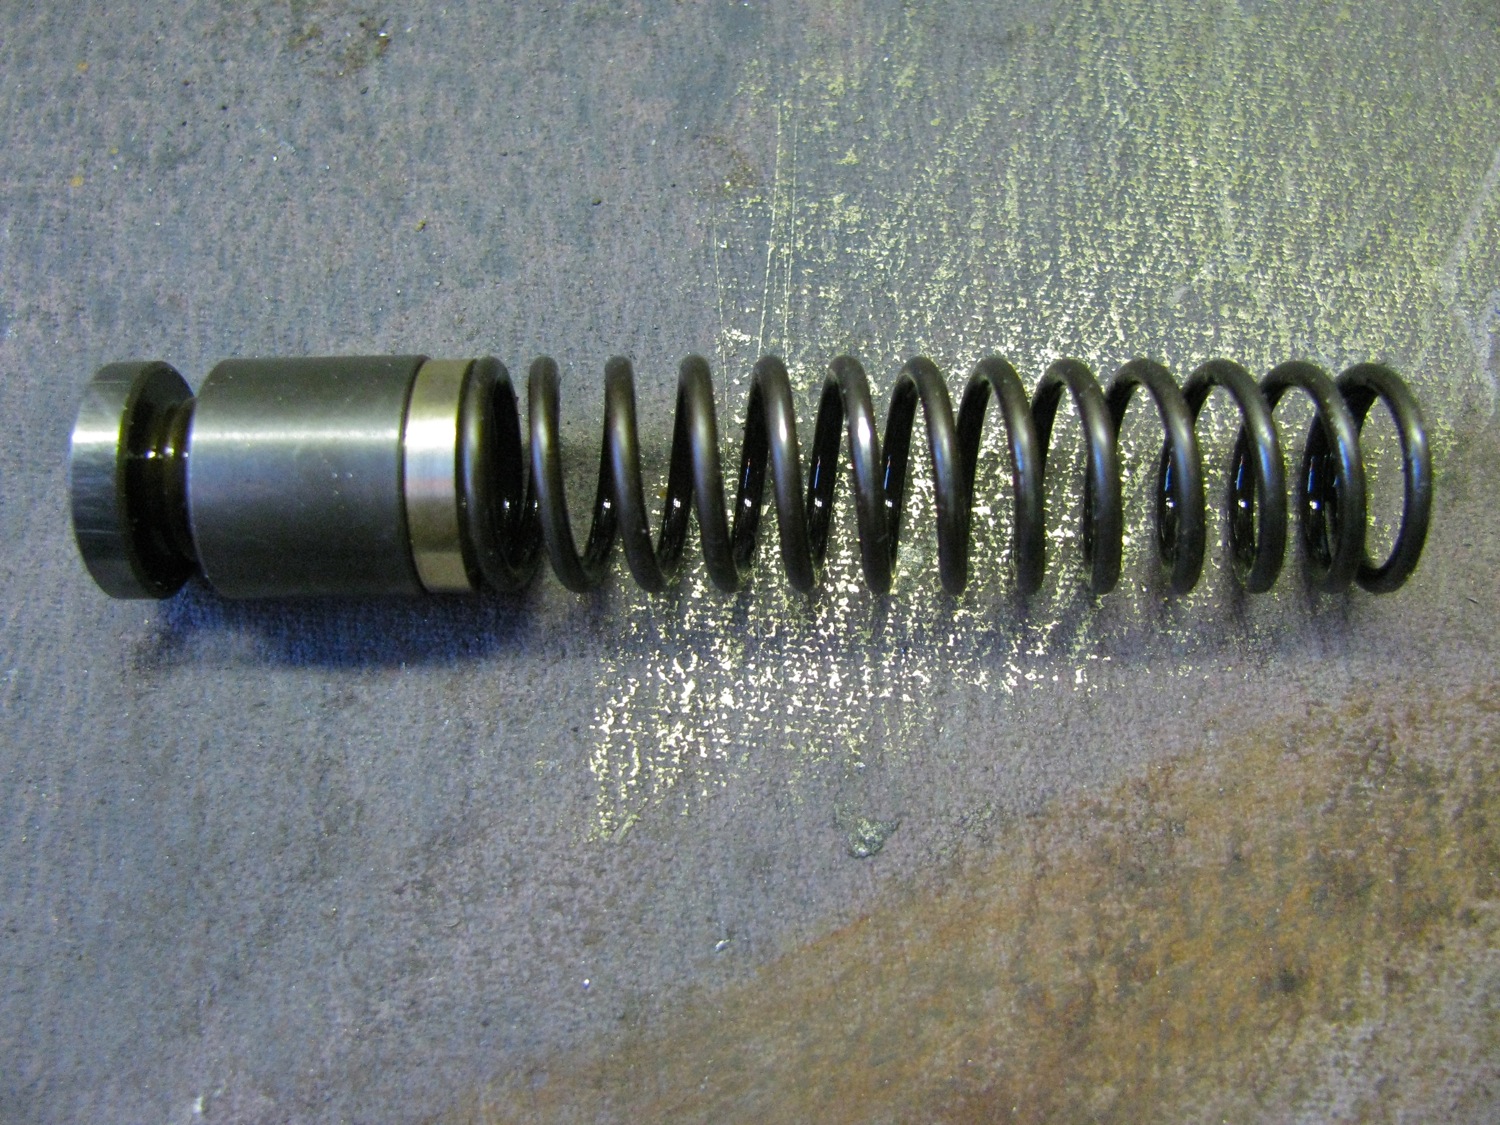
Back in it goes, start up engine… I got 30 psi cold at idle, max 75 psi. Hot pressures were 7-10 psi idle, 45 psi max, and just shy of 20 psi at 2000 rpm.
During all this the oil drain plug hole stripped. Damn and blast, what else can go wrong? I took a 14 mm bolt, one that was longer than the drain plug, drilled and rapped for a 13 mmm head bolt, turned down the head of the 14mm bolts, made a Delrin washer and ended up with a new plug that was longer and caught some of the remaining un stripped threads in the case. This will do until I put an insert in the hole.

Back to the oil pressure. Next step was to pull the oil pump cover and check the gasket. Then I pulled the cover from the oil pump. I was *this* close to putting it back on sans gasket, but I decided to use a 0.004″ gasket I got from local mechanic. I did not have this gasket before. Ok, added a little grease to pump gears (to help in priming), all the other things all put back on, coolant replaced, oil replaced.
Engine start… cold pressures: idle 70 psi, max 90 psi. Hot pressures, idle 20 psi, max 60 psi, a solid 30 psi at 2000 rpm. Much better. Turns out the gasket in the kit, the one for under the oil pump cover, was 0.012″ thick. Far too thick. BTW, the endplay for the pump gears measured between 0.002 and 0.003″. After driving around for a week I am still not happy with the oil pressure, I think I can do better. Hot idle (after hwy run) is only about 7 psi. I am going to pull the pump cover again and re-install with no gasket, just sealant.
There were other annoyances after install – poor fitting (new) exhaust pipes was the big one, but I won’t bore you with my griping. So here we are, engine in.
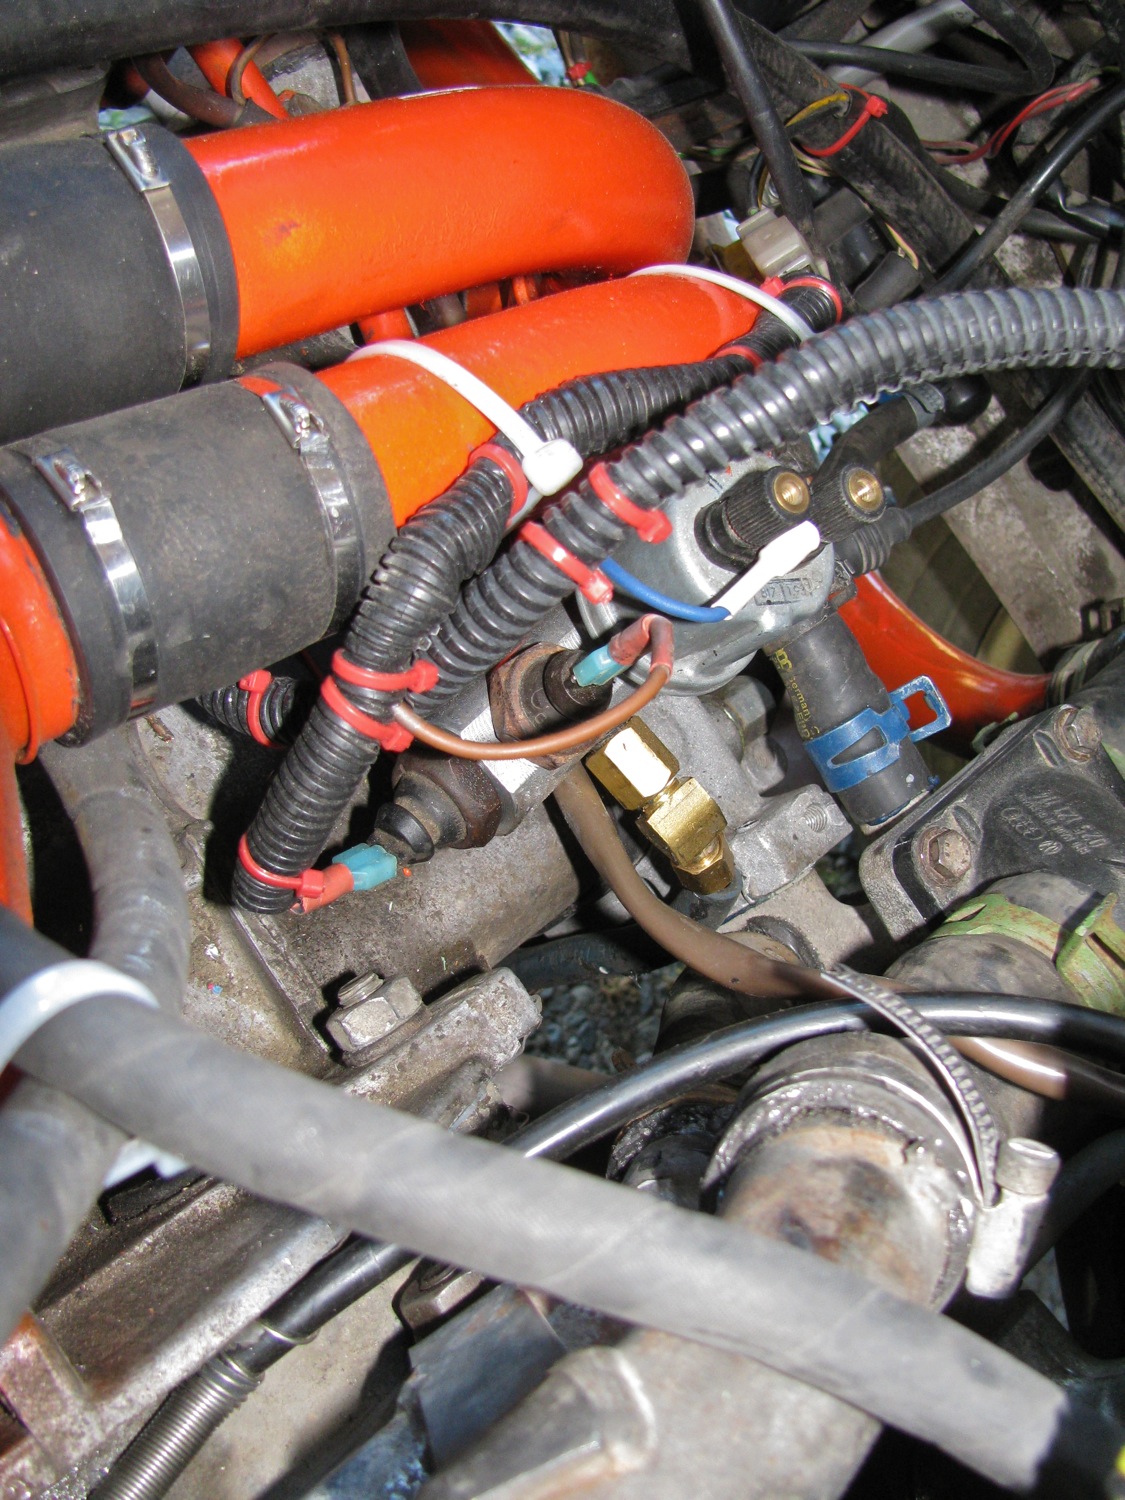
A closer shot of how the oil pressure sender relocation manifold fits in. God I hate non-black cable ties.
So after a week or so of driving? Well apart from my lingering concern about oil pressure I have 2 other niggling issues. One is a little oil leak from the engine end of #1 cylinder exhaust push rod tube. Probably no chance of it sealing itself, so I’ll be putting in one of the spring loaded push rod tubes that I found on this engine. I cleaned one up and replaced O-rings.
The second thing is a funny, intermittent scraping, rattling noise. I think the forward exhaust pipe is sometimes rubbing on the skid plate. Only happens with some torque on the engine, and not when revving when van parked.
To finish up this post I’ll mention a couple of tools that made this job a whole lot easier. First one is a bit of a surprise, “The Larry” miniature trouble light. Was given to me by good friend Stephen and it really does do the job. The clip is magnetic so the pen sized thing will stick. Gets into tight places, puts the light where you need it and not in your face.


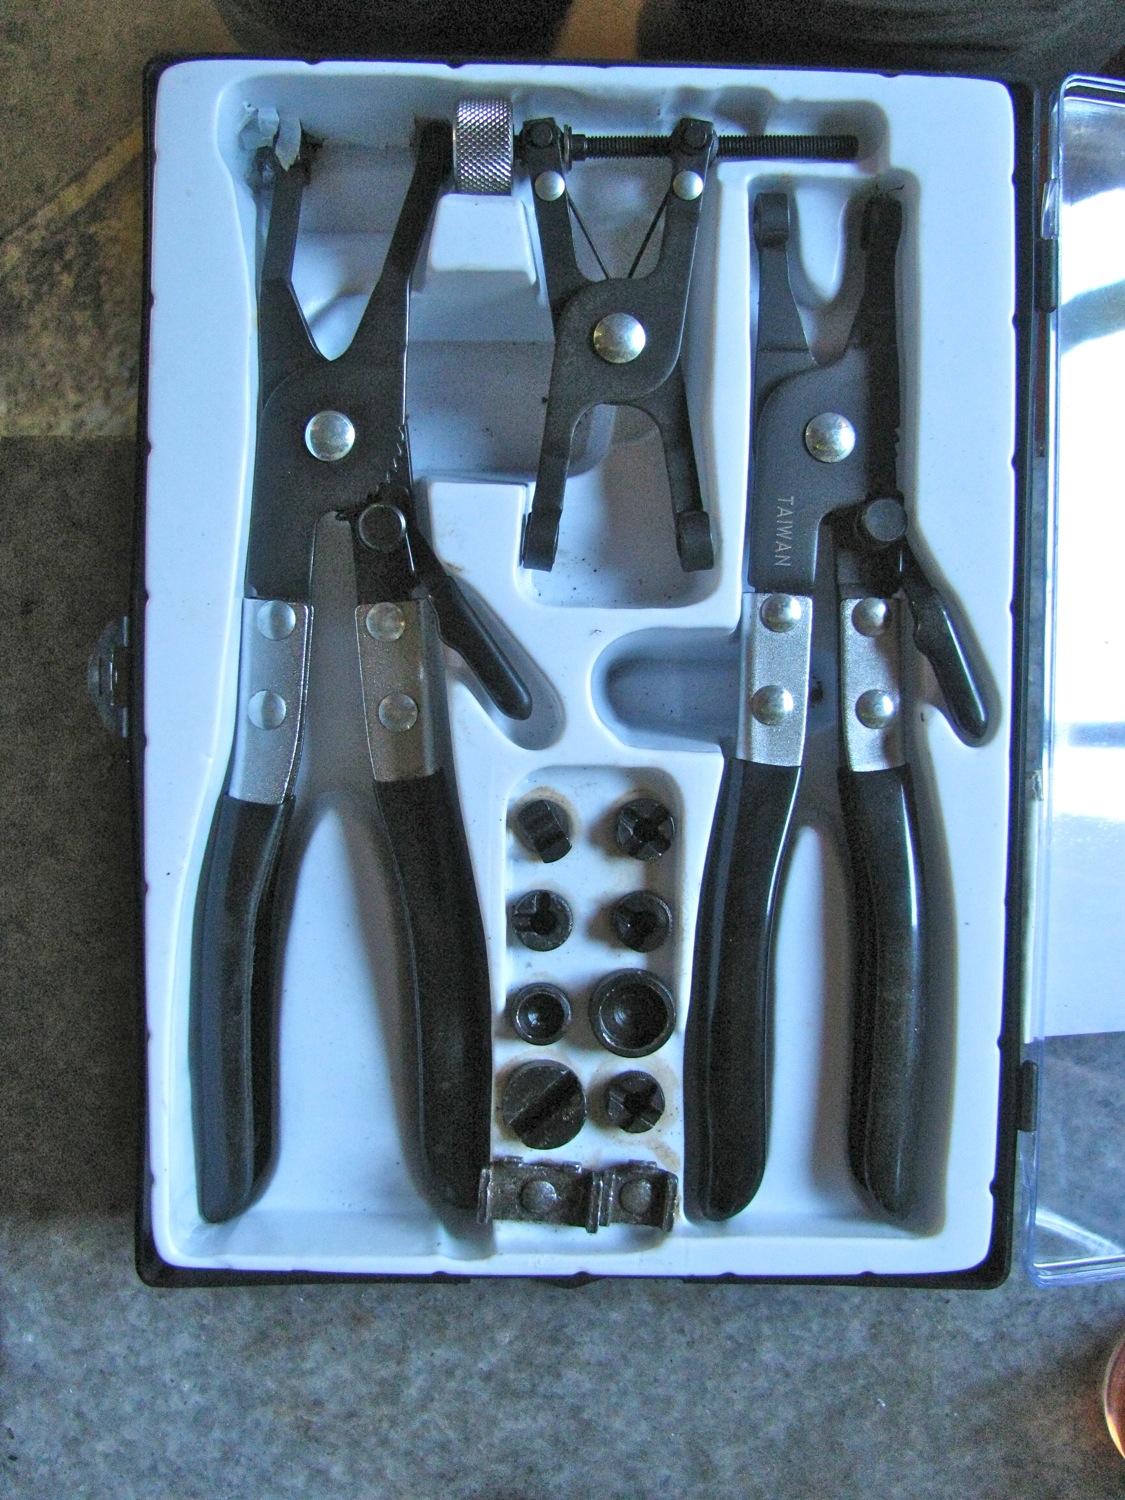
A set of hose clamp pliers. This is a pretty cheap set but works quite well. Well enough to make you love spring clamps.
This tapered punch came in handy to line up recalcitrant bolt holes on the exhaust and my skid plate/

The job is not completely over, but I’ll say it was a success. Tragedy + time = comedy, I’m laughing now.
Vanagon – front door speaker mounts – painted
Posted by albell in vanagon, vanagon mods on June 18, 2013
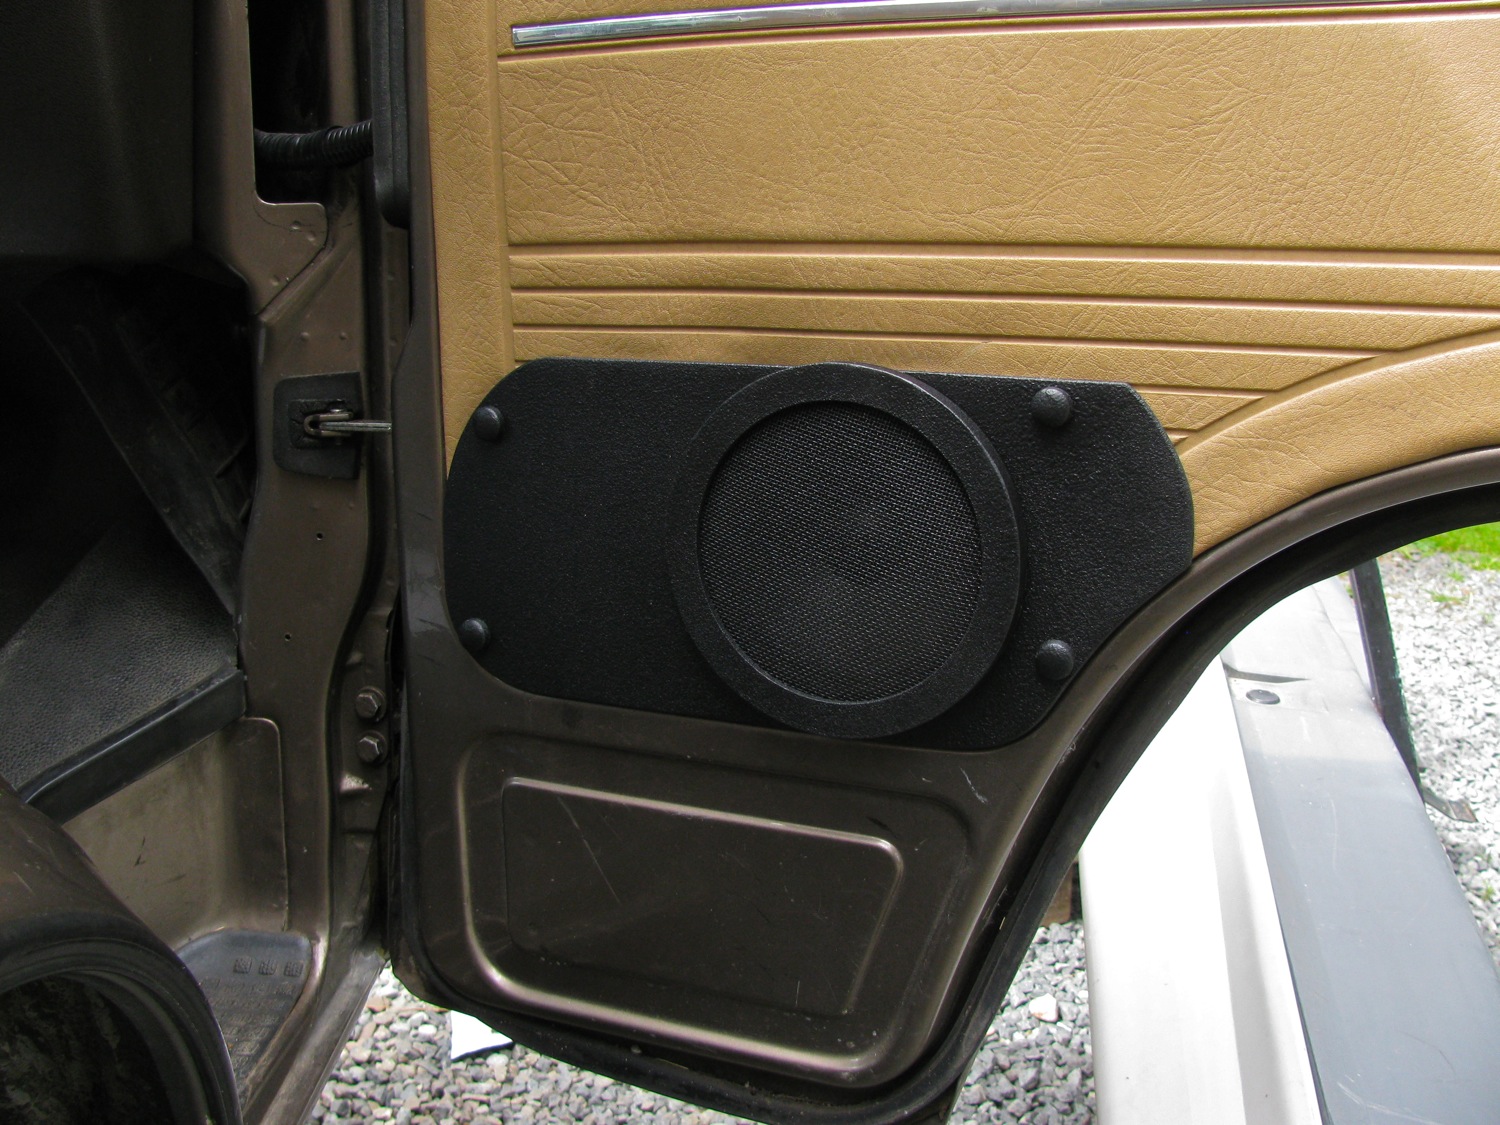
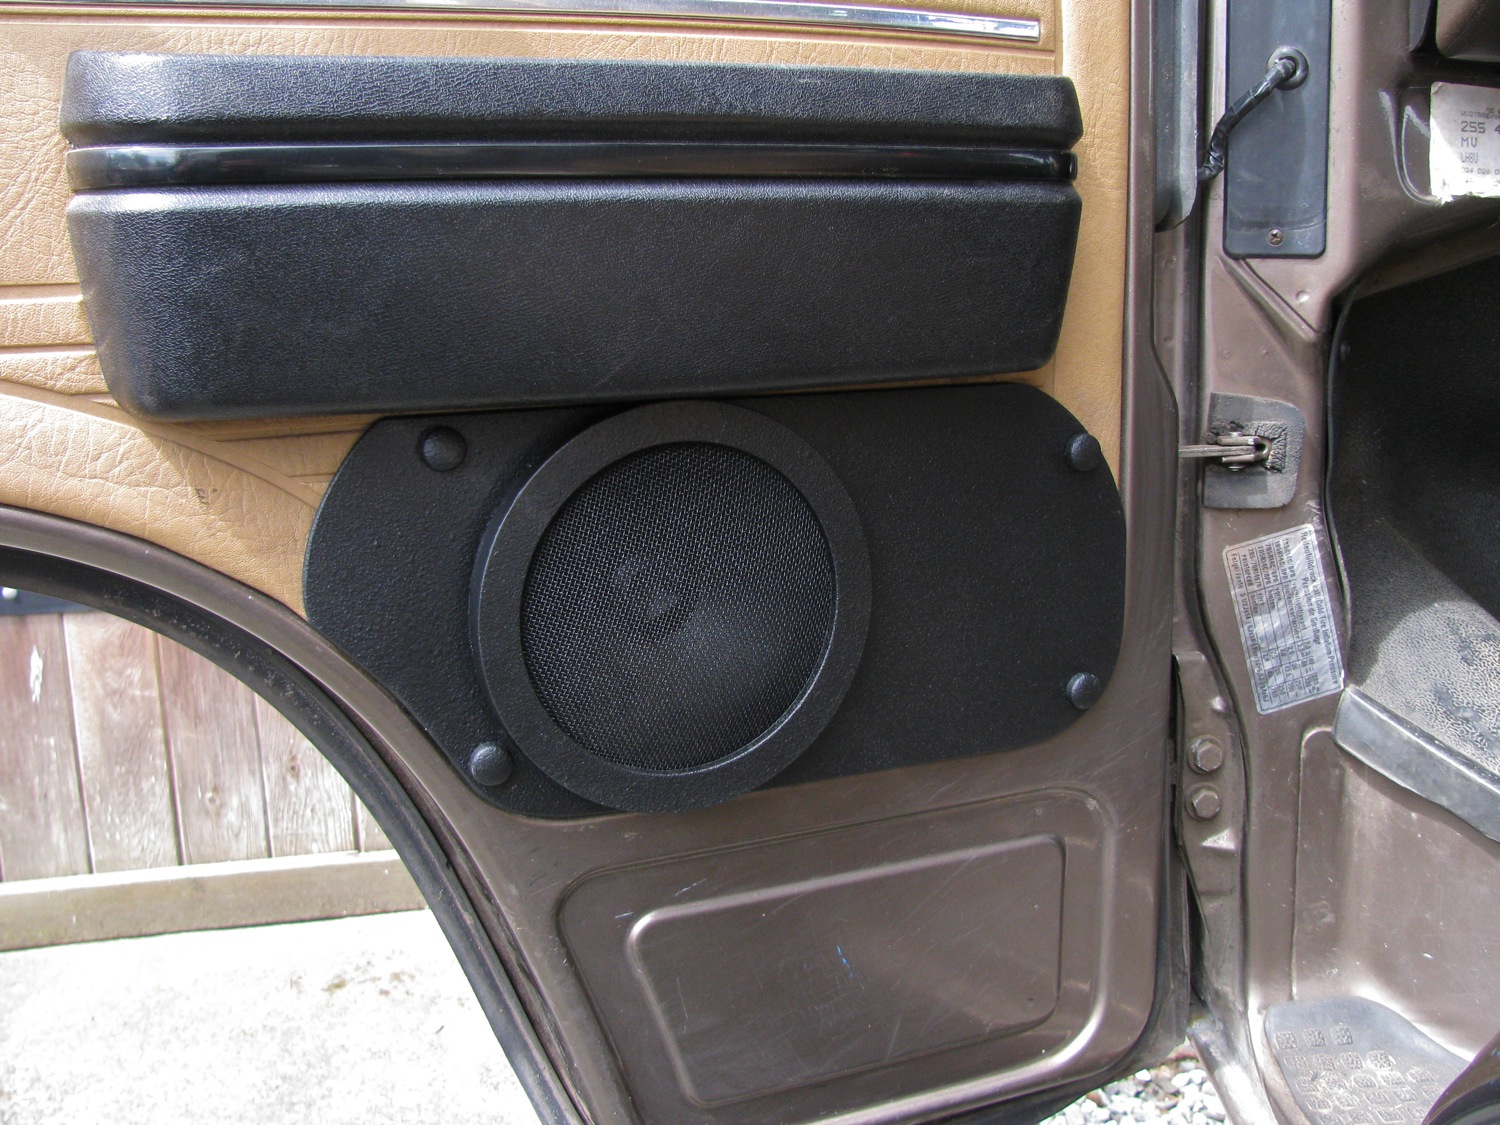
A year ago I made some speaker mounts to help hide the torn up lower half of the front door panels, and to mount the speakers more securely. It was a previous owner that installed (and cut some door metal) these speaker and it really wasn’t a very good job. My solution worked out ok, but I tired of the unfinished aluminum look and the speaker grills had been kicked repeatedly and were dented. I can’t really blame anyone for the kicking, the speakers are in a vulnerable spot.
So I pulled them off, took them apart, and reformed the stainless mesh grills back into a shallow dome. Then I painted everything with rattle can bed liner. I think the paint stiffens up the stainless mesh, gluing the wire crossings. I painted some plastic screw cap covers to match.
Original look:


New look:
Vanagon – auxiliary gauges
Posted by albell in vanagon, vanagon mods on June 18, 2013
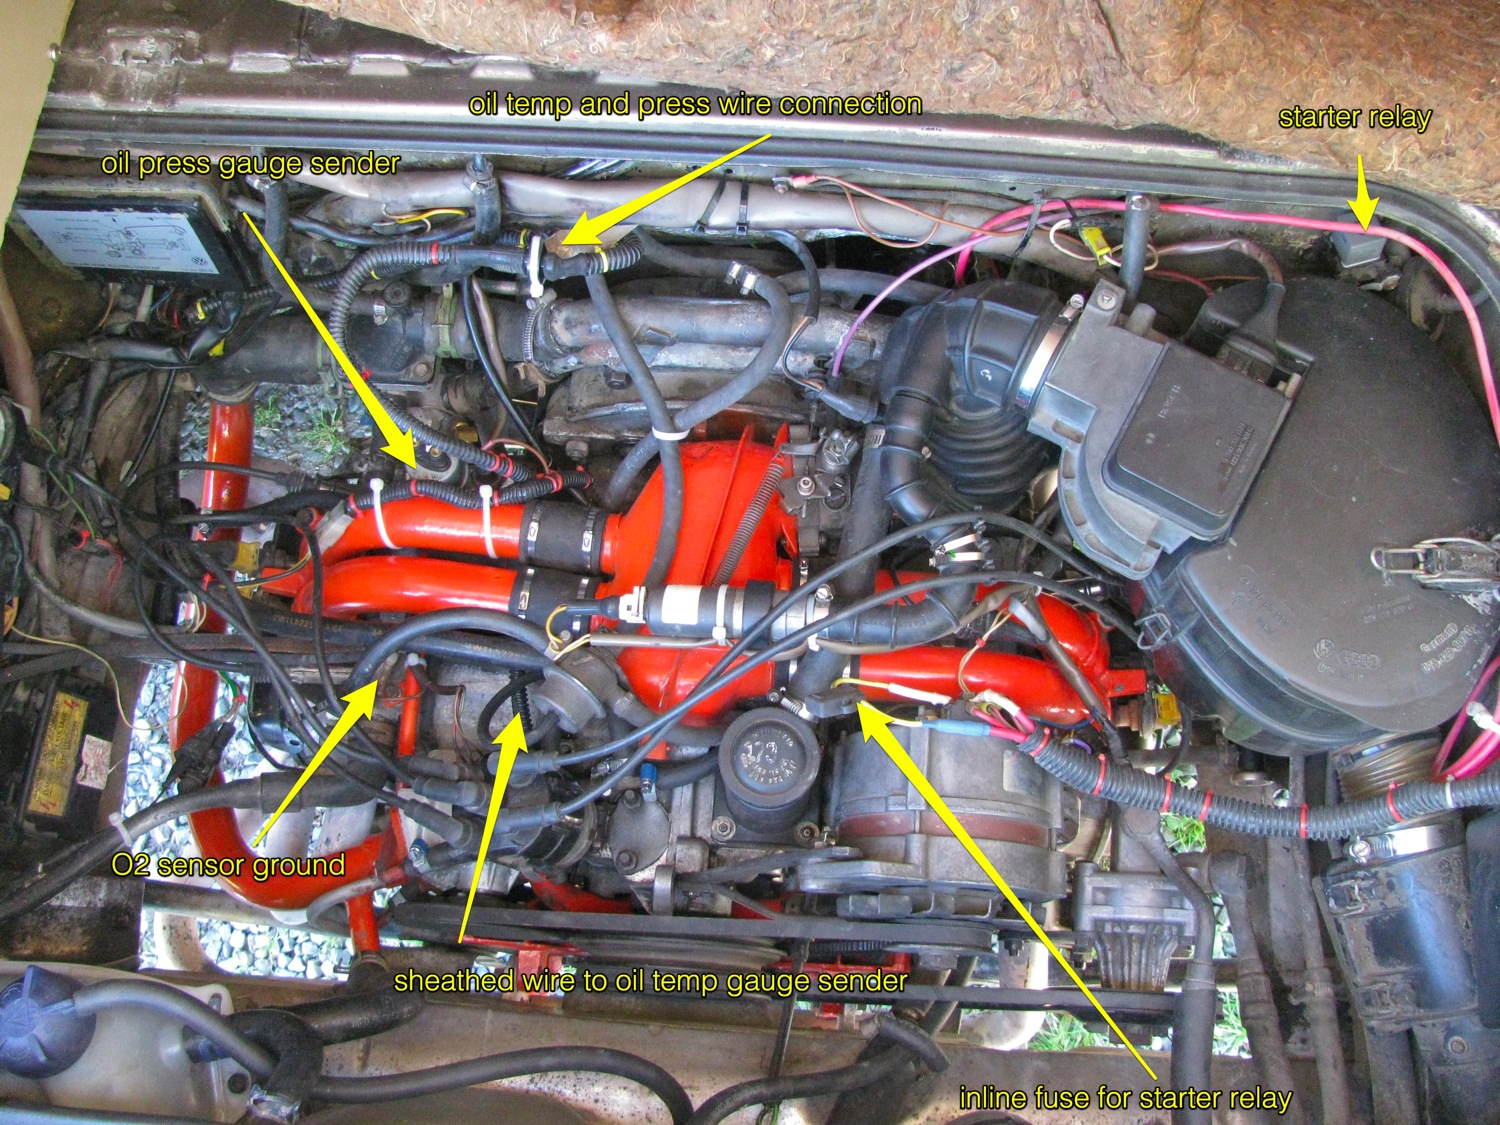
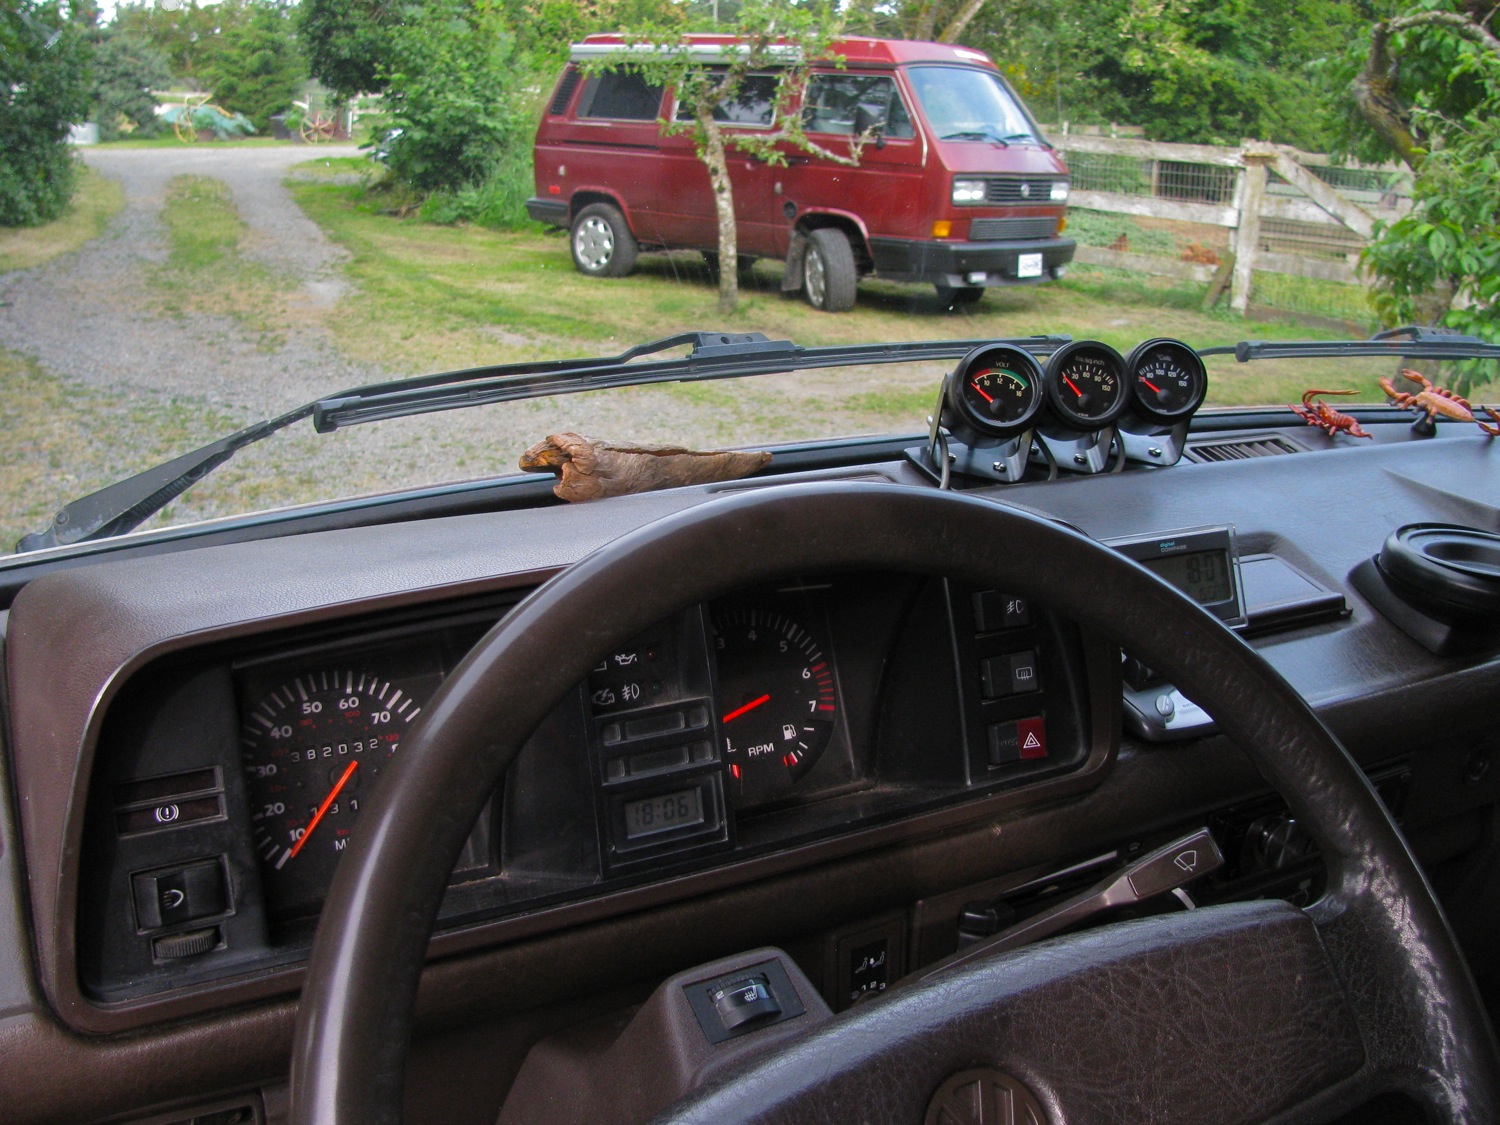
I installed 3 old gauges, VDO Cockpit series, that I had in my old I4 powered ’82 Westy. It was sure easier to install the senders in that engine, no relocation manifold needed. But on the WBX I had to relocate the stock oil pressure senders so I could add an oil temp. sender and an oil press. sender.
I detailed the sender install in this post. That short temp sender (Beck Arnley part# 201-1098) seems to be the right one, the oil temp gauge is indicating pretty well expected readings. Yeah, yeah, I should have set up some boiling water and tested before installation. But I didn’t, so there.
Hey, if anyone has a mind to copy the aluminum manifold for the senders, give more room between each sender. I put them too close together, wrench access not so great.
The gauges have seen some wear and tear, and I replaced the bezels on two of them with bezels from salvaged gauges from an old Volvo 245 turbo. The bezels are crimped on so removing them means prying with a fine edged screwdriver and you can’t really get that back to factory condition. But from a distance it is not really noticable. During the bezel replacement I dropped 2, yes 2, of the glass faces. What a clumsy fool. I had one spare glass, and for the other I cut a circle of Lexan. I repainted the needles with fluorescent orange paint while I had the chance.
For wiring I used some old computer cable, 6 insulated wires in a grey sheath. Each wire was multi-strandded and the sheath was pretty flexible but I bundled the 3 cables in some black heat shrink tubing and the bundle is pretty stiff. I used a heat gun to warm up the bundle so I could manipulate it into the right route. And that route runs right in front of the padded dash to the corner of the instrument panel cover, where I made a rounded notch and the cable makes a 90 degree bend and a little down to end up close to the right hand side dash support strut. The bundle lays down with no glue or clips after the heat gun treatment.
At the sender end, I used a couple of spare wires from the now removed Webasto BBW46 heater wiring to send oil press. and temp signals up front. For the voltmeter signal I connected to “G5” terminal on the fuse panel (“15” power, ie hot when ign on). For illumination, I tapped into “G8″ (dimmer controlled power) on the fuse panel. To make things a little neater, I used an old terminal strip that has screw connections and used that to connect the gauge wires to the sender wires. This terminal strip was mounted to one of the dash support channels beneath the instrument panel.
The gauge pods were screwed onto a bit of 1/4” aluminum plate, painted black. One day I’ll get some black covers for the screw heads. The plate is glued to the dash with that foam cored double sided tape. That stuff seems to take dash heat better than other tape . The gauges seem to work fine, I didn’t confirm the oil temp or pressure with another method, but the values I see look reasonable.

Vanagaon – Q and D head replacement – quick update
I’ve had the engine installed for a little over a week now. I’ve had some niggling problems and I will write about them, but for now here is a crude little video of the engine running. Proof that I actually completed the job 🙂
(dirty lens, sorry. Oh the dipsy-doodle to the exhaust pipe was to try to record a bit of the exhaust note. Since the new exhaust pipes have been installed, my home made muffler does not sound as good as it did with my leaky exhaust. Wait, what? I dunno)
