Archive for August, 2012
Victoria Fringe Festival – “Alone”
I have to plug the Fringe play my son Michael is acting in, Alone. Here is a link to a review, and another.

Vanagon – main battery kill switch
Posted by albell in vanagon, vanagon mods on August 24, 2012
There have been a couple of disturbing posts recently on the Samba and on the Yahoo Syncro mailing list about Vanagons moving on their own and or catching fire due to massive electrical faults. A short somewhere in the ignition wiring causing the starter to engage etc. It’s enough to make even the most happy go lucky owner shiver. A recent post to the Yahoo Syncro group mentioned this kill switch – Amazon link and how it was possible to mount it on the negative pole of battery (starting battery under front passenger seat of gasoline Vanagon). I happened to be out Langford way today and dropped in to Princess Auto and found what looks like the exact same switch ($9.95).
It is a squeeze to get it on the negative post of the battery (I installed the Westy swivel seat base on that side, that does not help matters at all), and the taper on the switch is designed, I think, for the positive post so you have to be sure to tap the switch down to the base of the post.
It works as advertised, a turn of the green knob connects/disconnects the ground. I have a house battery under the driver’s seat (and a fused distribution box) that supplies power to the circuits needed during camping i.e fuse #3 circuit (which powers radio, interior lights, cig. lighter, clock) and power to the kitchen. The kill switch will be used when van is parked for a time, or if I feel especially paranoid. The battery compartment lid does fit over it ok.


Vanagon – sliding door quietening hack
Posted by albell in vanagon, vanagon mods on August 23, 2012
As seen here on this Samba thread and I got the tape from Lee Valley, (link to product page). I’ll cut to the chase and answer the question “Is it worth it?” – yes. It really does make a difference in the noise made by the sliding door as it is opened and closed. This is on my ’86 syncro which has the improved sliding door set up that started in ’85. That improvement in door design is one of the nicest mods VW made to the van over the years. Ok, on to the hack.
First I pulled the track cover off the side of the van. Two screws at either end of the cover and then some wrestling to get it off. I’m not going to tell you the exact motions needed to get the cover off, but for goodness sake’s don’t pull the bottom of the cover out towards you. That is not the way it goes. It comes off straight up but you do need to clear the tabs that the attachment screws use and that does mean you have to ease the cover out a little towards you then back to the van. Sometimes grime and crap glues the cover to the van, so be careful.
Cover off and this pic shows the track one of the rollers rides on. You have to clean and degrease. And this is when I realized that I would only be doing a half assed job. You see the paint is worn off the track, and when I stick on the tape there will be no grease to keep that track from rusting. The best thing to do would be to paint on some POR15 or something similar before sticking the tape on. But I have a really annoying summer head cold right now and I just didn’t have the energy.

The forward end of the track. Two rollers there, and four surfaces to be covered in tape.

The lower track covered in tape. The tape is folded over the top edge of the track. It stuck on pretty tight. Both vertical inner surfaces of the track above this one was covered too.

I did this mod to my old ’82 years ago – a bit of self adhesive bitumen impregnated fabric to try and stop the track cover from acting as a sound board.

I put the cover back on and tried the door. Much better, really, I’m not joking. But still not as quiet as I thought it should be. I could hear noise from the upper track above the door opening. A roller bearing here as well, not the old plastic block of the pre ’85 doors. Tape applied to the outboard vertical surface (the only surface that showed sign of wear).

And I cleaned up the lower track surface, the one at the foot of the door. The track that is often dirty and greasy and rusty. Now I have my share of rust on the van, but fortunately the track surface was good and it got the tape. And now some proof. Note that the last clip that is titled “tape added to upper track” , the lower track had been taped too. God I have to deal with the rust on that door.
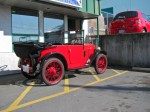
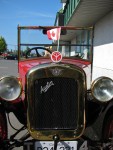
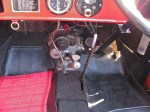
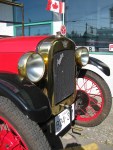
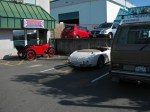
Austin Seven Chummy
Posted by albell in other cars on August 14, 2012
At the local Brit car goldmine, Owen’s, a true classic (the Healey and the Syncro are too). First time I have seen one in the flesh, I want it, really want it.


Trip – Camper Creek watershed again
My wife and I revisited the Camper Creek watershed that we went to a month ago. We had it in mind to see if we could find the trail down to Camper Creek, near the park boundary. So we set of on Thursday afternoon and arrived at our campsite around 3 pm. Funny thing about my stitched panoramas, the centre portion of the pic ends up narrower than it appears in real life. A bit of fog on Juan de Fuca strait, Neah Bay is over there on the other side, close to the middle of the picture and some smoke from (I think) slash burning up the hillside to the right of Neah Bay. Cap Flattery to the far right.

This fog evaporated as the afternoon wore on and we could see some of the marine traffic in the strait.

Neah Bay is behind the leftmost ship.

I’m guessing you get the idea that we didn’t do much once we got to the campsite, not much except sip cocktails, look out over the strait, and read mystery novels. Oh and then before you know it, it was dinner time.

And three Nighthawks appeared, diving and buzzing. Very hard to get a picture of them.

A bit of an apocalyptic sunset.

Next morning the fog was back.

I took us half the day to pry our selves out of the chairs and stop reading long enough to do some exploring. We found what we think is the trial down to Camper Creek, but the dogs were acting excited and we decided not to go down it for fear of running into something that the dogs would chase. There are lots of bears around this area, no shortage of bear poop, and our dogs have a history of going after them. So we decided to drive as far northwest as the logging roads would allow, heading to where Walbran/Carmanah Park “T’s” into Pacific Rim National park. It is a logged area between Cullite Creek to the north, and Sandstone Creek to the south. Interesting area but no great campsites so back we headed to the original spot. On the way back we had a dip in a nice pond in a gravel pit (often find blasted areas at the side of the roads. The rock used for logging road construction). I’d give this pit 4 out of 5 stars.

Back to the book. I was reading “Voices” by Arnaldur Indridason. The fog never did lift form the straits that day. We wondered about the number of fog days Neah Bay must have. Here is a link with some weather data. Seems that Neah Bay has at least 14 days per month of fog.

As the sun set, the fog crept up towards us.


But then the wind changed to a land breeze and the fog was pushed back a little.

Following morning was pretty darn nice.

We packed up around noon and headed back out towards Port Renfrew. We did explore some logging spurs, nothing much to report except to say that expect some bugs when going down dank, alder lined roads like this.

There was one productive side trip, up Braden main a few kilometres. A couple of female elk trotted across the road, finding and fumbling with camera got me this “Bigfoot spotted in PNW” class picture.

Then we found a nice spot where a bridge crosses Braden Creek.


We had a dip in the (cold) water then headed home. The van ran fine throughout the trip, but I’m really starting to get tired of the front springs – I still have the originals (tin top) on, and they are just not up to the task of supporting a westy conversion. I’d like a little more lift up front and I had been thinking about spring spacers, but now I’m wondering if those 2wd westy springs I have might be worth a try. I’ll need to look over the spring data again.
Vanagon – my inattention one year ago bites me
Posted by albell in vanagon, vanagon mods on August 7, 2012
So I notice the seal on my luggage rack was detaching from front rack, damn 3M weatherstrip adhesive failed me (see here for glue on pics). So I pulled off the luggage rack to re-glue the seal and I was shocked, shocked I say, to find some rust spots on the roof under the seal. Pic below is after I scuffed with Scotchbrite pad.

Was it just abrasion by the seal on the metal roof? No, looking at the seal I could see bits of rusty metal embedded in the rubber. Bloody hell, looks like metal filings trapped between the rubber and the roof. A lot of filings were created when I was cutting up the roof to add the pop top, and I thought I had cleaned them all up before installing the luggage rack. I’m sure I did, perhaps some fell through the drain holes in rack and lodged themselves under the seal. In any event, it was my fault .

I masked off and painted some POR15 over the affected parts. I scrubbed the embedded rusty bits from the seal and re-glued it back on the rack, this time using clear silicone caulk.

While I had the rack off, I glued on some stainless mesh on the underside of the (5) drain holes. Some have used little stainless filters that you find on some garden hose connections, but as I had the stainless mesh… I used “Automotive Goop” to glue the mesh onto the fiberglass and that glue worked very well.

But that rust, what a pain.
Vanagon – roof rack mounts
Posted by albell in syncro, vanagon, vanagon mods on August 5, 2012
A bit of a kludge, but I wanted to get some racks up on the van to carry my son’s kayaks and perhaps a Thule roof box. My old towers that I used when the van was a tin top would have been pretty tall on artificial rain gutters mounted to the pop top. We had another Thule rack, used on my wife’s Subaru and is one of those “sits on the roof and clamps to door frame” types. I decided to use it but swapping in the longer bars from the tall tower set.
Ok, to the scrap bin for this bent bit of 1/8″ stainless and away I went with the angle grinders.

I must have been hepped up on goofballs, this was the result for the rear most bracket (to be attached via pop top hinge bolts)

I drilled them for mounting and put them on. They looked, in a word, ass. Ok, back to the pile o’ metal and out with some 3/16″ (!) stainless flat. Cut, drill, grind, etc. and got something a little better. The first attempts were cut down to make the forward mounts and here are the results.


The racks are pretty firm, even with the forward pads not 100% in contact with roof.
