Archive for January, 2012
Vanagon – Jim’s sunvisor clip mod
Posted by albell in vanagon, vanagon mods on January 31, 2012
Another from the Felder Files©, modifying sunvisor clips on early (pre ’85?) to accept later model visors. I’ll let Jim explain:
“And please excuse the casual reference to “early vanagons.” The problem may
be limited to early Westies, but since I do not have an early non-westy
around to check, I”ll have to let you do that.
The main problem is that by now, the early-80s era sunvisors (which weren’t
all that great to begin with) have become sagging bags of foam dust. I have
tried everything I could think of to rebuild them. It’s a lot of work with
mixed success.
Online parts vendors stock them, but they tend to be for one side or the
other, not a set, don’t have a mirror where they should, and are hideously
expensive.
The world is full of very nice, late model padded visors in great shape. So
why can’t we use them?
The problem is easily noticed if you install them. The very end (near the
mirror) of the visor beyond the point where it snaps into the the visor
clip has just a little too much meat on it. Everything else lines up,
screws all fit, no mods needed, everything is nice–until you operate the
visor. When you do, you rotate the visor through almost 180 degrees,
thereby smashing that “meaty” part against the hardboard ceiling, and
levering off the top part of your clip in the process.
If you are handy with a hobby saw, and sandpaper, and have access to a set
of four clips that can be combined into two, you can have a very nice set
of late-model visors in your early vanagon. Did I mention that you could
have a lighted mirror on the passenger side?
I have pictures to send to those interested, but basically you take a clip
and an x-acto hobby saw and you saw the top (the part with the clip, sure,
you can used a broken clip for this) so you have a base with a flat top and
no clip. You take another one and saw off the clip as low as you can. You
glue the two together into a unit that looks like the original only about
1/4 inch taller. You sand the sides so that no excess glue show, and
install as usual.
Some may comment that it would be easier just to make a base out of some
plastic material that raises the unit, but if you get into it you will see
that there is a molded plastic tang on the bottom that fits into a square
locator hole where the clip goes. Unless you are prepared to recreate and
attach this tiny tang, you are better off with the procedure described
above.
It just works great. Time will tell if the epoxy has trouble sticking to
the plastic of the clip. I will report in due time.
In the first picture you can see more easily how the cuts were made. You can see the lip of overhang on the top piece that will be sawn off when the epoxy cures.
The second picture shows the piece trimmed and sanded, ready to install. ”


Hudson pickup
Posted by albell in other cars on January 27, 2012
Someone’s abandoned project

Here’s a shot of the engine. Doesn’t look like a Hudson L-head six, because it’s one of these.

Burns Night Supper
Tonight’s nod to tradition, haggis, mashed neeps and tatties. One slight alteration – for the first time in my life I baked the haggis instead of simmering it.
Och, its just a wean.

The tatties, cup-up neeps (swede/rutabaga), and the poor wee thing. Och, I just remembered calling neeps, tumshies when I was a bairn.

After about an hour at 400 F (haggis was wrapped in foil)

I’m sold on this method, even before tasting.

The full meal deal.

A confession, I like HP sauce with my haggis.
ATA – snow
Posted by albell in aircraft, around the airport on January 18, 2012
Our yearly snow event, chased all the planes away.

So, which one is closest to your reality?
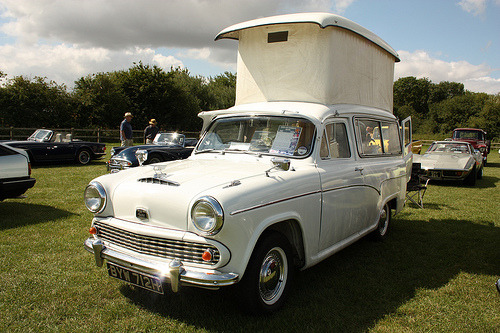
Posted by albell in other cars on January 17, 2012
Saddle Tramps continues to post interesting campers. The juxtaposition of these two vehicles made me think about fantasy and reality.

Vanagon – syncro front diff. input seal replacement
Posted by albell in syncro, syncro specific repairs, vanagon on January 13, 2012
Back in October last year, when I had the front diff. out to install a new VC, I noticed that the input seal was leaking. It would have been smart to replace it then, but I couldn’t wait for the seal to be ordered in. Then I procrastinated, put the job off until today. The job is quite straightforward; disconnnect the prop shaft from the front diff., undo the 24 mm nut that holds the drive flange on the input shaft, remove flange, remove seal, replace seal, replace flange, etc.
Addendum: Have a look at this thread on Yahoo Syncro list for discussion on cheaper seal. I didn’t see that thread before I bought the expensive one from dealer.
I’ll be pedantic and list the steps I took:
– chock pass. side wheels and jack and support driver’s side so that left rear wheel is off ground (you could have both wheels that side off the ground, would be easier to rotate propshaft to get at all the propshaft flange bolts)
– loosen the 3 bolts (17 mm) on the rubber mounts on front diff.
– mark the propshaft flange, the front diff. flange, and the front diff so that you can get all the bits back in same orientation.
– remove the 4 nuts and bolts holding propshaft to front diff. flange (13mm, use 2 open end wrenches), and let the propshaft rest on ground, or support with wire.
– rig up some sort of tool to hold the flange as you undo the nut (24 mm), the nut is on there tight (135 ftlb). My elegantly engineered (ha!) flange holding tool required the pass. side propshaft protection rail to be lowered a tad.
– a 2 arm puller to pull the flange off the shaft, came off very easily.
– the exposed seal can be pried out with a strong screwdriver. I was surprised at how secure it was in there. Be careful not to damage the aluminum housing.
– some oil will drip out, have a container in place to catch it
– new seal is lubed then, as the Brits say, offered up to the housing. I used a brake caliper piston to carefully drive the seal home.
– then the flange, and the washer and nut. Again you need to hold the flange as you tighten the nut.
– propshaft back up and secured.
– some gear oil squirted in the fill hole (17 mm socket head plug) just back of the driver’s side inboard cv joint.
– the diff mount bolts left loose for a few miles, then tightened up. Just to allow the front diff to settle in a happy place (a sort of horizontal self alignment).
Addendum: overview of area. 26 = 24 mm nut, 25 = thick washer, 24 = input flange, 23 = seal (22 = circlip and 20 = bearing. Both un-involved with this repair)

Here are some pics:
See the oil splash?

Propshaft removed, the 24 mm nut that holds the input flange on is revealed.

Flange held firm using homemade tool, nut loosened.

Flange off, seal exposed.

Shots of how the brake caliper piston is a good fit to use as seal seating tool.


New seal installed.

Vanagon – silliest toaster ever
Posted by albell in metalworking, vanagon, vanagon mods on January 13, 2012
Fever dream realised with some scrap aluminum tubing and some stainless steel mesh. Space efficiency? We don’t need no steenkin’ space efficiency.


ATA – more Alphajets
Posted by albell in aircraft, around the airport on January 9, 2012
One in interesting colours.

Beached
Phil Z. took this pic, somewhere near Campbell River.

Pintle hitch
I bought 2 of these at a government auction a few years ago. Gave one away and managed to bury the remainder under junk in the “workshop”. I wonder if I can machine an adapter so that it can fit in a regular receiver and retain the rotation feature. Just for no other reason than it looks cool.


