Archive for September, 2011
Vanagon – looking at pop top truss head bolt alternatives
Posted by albell in vanagon mods on September 23, 2011
I hate the truss head bolts used on the Vanagon pop top. They are hard to unscrew and they rust. Some vendors sell stainless steel versions (it is a M6 x 1.0, 20mm long). Phil Z. used oval head stainless machine screws stainless cup washers (he filled the back side of the cup washer with thickened epoxy), and they looked pretty good. But I wanted try something else, something with a big head and that looked good, I only had 50% success. I made a cup washer of sorts from 1/4″ aluminium and used a M6 machine screw and I think it looks a bit odd.

I had another go, this time with the bolts that fix the pop top assist struts to the fibreglass. A bit better looking or maybe not.
 On the other hand, they don’t look *that* bad, and certainly better than what was there before. Who am I kidding? The last one looks like crap. Here is another attempt.

ATA – Scorpion Too helicopter
Posted by albell in aircraft, around the airport on September 23, 2011
It was temporarily moved out of its hanger at the BC Aviation Museum, and was tucked under the wing of the Douglas A26 Invader. Wikipedia entry on this aircraft here.


Vanagon – steering arm boot and radius arm sleeve
Posted by albell in syncro, syncro specific repairs, vanagon on September 19, 2011
It all started so easily, replacing a torn steering arm boot (same boot in all Vanagons).

I figured if I removed the ball joint end of the arm from the steering knuckle I could pull the boot off over it and and not change the arm adjustment (toe in). Out to the ball joint at that end, castellated nut with cotter pin.


I pulled the cotter pin and unscrewed the nut, then screwed the nut back on backwards to protect the threaded end, gave the steering knuckle around the ball joint a couple of good raps with a heavy hammer, then rapped upwards on the nut and the joint popped free. Nice when it happens so easily.

The boot was held on by 2 metal clamps (Oetker?) and I snipped the crimped part with some wire cutters and then pulled the boot out towards the ball joint.


That rubber doughnut on the arm locates the outboard end of the boot. The new (well, used one I had in my parts bin) went over the ball joint and up to the rack. Oh, I did put a bit of grease on the exposed ball joint on the inboard end of the steering rack. I used cable ties to secure the boot the the rack and the rubber doughnut.

Now the interesting part, while under the van I decided to have a look at that side’s radius arm rubber bushing and inner sleeve. These parts do wear out, and the sleeve rusts. I undid the drop link from the sway bar to the radius arm, the 19 mm nut at the out board end of the radius arm (inner bolt not touched, to keep the castor unaffected), and the 3 X 19mm bolts that holds the radius arm to the steering knuckle. As suspected, the sleeve was badly rusted and the bushings shot. The subframe hole also was rusty, but still sound underneath. Pretty well the same set up in 2wd Vanagons, its just that the syncro has that front subframe. Neil has a great write up on fixing his damaged radius rod mount on a 2wd Vanagon.


So I have to get new bushings, but right now I decided to make a new sleeve. The dimensions of the sleeve (found on this Samba thread) are: 56 mm long, 25 mm OD, 19mm ID. I did not have any pipe that was close to those dimensions but I had some stainless steel shafting from the scrap yard. It’s not the most efficient way of making a sleeve I admit.

etc…

I could have made a few pot scrubbers with the swarf. The finished sleeve beside the rusty one (btw, the stock sleeve looks like welded tube, and only rusty on the outside).

I slathered everything with a homemade Waxoyl concoction and put it all back together. I’ll order some new bushings.
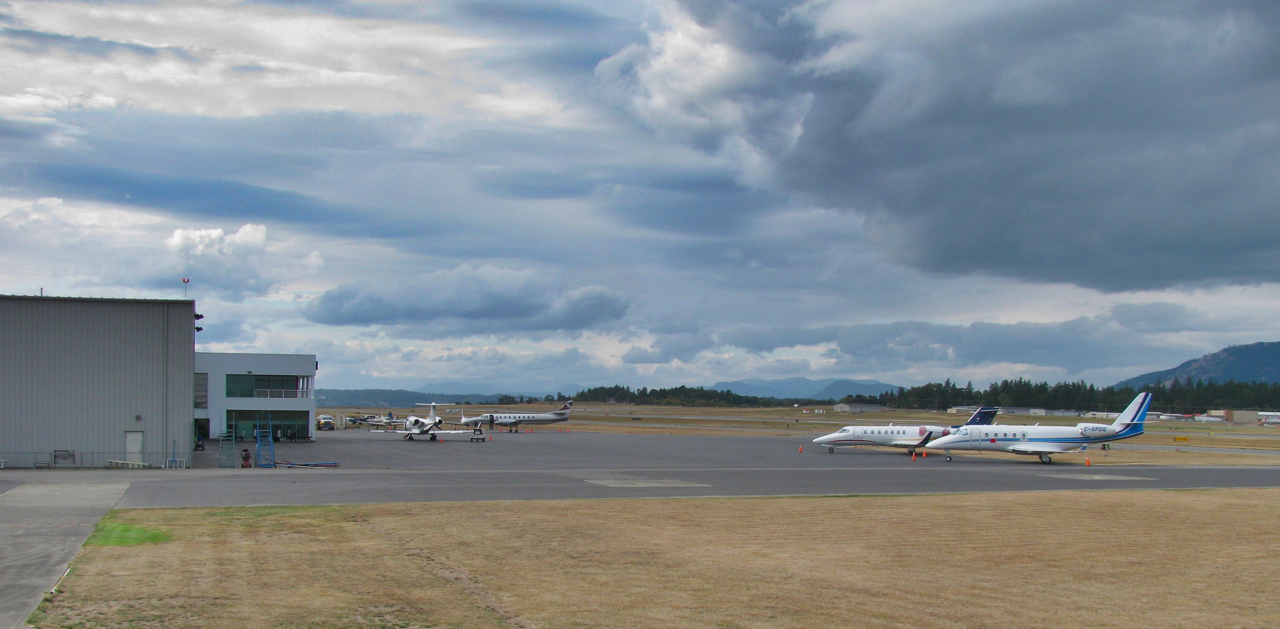
ATA – the grass is brown
Posted by albell in aircraft, around the airport on September 16, 2011
A wet and cool spring and most of the summer but in August and now through September, the sun has been shining and not much rain has fallen. This will change soon of course, the clouds are presaging the rain to come.
Edit: Angus tell me that “the closest one in that shot is a Gulfstream G150, until recently, known as an Astra. Behind it, a Lear 45”.
Vanagon – cleaning the Shadyboy awning
Posted by albell in vanagon, vanagon mods on September 16, 2011
After about 5 years of use my Shadyboy awning was looking a bit dirty. I contacted Wolfgang at Shadyboy and he confirmed that the material can be cleaned with soap and water. Here are some pics I took, padding the post a bit, but maybe someone would be interested in how the awning looks non-deployed.

Some of the dirt must come from keeping the guy line stakes in here.

Unrolled, you can see it is a bit manky.

There are silicone plugs at each end of the grooved aluminium extrusion that the inboard seam awing slides into. The seam has a flexible rod sewn into the hem. The plugs can be pried out with a flat bladed screwdriver, just need to do one end.


With the plug removed, the hem slides right out. Notice the gap between the aluminium block with the hole drilled in it and the case? Seemed like the case might have been bent away from the block, I used a little C-clamp to draw the case back closer to the block.

I hand washed the awning using warm water and a very little bit of laundry detergent. I rinsed it well, and I noticed the water beads up and slides off the material just like it used to. Then the material was fed back into the groove and the silicone plug installed. Before and after shots.


Vanagon – headlight relay upgrade
Posted by albell in vanagon, vanagon mods on September 15, 2011
Some sort of planetary alignment must be happening, I’ve been talking to a few Vanagon owners about headlight relays, so I thought I’d post a couple of diagrams. Adding headlight relays to the van is a good idea, it redirects headlight power current away from the hi/low beam selector switch and the headlight switch. By passing the switches helps to maintain a good voltage to the lights and most likely prolongs the life of the switches. Also, if upgrading the lights to higher wattage bulbs, then relays are a definite requirement.
First off, here is a diagram I made years ago when I did the mod to my ’82 westy. For some reason I think the diagram has an error in it, can anyone see it? Seems silly to post a schematic that I am not 100% sure of, but on the other hand if one was to study it to find the error one would come away with a better understanding of the headlight circuit 🙂 Oh, one more thing, if I was to do this over, I’d run separate fused power for each relay.
Note: Mark Drillock pointed out that: “For the early diagram there are a couple things I would change. The red wires to the headlight switch and hi/lo switch are both labeled as coming from fuse S9. This is not really true and misleads people into thinking those 2 wires are fuse protected. They merely connect to the back of the fuse holder on the end that the fuse itself gets power from sharing that power source. The fuse does nothing for those red wires.”
He also notes: “Also your added note in the later diagram about the red wire to term 30 of the hi/lo switch applies as well to the earlier wiring.”
Thanks for the clarifications Mark, I’ll look for the original source file of this diagram and change it.

Edit: well I couldn’t find the original file so I dashed off a new version, quick and dirty.

And now on to the post ’85 Vanagon wiring. A couple of notes first. The power source for the relays can be the “P” terminals on the left side of the fuse panel if looking from the front, or the right side of the panel if looking from the rear, ha!
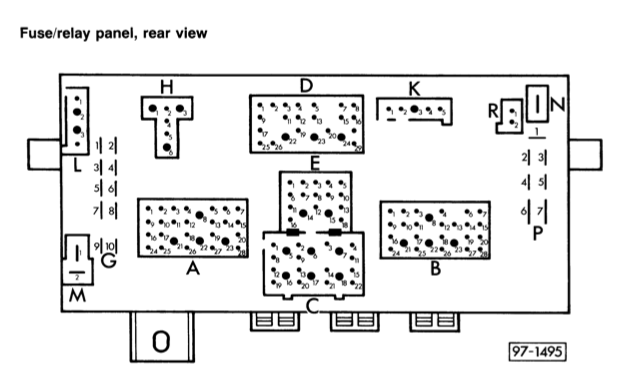
Or you can run new wires directly from the battery. Whatever source you decide to use, you HAVE TO install inline fuses close the power tap. The relays themselves can be clipped onto the top of the fuse panel if you have a couple of those relay bases that fit. This diagram does not include upgrading the wires from the panel to the lights, but does retain the stock fuses for each beam/light. I have gone over the diagram, I believe it to be accurate, please post any corrections in the comments.

There are suppliers that will sell you a kit to do all this, a good one is sold by Jay Brown.
Recovery Gear
Amazing what you find when you start cleaning up the workshop. If I lash this to the front of the van will it get me in tight with the Landrover guys? 🙂


August trip 2011
Back from a 2.5 week trip into the southern interior of BC. It was a bit of a rush to get the van ready for the trip, the last week or so of camperization was a mixture of success and compromise. I did not get the upper bunk installed in time, I hit a few snags that I will write about later. To add to the pre-trip frenzy, the day before we left I noticed the front outer CV boot on the driver’s side was ripped. Fortunately the local VW dealer had boots in stock, so the night before we left I put on a new one. It was a fairly straightforward job; jack up and support the van, remove wheel,undo the axle nut, undo the sway bar drop link on that side, remove the 2 socket head bolts holding the ball joint to the upper A-arm, let the spindle swing out, undo the inner CV joint, wrestle the axle out (tight), pull the inner CV joint off, pull the ripped outer boot off the free axle end, clean and repack joint, install new boot…. yadda yadda.
Next day we left, wife, son, 2 large dogs, and a borrowed canoe (my 18′ cedar canvas canoe was too heavy for the stop gap rack I had installed on rear of van). Here is the van at the Swartz Bay ferry terminal. It really does look like a Westy now, doesn’t it? And to my eyes, it looks a lot better than the other RVs in the line up.

On the mainland we headed east to Hope and then on to Manning Park. It has been a tradition with us to stop for a few nights in this park. While the campsites at Lightning Lake can be busy, it only takes a little bit of effort to get away from the other campers. The air is clear and with the elevation (+4000 ft) the nights are cool. I really recommend stopping here and exploring. Here is our campsite.


A black bear was around and it wandered through our campsite one evening (luckily our dogs were out on a walk with my wife) and again the next day it passed behind our site, this time the dogs did raise the alarm. Of course the camera was not handy. We did some canoeing in Lightning Lake, and I portaged the canoe to the next lake (Strike?) and we did some more exploring.

There is a trail around all of the lakes, I took the dogs for a look.

Plenty of Devil’s Club.

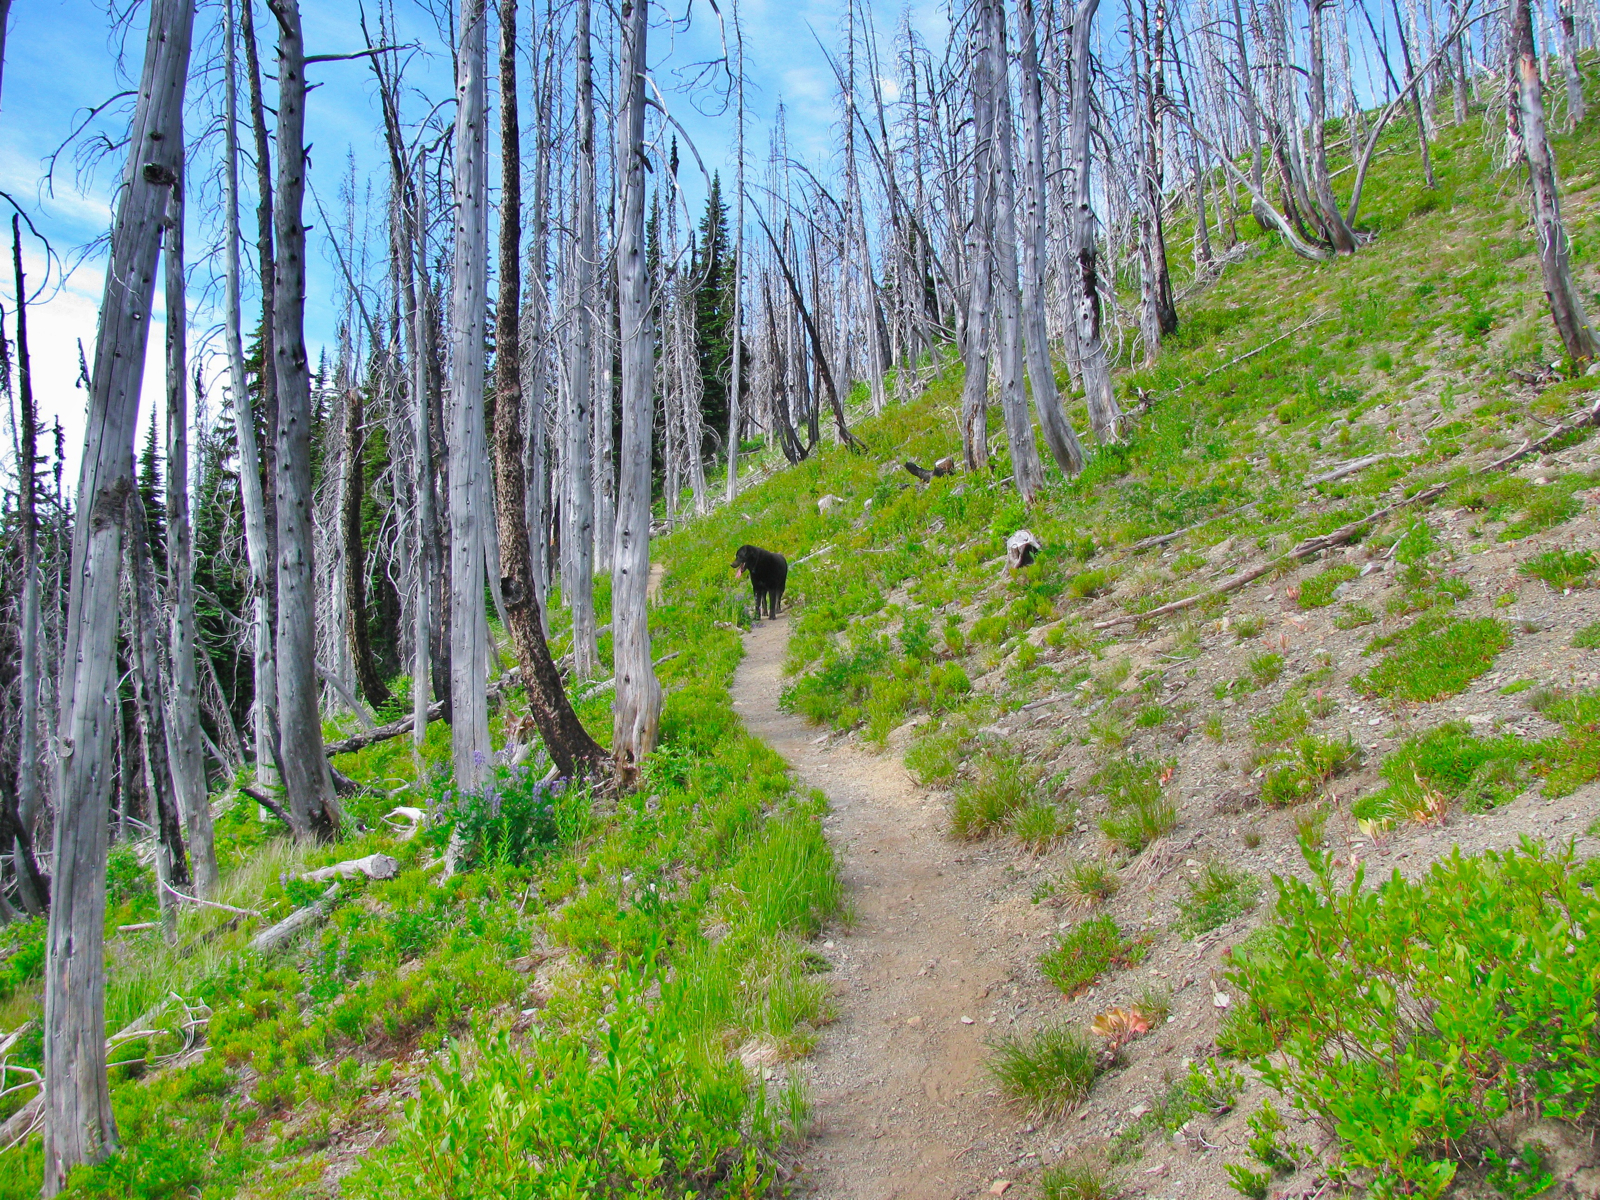
Next day I took the dogs on a hike up the Skyline Trail which leads from Lightning Lake up onto a ridge in the alpine. The trail goes through an old burned out area and the alpine flowers were still in bloom, and there were patches of snow around.


Then on the last day my wife and son paddled the canoe from the campsite over to the day use area where we loaded it on to the van. You can make out the burned trees on the Skyline Trail at the top of the ridge in the background. We met an older German (Berlin) couple at the park who were taking 2 months in a rented RV to tour BC. Nice folk and they really enjoyed Manning Park.

Then it was on east to Princeton, and from Princeton, north towards Merrit. The countryside is much drier now. Yup, that’s a nice maroon Vanagon Westy heading this way.

We were heading to Kentucky-Alleyne Provincial Park. It’s a busy and popular park and we started going there when our son was young, so we went back for old time’s sake. The lakes are kettle lakes, with no real water in flow apart from snow melt, and the lake level has been dropping for the last 10 years. So now the lake shore is about 30 metres further out than when we first went there. When we arrived, we could not get a lakeside camping spot, so the first night was back up on a site on a ridge between the lakes.

A lot of the impressive Ponderosa pines have been killed by the pine beetle epidemic. Next day we moved to a lakefront site and did some relaxing.

We ended up spending a few days here, with one trip into Merrit for supplies. Then it was on north to Kamloops and then further north following the North Thompson River to Little Fort. West from Little Fort (and up a 10 km 8% hill which forced the van down to 2nd gear, the old engine is tired but it did not over heat) to Bridge Lake, then south on logging roads to Scot Lake. There is a Forest Service campsite here and it is another one of those places we first camped at when my son was a toddler. We did not stay at the campsite proper, but up on a hill about 200 meters west, over looking the lake.


Compare the last picture with this one taken a few years ago when we were using the old faithful ’82 Westy.

We stayed here for 6 days, fishing, exploring, canoeing, reading. Sandhill cranes were calling, but we only saw some when a couple flew over one evening, coyotes were about, making noise and exciting the dogs, most of the Lodgepole pines around were killed by the Pine Beetle, but lots of new pines were coming up. The Spruce trees (and of course the Aspens) were mostly unaffected.

Here you can see the tell tale pitch extrusions from the beetle affected trees.


And another picture of the van, the cloudy day when we left. I have to say, coming from the damp coast, the climate around Scot Lake was wonderful. The air was clear, the sun hot (30-33 C ) and the nights cool (2 C at 7 am). There was absolutely no dew on the ground or the van in the mornings, something I found amazing.

I had my gold pan with me and one day I thought I’d see what was in the coarse sand by the side of the lake. I struck iron! I can reveal the secrets behind panning for iron, send me $9.95 and I will detail the simple but clever method to extract gram quantities of this amazing metal 🙂

I couldn’t resist taking a picture of one of my tires. Good old Michelin Agilis 81, crap in mud or snow, but great for the dry and they are a very tough and durable tire.

Another goofy pic which led my son to declare me a “doofus hipster wannabe”, making a simple pasta sauce with shallots, garlic, sun dried tomato sauce and pimenton, and the computer.

We left Scot Lake the way we arrived, back south to Kamloops then east to Armstrong to visit friends. Then back west again, passing this nice collection.


Back through Kamloops and instead of heading south there (Coquilhalla Hwy) I decided to head on west to Cache Creek and head down the Fraser Canyon. I like the stretch of road between Kamloops and Cache Creek, and sometimes you see things of interest.


In the Fraser canyon we were held up for an hour by a tandem trailer that had spilled its load of lumber. I don’t know if anyone was hurt, a helicopter did fly off from the scene.

Was another chance to take a picture of the van.

And the CPR railway was on one side of the river, the CN on the other side (lots of history here). A few model trains passed by during the hold up 🙂

Then it was a mad dash to the coast and the ferry. The delay caused us to miss the 9 pm ferry to the island, and there was no 10 pm sailing… so we took the 10:45 pm sailing to Nanaimo (further up the island from where we live) and drove down the island to home, arriving at about 2:30 am.
The van ran great throughout the trip with one exception. We had about 1.5 hrs of bucking and hesitation driving south from Scot Lake. A fresh fill up of gas solved that. Previous fill up of fuel was with 10% ethanol blend, I wonder if that had anything to do with it?
