Archive for November, 2009
Shilling for Meguires
Was asked to treat the ’80’s style floor mats with the same stuff I used on the full front mat. Marvel at the before and after pics.


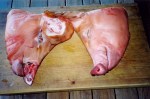
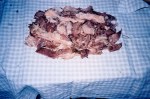
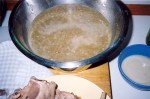
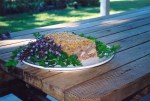
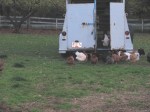
Headcheese (brawn)
Looking at the pigs today reminded me of the time back in 2004 when I made headcheese from one of the pigs raised on the property. They weren’t “old breed” pigs, just the regular old commercial variety. Anyway, I had the butcher set aside one head for me. It came, de-brained and split, in a vacuum pack. Funny thing was one half seemed a little roughed up. I consulted a few old books and I set about making brawn. The pictures tell the story. I don’t like headcheese, but it wasn’t that bad, good sliced on a sandwich.


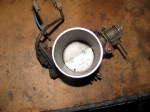
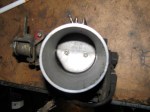
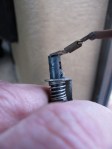
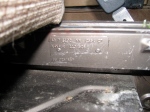
2.1 l wasserboxer throttle body
Old throttle body from my spare 2.1 l engine. Note the “cut out” on butterfly plate.


Cyclekart
Posted by albell in cyclekart, metalworking on November 29, 2009
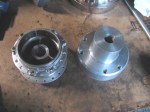
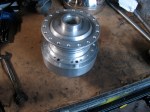
I am making a cyclekart for my son, thought I’d start posting pics. For more information on cyclekarts, see here.
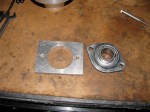
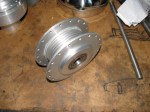
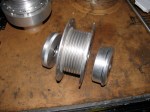
Hubs are Motobecane moped hubs, I took the spokes off and machined them a bit. One front hub is shown, with machined bearing housings. The rear fixed hub is shown, its the one with the overbuilt hub adapter. Lots of aluminium shavings when I did that one.
I’ll add more text explaining the parts later.

November 29, sunny afternoon
Three days now without heavy rain.


Cibie aux. light
Posted by albell in vanagon mods on November 29, 2009
Another auto wrecker find, from a JDM Pajero or Montero (can’t recall). I thinks its a Japanese market SC Oscar, its stainless with H1 bulb. I got the pair. I don’t know yet whether they are wide or narrow beam. The reason I post them here is that the housings are tantalizingly close to fitting the Iltis H4 headlights.


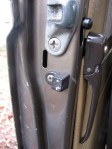
Rear hatch switch
For those who have wondered…
Metal tab screwed to hatch presses on the switch on the body. The switch is slightly larger and all metal, different than the slider and front door switches.


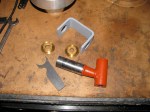
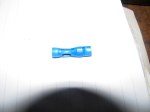
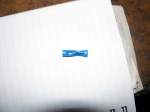
Crimping butt connectors
Fellow Vanagon list member Neil queried me on my use of an un-insulated crimp on an insulated butt connector. I find it works ok with the long handled old school crimper I have, if you align the butt connector in the tool so that the divot making portion of crimper is 180 degrees opposite the seam in the metal portion of connector. Pictures show 2 types of simple crimping tools, the long handled all steel one is my favourite. Also shown are 2 crimps on each end of a butt connector, one made with yellow handled crimper in the “insulated” labelled crimping die, the other with the long handled tool.

Full front rubber mat
Recent auto wreckers find. Its not ripped or punctured but looks tired even after power washing. I need to find some sort of rubber reconditioning agent to see if I can rejuvenate it.
Update: I used Meguire’s rubber and vinyl conditioner on the mat, 2 applications, sprayed on, let sit a few minutes, then wipe off. Worked quite well, the “high traffic” areas on mat less glossy than the rest of the mat.
I should mention the mat replaces the fitted carpet, not over it.


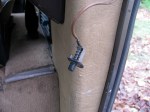
Sliding door light switch
Had intermittent failure of light switch in sliding door. Solved by bending the tiny triangular tab on switch so it rubs more in contact hole. Picture shows me depressing plunger fully to show tiny tab.

Delayed switch-off interior light
Posted by albell in vanagon mods on November 28, 2009
Installed a delay dim interior light in drivers side. Its from a late ’80’s early ’90’s golf/jetta carat/wolfsburg models, looks like standard vanagon interior light with some added circuitry, (VW part number, 191947111
“interior light with delayed switch-off”). Very simple splicing, 2 reds (power) to the light’s 2 reds, the 2 browns (ground) to matching 2, and the brown with white stripe (switched ground, door switch) to matching wire. Works great, maybe 6 seconds delay.
But my big surprise, and I guess I shouldn’t have been surprised if I looked at the wiring diagram, is that the delay works on all the lights and all the doors, slider, back hatch, pass. door. Yup, just by installing that one light at driver’s position.
Found the light at auto wreckers, got 2 for $10.


Mud
I just spent some time at car wash getting mud and hay and straw off the van from my recent around the farm vc testing. Its astonishing how much mud gets trapped in all the nooks and crannies.
Prop shaft R&R update
Posted by albell in syncro specific repairs on November 27, 2009
to recap… purchased ’86 syncro this last summer, prop shaft out because of vibrations, vc was assured to be ok. U joints on prop shaft looked suspect, but i installed and yes, vibrations at 50-60 kph. Also vc was weak, not passing the 2×4 test.
I replaced u joints on shaft (precision brand, #813, see earlier post), checked the fit of the shaft and bushings on guibo end (nice and tight), and popped shaft back in. Still vibrated at same speeds. Loosened front diff mounting bolts, drove around, no difference.
Removed shaft, examined u joints, one was loose so I replaced circlip with thicker one (u joints came with 2 sets of circlips). Checked bushings and shaft fit again.
Two days ago I put it back in, but before it was installed I did a quick check on vc by using the volvo method outlined on testing vc post. I got a value of 17 ft/lbs. Not much eh? Confirms vc is weak.
It would would be interesting if others would do this simple and quick test and post results, I bet there is a range of values.
Oh, and as well as putting prop shaft back in today, I replaced the dodgy Uniroyal Laredo tires the van came with with some Nokian Hakkapeliitta CS tires.
Road test: tires louder and firmer. Vibrations almost gone, A very slight vibe at 50-60 kph, but its very slight and not bothersome (that said, I will work to eliminate it).
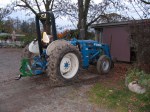
Mud test: on the farm here there are ample spots to get stuck, and it has been raining pretty hard the last 2 weeks. Last week with prop shaft out and the Laredo tires on, I tried going up a curving, maybe 20% hill, grass and clay/mud. I never made it, even with rear diff lock on. Today, with much wetter conditions, I made it up no bother, and no diff lock.
i toodled around lumpy, uneven, sloping ground, grass over North Saanich clay. Didn’t get stuck, but the front wheels didn’t “feel” like they are doing much.
Conclusion: prop shaft vibes mainly due to “loose” u joints, either when they were old worn out units, or new ones, not installed with correct circlips. The “off road” performance I attribute mainly to the great tires. Perhaps the vc is allowing a little torque to get to the front, probably wishful thinking.
Elektrische anlage
Posted by albell in vanagon tech papers on November 20, 2009
German language version of electrical system, 1979-1985 models including diesel. More info here than is in the equivalent English language version, including some detailed exploded views of alternators (drehstromgenerator).
Elektrische_Anlage
Testing the viscous coupling
Posted by albell in syncro specific repairs, vanagon tech papers on November 20, 2009
I’m just going start dumping links here that relate in some useful way to understanding how to test the function of a viscous coupling such as installed in the Vanagon Syncro.
Derek Drew’s comprehensive analysis and test procedures.
syncro.org page. Not sure about conclusion derived from graph of viscosity vs. heat though, but still good info here.
Volvo vc test, in car, interesting – FHPs_SB46-0005-0101
Natterings on the North American Subaru Impreza Owners Club, extracts from a SAE paper on how the VC works (not bad, still does not fully explain how the plates are forced together in the “humping” stage, its still a mystery). This Subaru site has a few discussions about vc function and testing, its worth a look around.
“Out of car” testing of a Subaru vc. Autospeed article.
Test for Landrover vc described here at transmission specialist. Look under “technical information”
Syncro prop. shaft R&R
Posted by albell in syncro, syncro specific repairs on November 20, 2009
This last summer I replaced the original u-joints in the syncro prop. shaft. The previous owner had removed the shaft for the summer, but told me there was some drive line vibrations. There are a lots of tales of woe and intrigue on the net about prop. shaft vibrations, causes and cures, so I decided to have a go at fixing mine. First thing was to replace u-joints. Stock VW joints are expensive, so I used the same replacement joints as Herman did on his syncro project (Precision brand, part #813). The bronze bushings that the yoke assembly and shaft fits into at the guibo end of the shaft seemed ok, the shaft fit in snugly. I just re-greased that, installed the new joints (blanking off the grease nipple fitting holes – I couldn’t get a nipple to fit in the tight spot, you’ll see what I mean if you ever do this job), and then painted the shaft. I re-installed the shaft and still had drive line vibrations at around 50-60 kph. I tried the trick of loosening the front differential mounting bolts and driving the van to let the drive line “find its sweet spot”, but that did not work. I removed the prop. shaft and re-examined it, and noticed some play in one of the joints. I removed that play by installing a thicker circlip (new joints came with two sets of circlips, differing in thickness).
That seemed to have removed the play. I double checked the fit of the yoke shaft into the bronze bushing, was ok.
The next step is to make sure transmission output flange and front differential input shaft are aligned to specifications. They are supposed to be aligned longitudinally, but each flange can be pointing down slightly, 4 degrees or so. I have made a laser alignment tool and I need to get under van and do the deed. One thing that has slowed me down is my suspicion that my viscous coupling is weak, but that’s a story for another blog entry.
Meanwhile have a look at the old u-joints. Notice the pounded marks on one of the bearing surfaces! (apologies for the blurry pic).

Stock wheel and tire specs
Posted by albell in vanagon tech papers on November 18, 2009
How’s the German reading course going?
Reifenfreigaben_VW
Guibo end of prop shaft
Posted by albell in vanagon tech papers on November 18, 2009
A rather low resolution image of guibo (rubber doughnut) end of syncro propshaft.
Vanagon technical data and torques
Posted by albell in vanagon tech papers on November 18, 2009
Yet another German document, “Technische Daten und Anzugsmomente Stand November 1986 (Letzte_Ausgabe)”
Translation: “Technical data and torques conditions November 1986 (last expenditure).”Technische_Daten_und_Anzugsmomente_Stand_November_1986_(Letzte_Ausgabe)
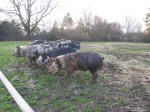
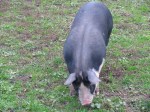
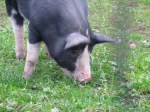
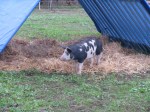
The pigs
Berkshire X Duroc and something else

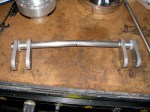
Quick visual of simple thread cutting set-up
Posted by albell in metalworking on November 14, 2009
Posted here to remind me to look at my own files more often.

Snow
on the hills north of Duncan, November 13.

November afternoon
Between the downpours, about 4 pm.


Anschluss ladegeraet
Posted by albell in vanagon tech papers on November 12, 2009
Non German speakers, break out the dictionaries, instructions and schematics for an in-van battery charger.
VW_Anschluss_Ladegeraet
My m-codes decoded
Posted by albell in vanagon tech papers on November 11, 2009
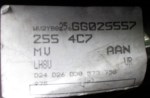
On my ’86 Vanagon syncro, 7 passenger, there are two m-code plaques, a white paper one below fuse box and a metal one under driver’s seat.
First the vin can be decoded (link for site with vin decoder)
My vin decodes as:
made in West Germany, by VW, multipurpose van, 1980-1991 bus, 4-cyl gasoline water cooled, passive seat belts, vanagon, a check digit, model year (G=1986), Assembly plant Graz Austria (bodies sent to Graz from Hannover for syncro mods), then lastly production number.
So far what i have decoded from white plaque/sticker:
255 = Caravelle, Vanagon, Westfalia etc; LHD.
4C7 = not found on any list so far.
AAN = not found on any list so far.
LH8U = paint code, Bronze Beige Metallic.
D24 = not found on any list so far.
D26 = not found on any list so far.
D30 = not found on any list so far.
573 = klimaanlage (+leuchtspiegel in beifahrersonnenblende M 999), overhead air conditioning.
758 = “Sonderausfuhrung” Steuerungsnummer fur Programm Steuerungs-Zwecke von Internen Sonderfahrzeugen. Internal control number for special vehicles, I assume its a tag for syncro production. “Sonderausfuhrung” means special model, note there should be umluat on middle “U”.
975 = Zusatzheizung (Webasto BBW 46.10, speist in den Wasserkreislauf ein, keine standheizung (+ batterie 63 Ah M 597). aux heater (coolant type), Webasto plus 63 Ah battery.
And on the metal plaque below driver’s seat:
40 = could be produced 40th week of the year. Door jamb sticker says 10/85, so its close. But syncro production is complicated by the shipping of bodies from Hannover to Graz.
7 = ?
KN = ?
2554 = is it the model number? 255 = Caravelle, Vanagon, Westfalia etc; LHD. Not sure about this.
C7 = ?
X4X4UR = another code for the paint, Bronze Beige Metallic.
113 = Canada version.
526 = Luxury edition Caravelle (ha!).
66 = ? if it was an m code it would have a leading zero.
025 = Instruments with trip counter and clock.
557 = not found yet.
M-codes reloaded
Posted by albell in vanagon tech papers on November 11, 2009
sheesh, when you start looking they are everywhere! Here is a link to UK vanagon site (Brickyard) with another m-code list.
German manual – early vanagon westfalia build
Posted by albell in vanagon tech papers on November 10, 2009
Westy, pdf. Measurements and plans for early Vanagon Westy interior.
German manual – 5 spd transmission
Posted by albell in vanagon tech papers on November 10, 2009
5-Gang_Schaltgetriebe_094 for 5 spd, pdf file, in German
M-code redux
Posted by albell in vanagon tech papers on November 10, 2009
Thanks to Pedro for the wayback machine link to Perl L’s M-code translation. Its not complete but adds to the canon.
Bosch English/German/French dictionary
Posted by albell in vanagon tech papers on November 10, 2009
to help with the German docs I have and will be posting, here is a dictionary.
bosch_dict_en_ger_fr
