Archive for August, 2021
Vanagon – hosed!
Finally, and just as the weather turns from the driest and warmest for years to showers, my wife and I get going on a trip to the places we like to go.
Of course I was nervous, after having engine and trans out. But driving around locally the van was fine.
But… we get maybe 30 min from home, driving thru Langford, I see steam in the rear view mirror. I get off the road at suitable spot and sit, contemplate, let the steam die down, before popping the engine hatch.
Was wetness at the rear of engine. Spray pattern, you know. Couldn’t see anything until I poured water into expansion tank. Then we both saw the leak. End of the hose from expansion tank to the left side pipe. The branch of that pipe just adjacent to the water pump. Ironically ( not sure if this is good use of that word) I had replaced that pipe with stainless version.
The hose down there was split at the clamp. Was able to push more hose down over the barb, get more water into tank, and drive back home.
The ess shaped hose is quite VW specific. Instead of going to dealer ( thinking would be an order in part) I went to local NAPA store. Beacon Auto. I like the place, good service. Thought I’d cobble up something.
Stock hose is nominally 1” ID at one end, 3/4” ID the other. They didn’t have anything but I bought a 1” right angle hose and some 3/4” hose. They didn’t have adapter nipple. But I said to myself … I’ll go back to work and make one…
Didn’t have the stock on hand at home to make .
Suffered the teasing at work 🙂
Made adapter, hose barb looks small , was a guess and worrying about stiffness of new hose, worked out fine. Original on left, shortened at the failed end.

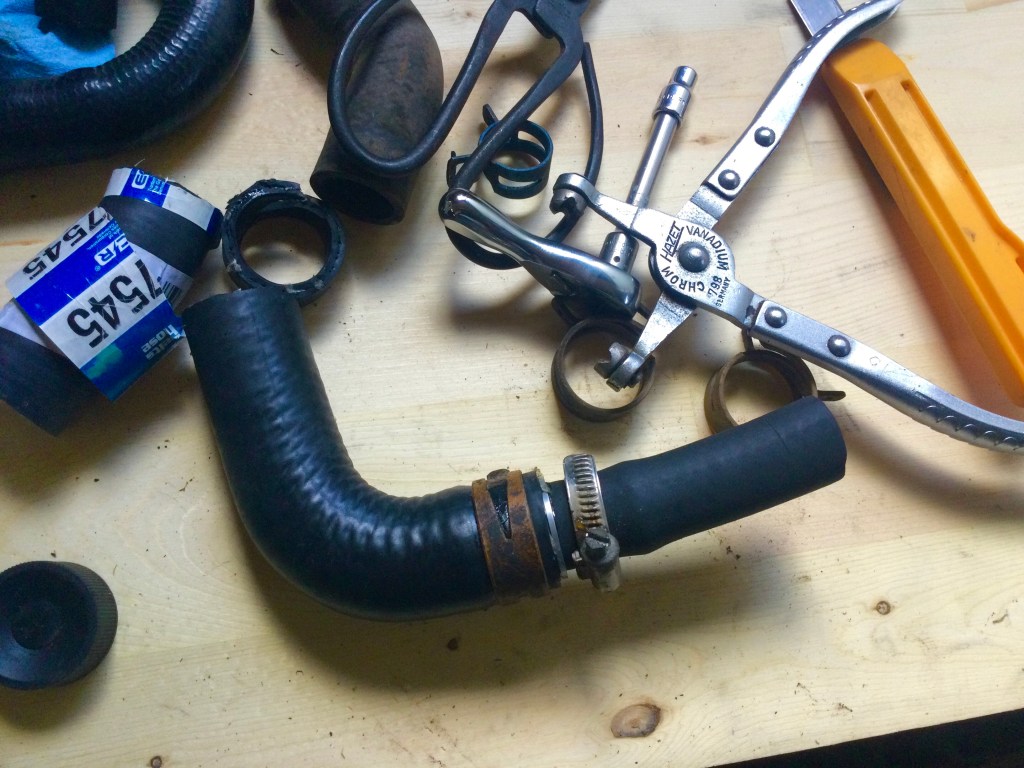
I’d have liked to have spring clamps all round, it used one gear clamp ( rolled edge though )
Installed. Looks clunky but believe me it’s tight .

Something different – WWII Canadian Civil Defense helmet
Over the last winter I picked up some stuff. One interesting thing was this Brodie helmet, WWII vintage ( 1941) , Canadian civil defence warden. Sorry but I lost the internet link to more info. But according to the stamping it was made by the Canadian Lamp Company.
Yeah, I’m on holiday and sitting with a nice drink digging up these pics from last winter.


Vanagon – Grills! Grills! Grills!
Over the years I’ve had fun making silly grills that go on the back end of the kitchen unit. Ostensibly the grill is to provide a bit more ventilation for the heat made at back of fridge.
I started with a more less copy of the stock grill, but that’s not fun. This led to my Cthulhu line of grills. Accommodates a USB outlet and a voltmeter, and switch to choose between either. This particular example has a cut out for a fridge cooling fan controller wiring .
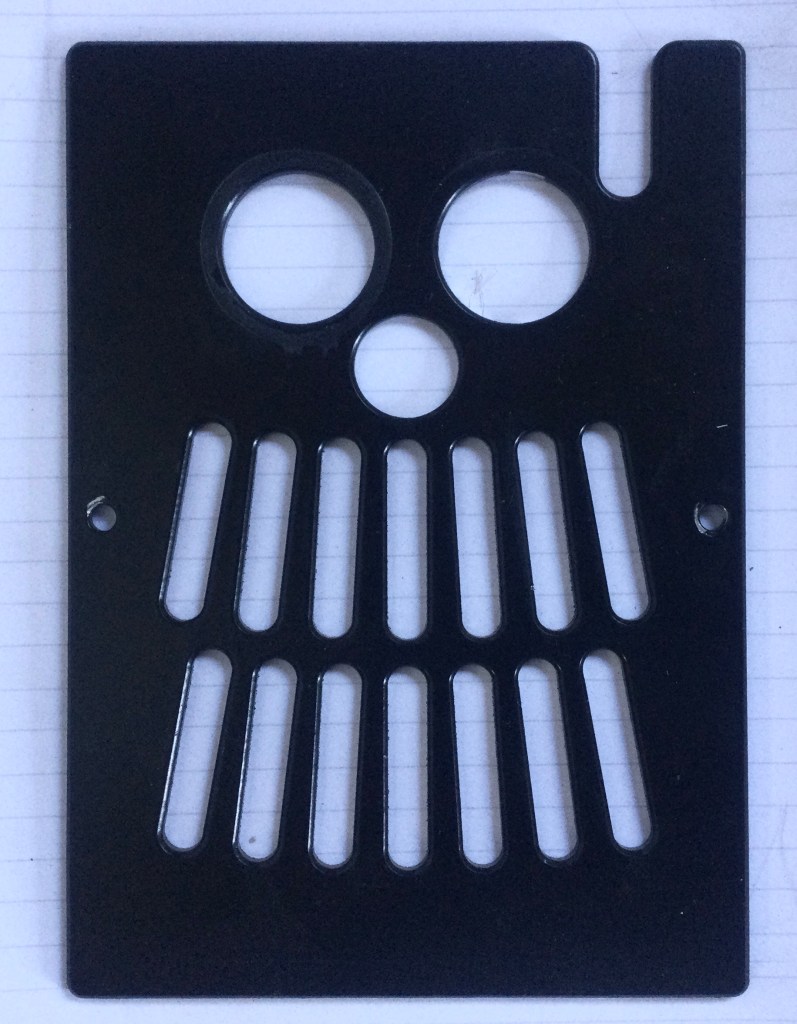
Next was the, perhaps more obscure, Austrian armament company line. To be fair Steyr , as in Steyr-Puch, had a hand in making the Syncro. You might notice lack of small hole for the switch to choose between USB and voltmeter, and the addition of screw holes that I used to mount a muffin fan behind to maybe help the “Vennelashun”.

Recently I’ve drawn inspiration from the Dieter Rams school and went minimal. You’ll notice the slightly wonky angles of the inserts… Herr Rams would not be pleased.

Ask me if I take myself seriously …
Vanagon – all wipers and washers stuck on
Hadn’t used wipers in months. Tried them last week and nothing. Funny… but had other fish to fry. Yesterday afternoon checked fuse and it was blown. Swapped in good fuse and when ignition on front and rear wipers turned on, and front and rear washers. Stalk wiggling did not fix. Pulled fuse.
Today I had a better look. Both wiper relays fine. Must be the switch. Steering wheel off and switch assembly pulled ( simple, just remove the electrical connectors and three screws. It’s pretty obvious).
Noticed that the contacts for the wiper wash function ( the pull or push in the stalk) were all together. There is a springy center contact that is moved by the stalk to select either front or rear wash function. Seems I had all on. I moved the stationary contacts back as much as they could move. They are held in place by plastic tabs moulded into assembly. The pic I took was after that. Pity I didn’t take a before pic. Near side contact not shown fully in pic, but same as the far side one
No idea how this happened. Hope it doesn’t happen again…

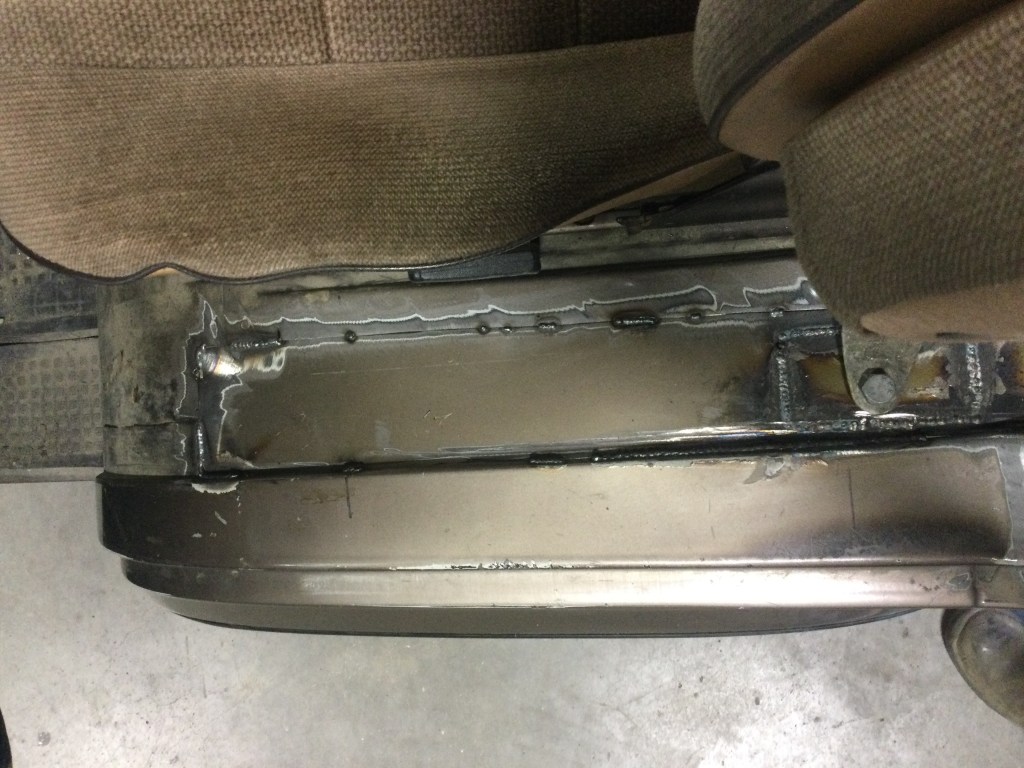
Vanagon – fix the nasty part two
It’s a hack job but I need it done stat so we can go camping in the backcountry. Have more grinding to do, and seal seams, and fill holes with filler…
I’m not proud but I just have to, as they say in the U.S of A , “Git ‘er done”

Vanagon – fix the nasty beginning
Body work is hard. But then again it’s quite satisfying. And especially if you’re not trying to be perfect. Today , well yesterday too, I cut out the rust and removed the temp patch I made about 8 years ago ( thinking it’d fix proper soon, but didnt).
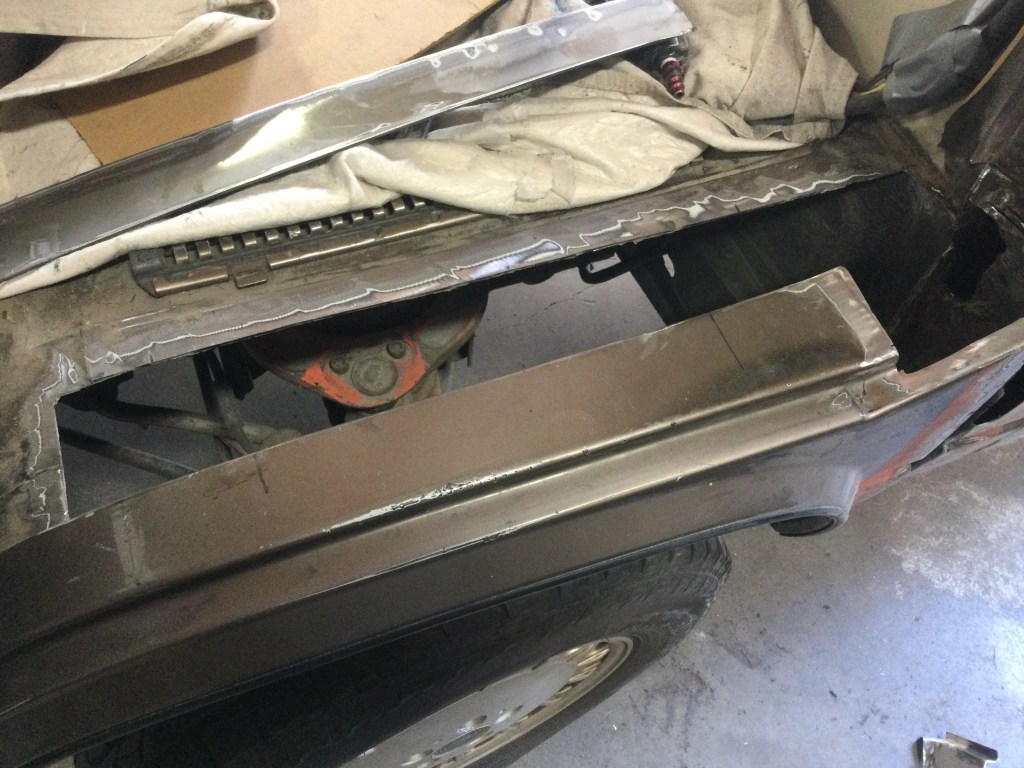
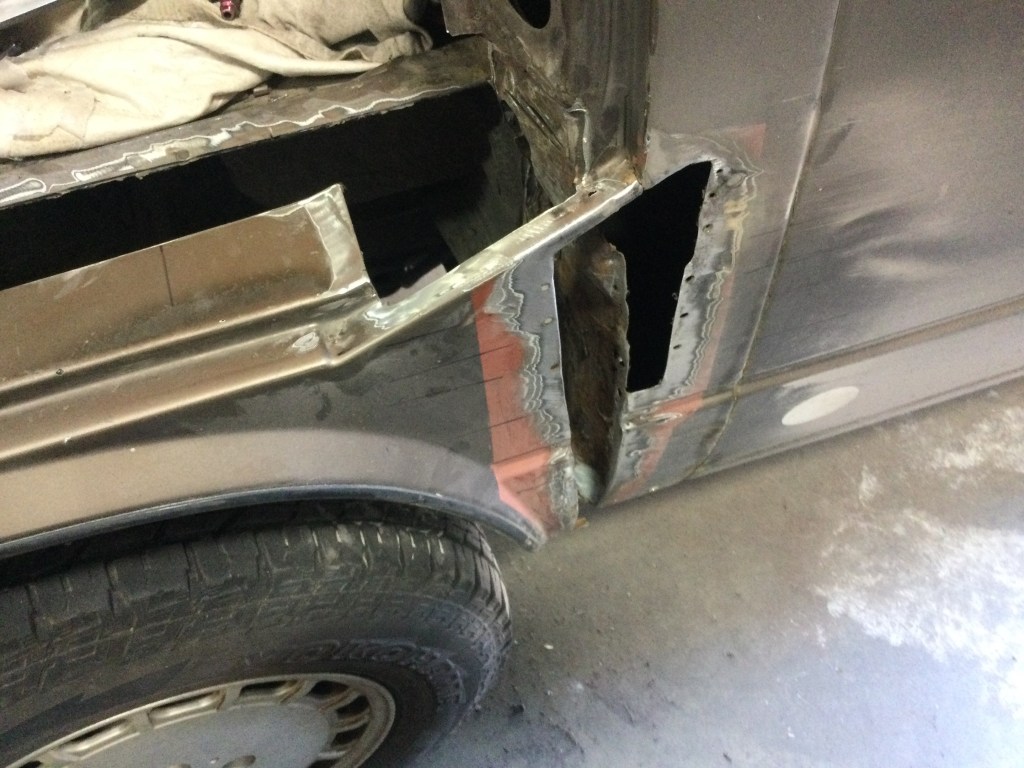
Today was cutting replacement metal, using the roof section I cut out years ago to make tin top into westy
Nice little Miller mig welder at work, 0.023 wire, in the hands of someone who knows what they are doing it’s a great machine. I’m having issues with my skill level. Good friend Donovan stepped in to tack the metal I had cut…
Btw, check out Donovan’s main gig here
Btw, the seat belt anchor point is reinforced on back. You can see my mig skills showing thru on that. Took the pic after seat in , as I was prepping to drive home. Not the best pic.
The side and corner still to be done . Lots of repair needed inside. Don’t get on my case, I know, I know . But I have a corner clip and a side clip , but the latter might not be used, I might want to make a feature on the side.

Steel is so dirty compared to my usual aluminum work. Tomorrow is another day, next chapter.
Vanagon – Dometic fridge fooling again
You have to know by now that if diddled with the fridge or as long as I’ve owned it. And this is an ‘82 vintage 182b , first installed in my old white 82 ( originally diesel ) westy. It’s been in the Syncro now for 11 years.
Last time I posted about fridge out and played with mods was back in 2017
Vanagon – a couple of minor fridge mods
Couple of things about what I did then, and subsequently changed… the bank of squirrel cage fans were replaced by two smallish muffin fans directly under the upper row of fins.
And I found the right stuff , thermal mastic, and re-did the fins to pipe and plate arrangement on the evaporator inside the fridge. Funny about the mastic. I asked at local rv store and they practically gave me their last tube for free. They have no need for the stuff anymore.


Anyway, fridge worked well after all that. I didn’t do any measurements like I did way back in 2010, but I’d guess I had same performance. A delta T of 22-23C below ambient is I think as good as you can do with these fridges in the van.
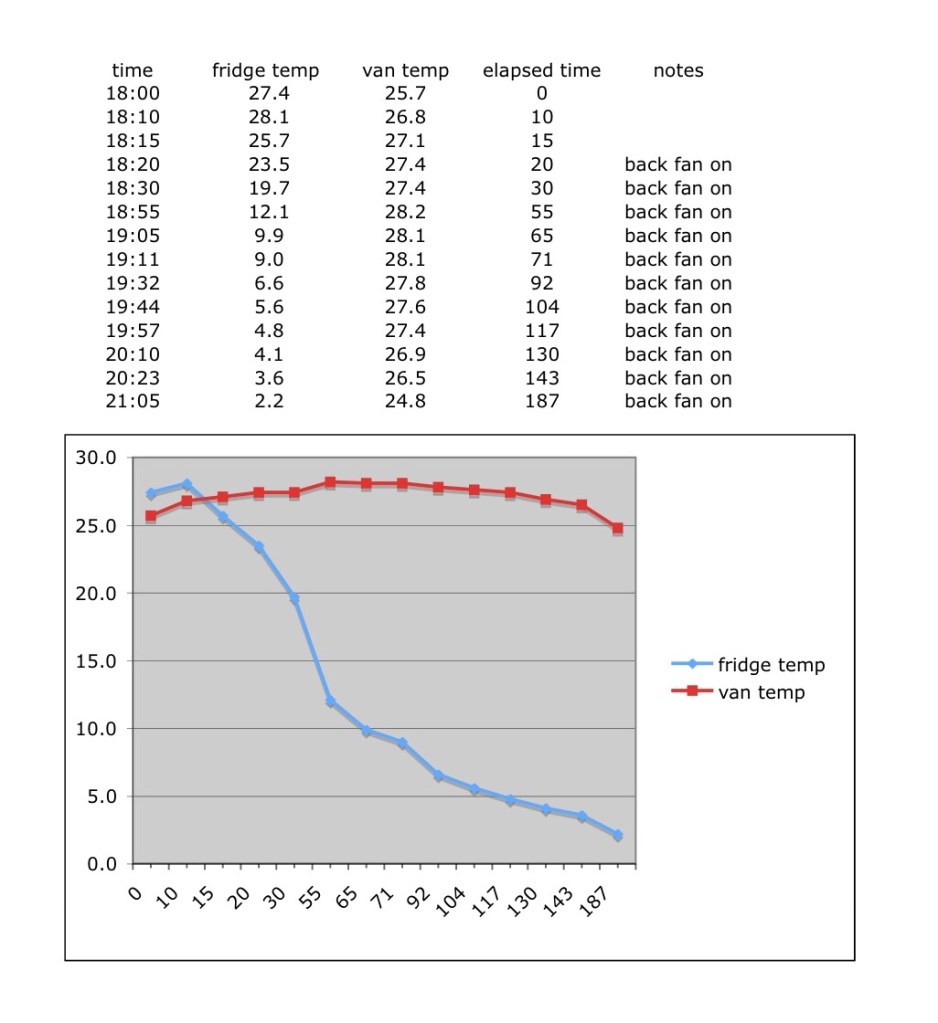
But last summer the fridge started to not perform as well. It would light fine, and cool, but not cool as much. So last week I pulled the fridge again.
Opened the combustion chamber, found more rusty dust then I’d expected, and I pulled the gas jet and found it fouled. Sorry, not a good pic but you can sort of see the dirt on the jet.


Ultrasonic cleaning for 15 minutes in that CRL ( calcium , rust, lime) stuff and it now looks like this.

Other things I did were:
Re lag the exhaust pipe ( I do think this lowers the behind the fridge temp

Installed a new thermo probe for a new fan controller. inkbird, replacing the no name previous one. I think it’s a nice mod to be able to adjust the temp that the behind the fridge fan(s) come on.
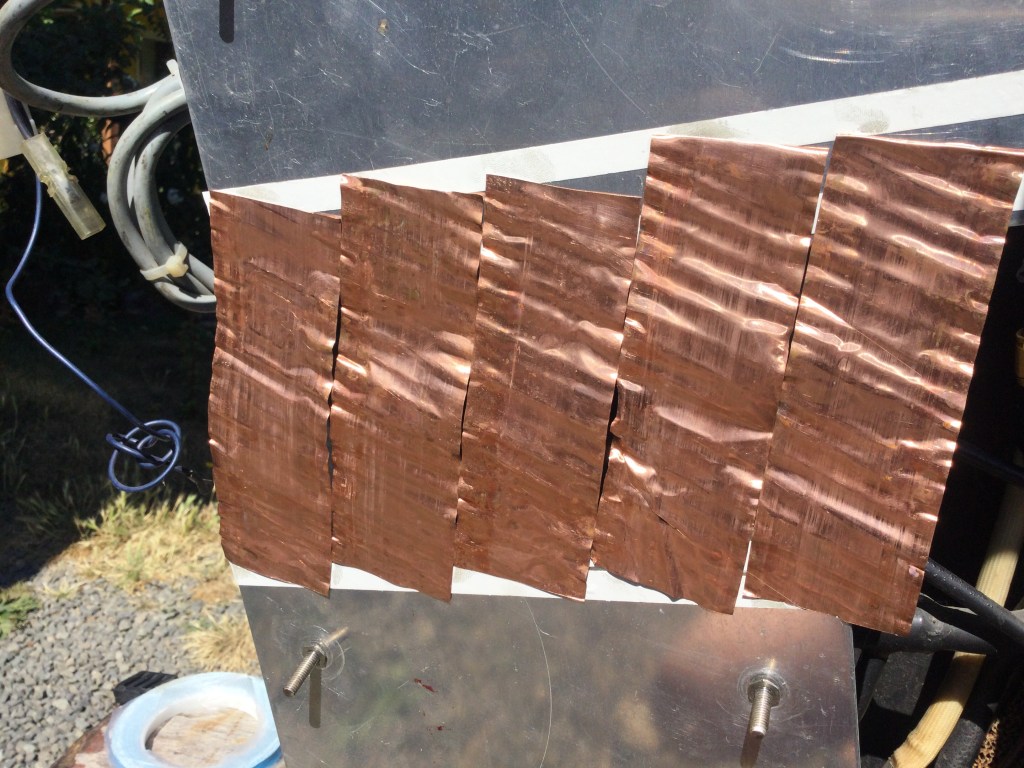
Added copper strips to bridge the gap between the two aluminum plates I added to the fins last time. My idea is to make a continuous shroud back there to better direct the air flow over fins. I used copper as I had a roll and the two banks of fins are on different planes from each other making a rigid panel bridging them difficult. Stuck them on with double sided tape ( supposedly thermal tape) then covered up with some sticky back foam reflective stuff.

And the results? Fridge lights easily and cools down as fast as it ever did. I’m really pleased by how fast its cooling. The behind the fridge fan noise I think is reduced, but never was loud to begin with. I can’t recall the cut in temp for the stock thermo switch , maybe 50-55C? I’ve been trying a lower set point, 38C. So far, at home tests with sun in side of van and ambient temp s of around 25-27C , the fin temp is staying around 39-42C with fans running.
Vanagon – home made muffler update
Posted by albell in vanagon, vanagon mods on August 20, 2021
I made a muffler eight years ago. Here’s a link to all the blog posts about construction then.
https://shufti.blog/?s=Muffler
Since then I’ve added a working cat, and new exhaust pipes. But I’ve also hit the muffler a few times on rocks and snow banks. Hit it enough that I cracked the weld at the tail pipe end of the muffler.
So when the engine was out recently I cut that end off and re-welded. Gave me a chance to look inside and see how the stainless steel swarf I used as muffler packing was doing. Was a little sooty, not much, a little discoloured by heat, but overall surprisingly good. Don’t know why I was expecting any different.
Gave the muffler a bit of a buff to take off dirt and shine it up a little. Also made new hangers. Same style as before but stainless pins to hold the band clamps instead of aluminum. It’s 3/8” aluminum, 1/2” diameter on the pressed in pins. Oh and new band clamps.


Sounds more or less the same as before. Yes, louder than stock.
Vanagon – wanna see something nasty?
I knew I had to get around to it someday, poked today, ugh. It reminds me of “Harry’s Garage” Lancia ( see his YouTube channel).
Heavy rubberized undercoating on the wheel wells is what I’m calling the culprit. And my years of neglect. But now the van is not daily driver it’s going to get some love.
Welding this Saturday

Vanagon – new fridge knobs installed
Posted by albell in vanagon, vanagon mods on August 18, 2021
Had to pull the fridge out a bit. Was it worth it? Meh…


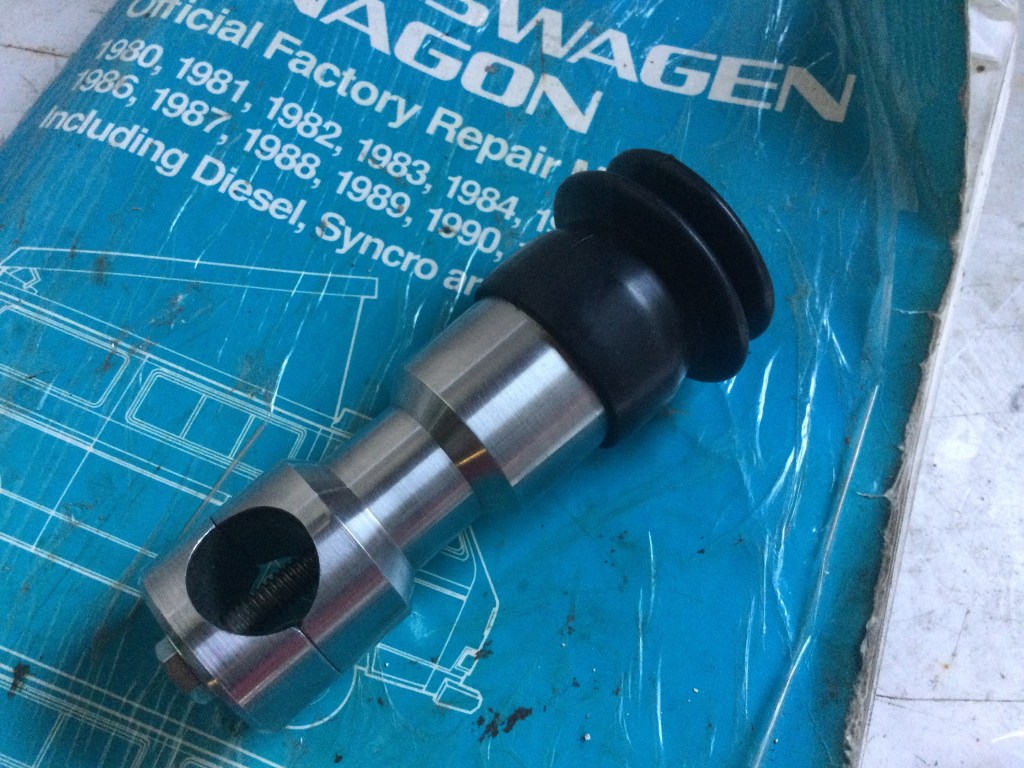
Vanagon – Dometic fridge knob repair
I need to adjust the stem lengths, but this is what I came up with

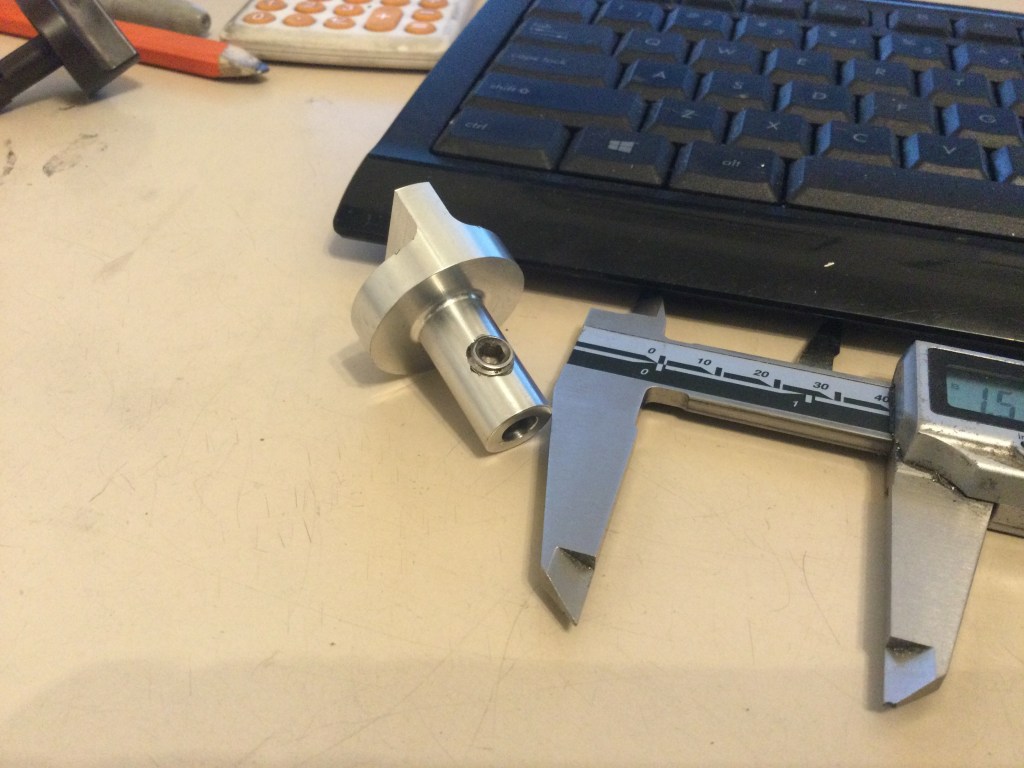
Second op – the part should be obvious now
Haas mini mill, coolant off for the shots, scallop tool path with 1/4” ball end mill. I like the pattern the scallop tool path makes, I think it works for this part.
Must be obvious now what part of the westy I’m trying to fix.
Corrected speeds/feeds
But still with unnecessary tool moves. Yes, it’s a Vanagon part. Only the first op on the lathe.
Wrong speeds/feeds
Programming mistake on the Haas TL-1 lathe. You’ll see what I’m up to in a bit…
Vanagon – replacing rusted rear spring perch
Posted by albell in syncro, vanagon, vanagon mods on August 14, 2021
Recently noticed the right side trailing arm spring perch was rusty, lifting from arm and the bump stop hanging on by a hair.
I think I showed the perches I made in recent post. Pretty well copy of stock except no flange on top of bump stop. Don’t know why I didn’t make flange.
But here are all the pics I have of the perches I made. Approx 1/8” steel, bump stop made from solid stock ( no right sized pipe handy) hollowed out a bit. Welded to plate on back side . Hdpe on top, with recess for spring pig tail. Those counter sink holes are a mistake, thought I’d screw plastic to the plate… no need .

Anyway… today I took van to work and got on with the rusty perch. It was ugly. Lifting at the rear. The plate is held to the arm by spot welds. So it’s common for rust to get between plate and arm. I thought I’d got all the spot welds with drill, but missed one. Chisel and hammer was the motivating force to lift the plate. Then power wire brush and flap disc.


I cleaned that mess up more. All the rust. Treated with rust converter. Ground down to metal around perimeter and clumsily welded on the plate. primed and painted. Notice the holes… why? I have no idea why I wanted plug welds in them. I tried but the rust preventative coating I put on… made welding not nice. So I stopped. Oh but before I welded the perch on I drilled and tapped the bump stop. Put a set screw in for now. I was worried I needed the flange that’s on the stock bump stop. The tapped hole makes it possible to screw on some facsimile if needed.

And plastic on , spring on, etc etc.


It all works but I’m not happy. Recently found out that the euro 16” Syncro had and angled aluminum spring perch, matched the spring angel better. I wish I had known this before. It would have given me more confidence to do what I had a notion to do. I need more courage. And I was considering a swivel spring perch. But no, I could have, but didn’t. Coward.
But it all works, good enough for now. But I’m not happy. Things can be made better.
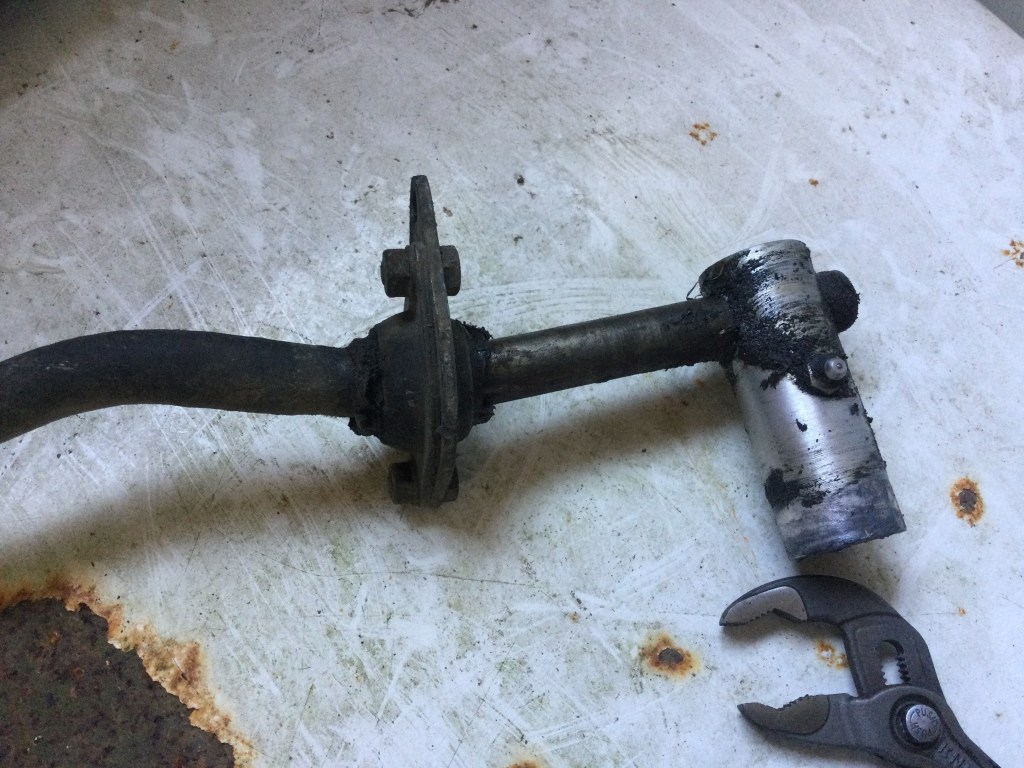
Vanagon Syncro – some shift linkage mods
Posted by albell in syncro, syncro specific repairs, vanagon on August 8, 2021
During the engine and trans out ordeal the last month or two, I added a couple of mods. One was a new shifter “cup”. The part that fits over the ball thingy attached to the selector shaft.
I had made a few different versions of this part over the years and was using a simple cylinder shaped aluminum one. Decided to swap in a stainless version I made some years ago. Also made aluminum version of roughly same design but I liked the stainless. You can tell which is which in this pic.

You see both are split bottom designs. Doing away with the stock method of a roll pin to attach to the shift rod. I think it’s better with the bolt. No slop at all. Here it is with boot on. The fit of the ball in the cup is close, not binding close, but close. Lubed with sylglide.
Here’s the old oily dirty simple version. oh and you can see the guide bushing in its bracket. And I had put in a zerk fitting on the cup.. why? for gods sake.
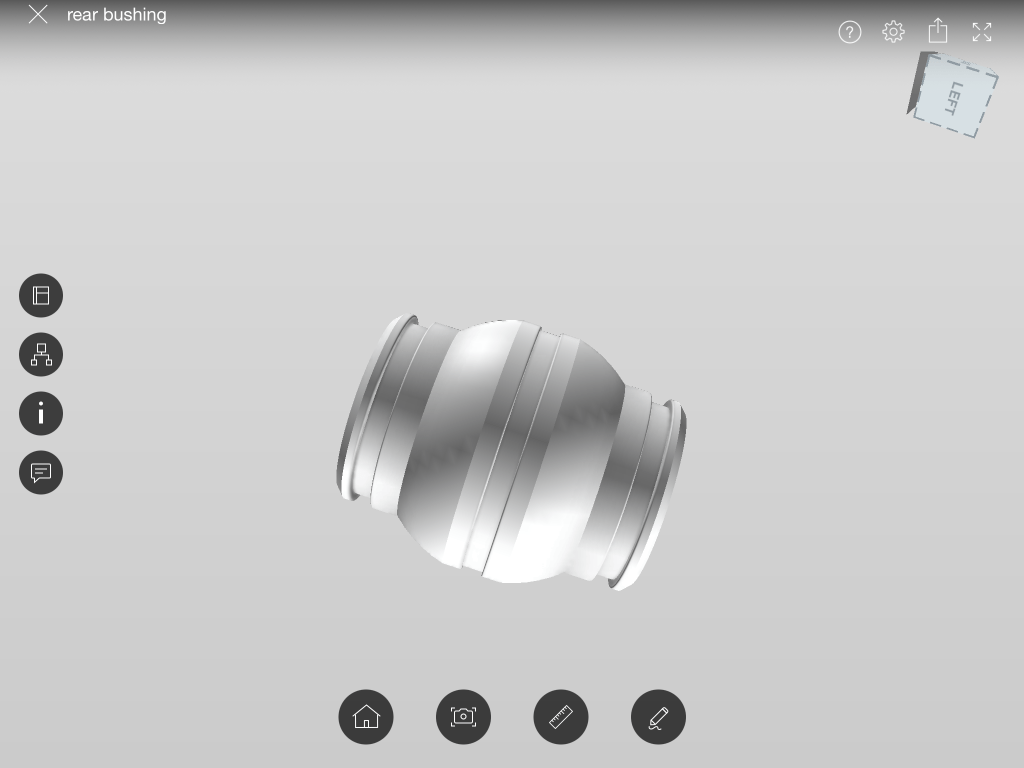
Another thing I did was make a new plastic bushing that guides the shift rod just infront of the above part. My Syncro did not come with the booted bushing found in later syncros or the ones with the “bad weather package”. Consequently the bushing gets hit by road spray and dirt and slush etc. You have to routinely clean and grease it. I’d like to have boots on it, but until then I made a Delrin bushing with a Teflon liner. I won’t grease it. To reduce the possibility of the Delrin transmitting more vibrations to the shift rod than the softer stock bushing, I added an o ring around the middle, located in a groove. The computer model shows the groove in a refined model. I added similar groove to the part after I took the pic. The grooves at each end are for boots if I can find suitable.
Yeah, always for me the first go round of making something brings up things I’ve overlooked.


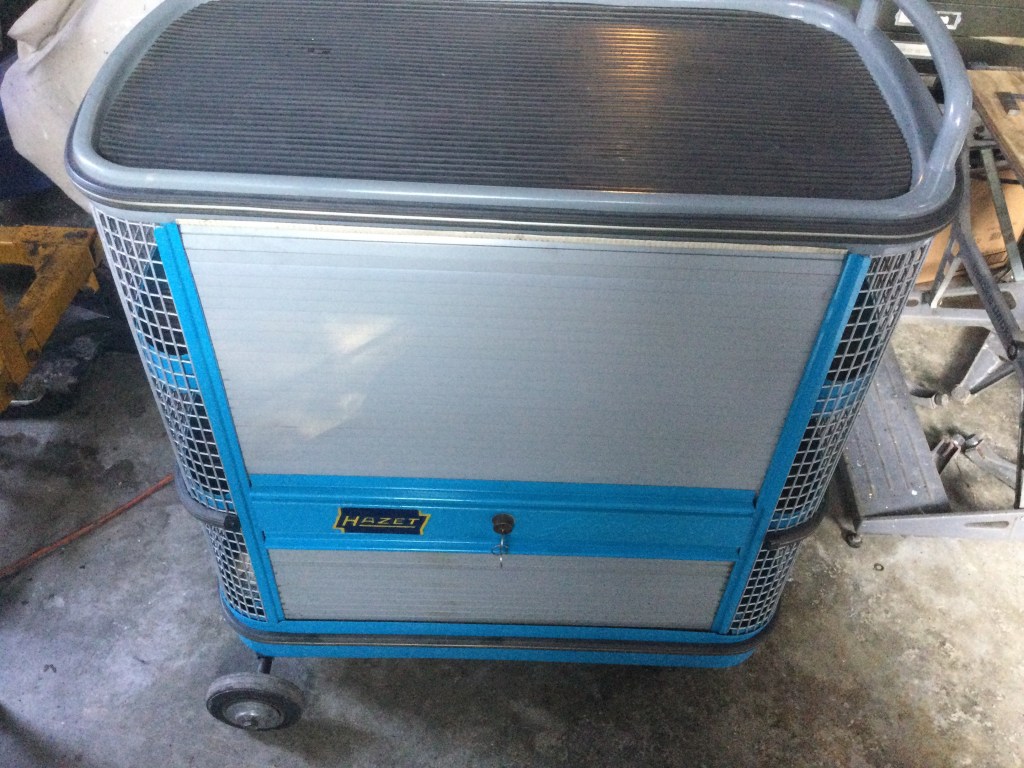
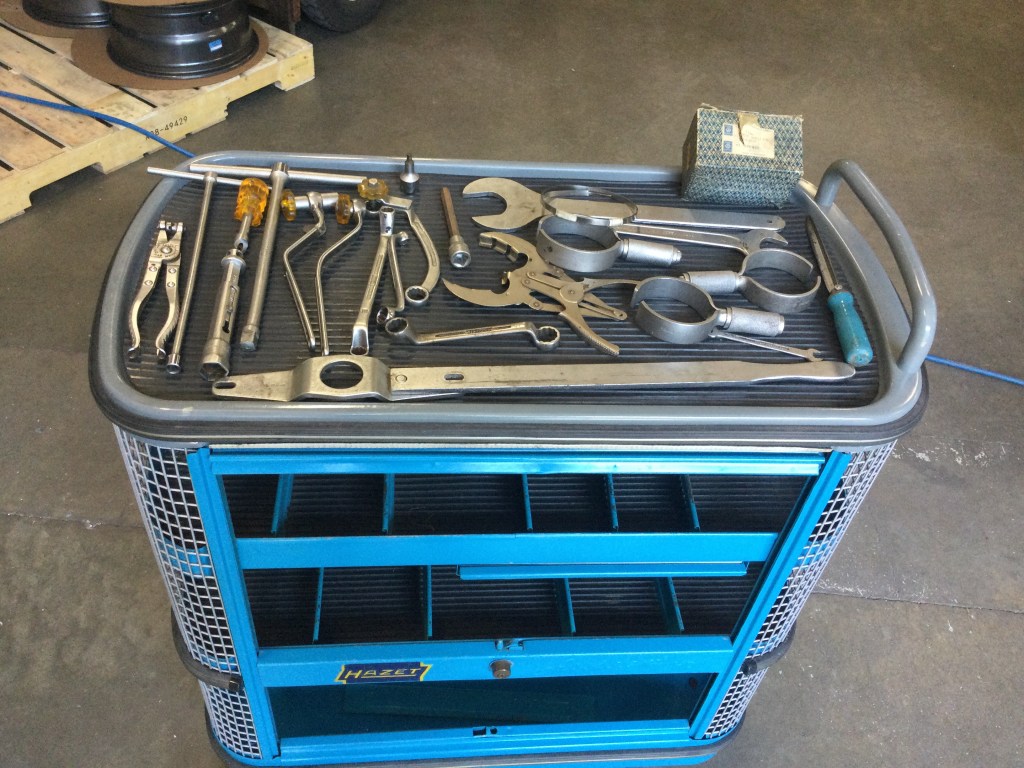
Hazet Assistent 172hd
A bit of a tool gloat, but it’s cool. I think it’s an early 70s model. Came with some VW specific Hazet tools.
I’ve wanted one of these carts for ages, but they are so expensive. This one was a good deal. Believe me, it’s very sturdy and rolls smoothly. Not saying other less expensive carts won’t do the job, but when you see one of these in person and try it out…
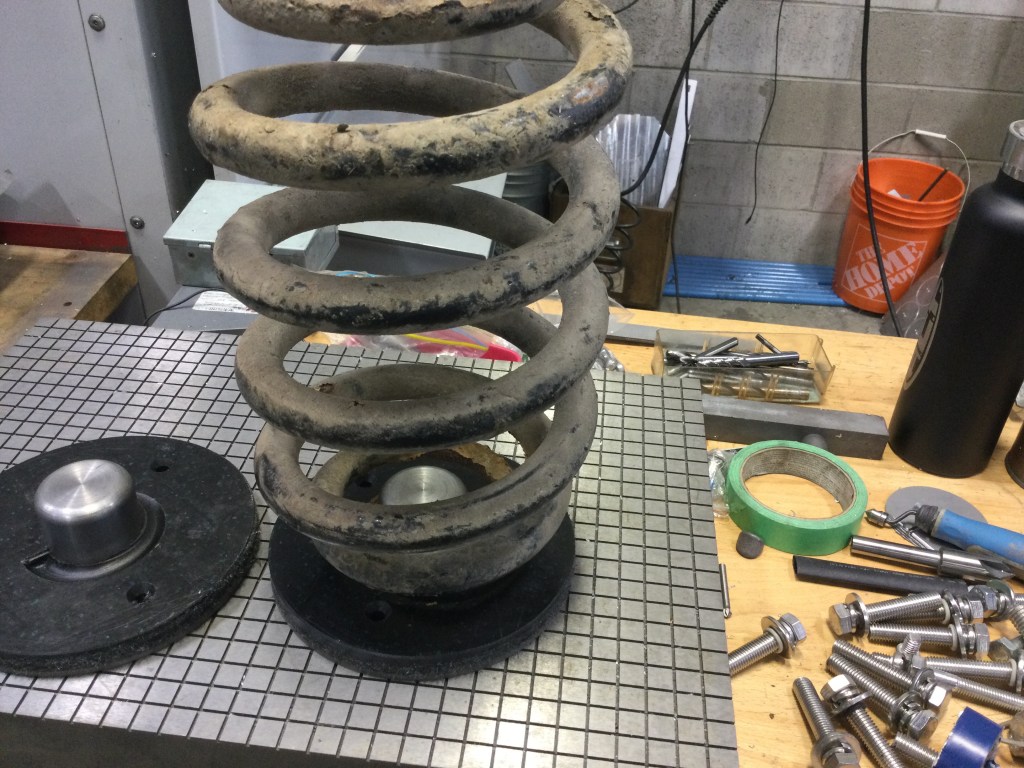
Vanagon – new rear spring perches
The van has been off the road last two months. Had to do some transmission leak sealing ( selector shaft seal) , clutch repair, and engine cooling line and exhaust work. Maybe I’ll post something on that business later. But while I was doing all that I noticed that my right rear spring perch was separating from trailing arm and the bump stop was also breaking off.
So I decided to make new ones. The steel part is water jet cut 1/8” mild steel, the bump stop was turned down 2” mystery steel ( I didn’t have any pipe or tube to suit. I did bore out the solid a bit though). Bump stop welded to plate on back side, recessed 1/6” in the hole for fusion weld ( no added filler). Yeah, I was a bit hot on the weld. I promise to try better next time.
The larger holes in the plate are for plug welds to trailing arm , if I choose to do that. The smaller holes are to be, or maybe not, tapped for M6 screws ( right thru trailing arm to). The screws to hold down the plastic part. I’m not sure if that really needed though.
Plastic part made from un virgin polyethylene left over from another job. This recycled poly machines poorly. Fuzzy cuts even with sharp cutters.
Made a recess for the spring pigtail. That seemed to work out ok ( 1/8” ball nosed endmill , scallop tool path).
Van is back on the road now so I’ll get the bad spring perch replaced and decide at the time if I’ll replace the other side too. Pics show old spare spring in test fit.
Here’s a pic of a model of the pad. I changed it slightly, slightly larger spring groove and led it further around