Archive for July, 2012
Garlic and shallots
The larger ones hung individually are the main crop (hard and soft necked). The bundled small bulbed ones are volunteers from another part of garden. The volunteers are nice tasting purple hard necks we planted years ago. Next season we will give some of them a better chance.
Some shallots hanging up there too.

Trip – Nitinat and Klanawa
A few days exploring the Klanawa river watershed, this general area – from Nitinat falls on the upper right, to Blue Lake on the lower left.
First night spent on Nitinat river, near the falls. It was raining on and off, plus their were other campers 300 metres downriver, we headed off next morning to find a better spot.

We had brought along the GoPro Hero 2 cam, and the only even close to worthwhile vid we shot was this less than exciting “vanagon in puddle” sequence on the road out of the campsite.
We headed northwest, over into the Klanawa watershed, and followed the river downstream. We stopped here and there, looking for a nice spot. An example of a side track – grey skies but it was mild and not raining.

My son trying “logging parkour”.

And at last we found a spot, secluded lake, not logged.


Nice big bear poop close by.

Next day was sunny.


And off we went again, further west, looking for a spot on the Klanawa river and no, we didn’t want to camp under the bridge. We did swing past the spot on the Tsucowis that we camped at 2 years ago, but it was occupied. We went part way around Darling main loop, and took one spur that led down through an old (1960’s?) logged area and found a skidder. I’m thinking that someone took it down there to salvage cedar logs for shake block cutting.


We didn’t find any nice spots, so back east to the bridge across Klanawa and then west again on south side of river. Finally found an OK spot west of Blue lake. Slash camping again, but a nice view.

Plenty signs of elk.


And bear, of course. Dogs are tired out.


As the sun went down, the marine cloud formed. That’s the west coast trail way down there in the cloud.

The moon was pretty, sky red with smoke from Russian and Alaskan fires?


The lads slept in the tent that night.

Nice sunny morning.

After breakfast we packed up and made a concerted effort to find a trail down to the Klanawa. Some false leads and a lot of bushwhacking later, we got there.


It was a lovely spot, virgin forest and clear water. At five pm we headed back to van, and then home. Van ran fine, but we were heavily loaded and the stock tintop syncro springs are not stiff enough for this sort of thing. Perhaps my old ’82 westy springs might be installed in the front and coil over shocks to help the rear?
Vanagon – syncro front spring removal without spring compressor
Posted by albell in syncro, syncro specific repairs, vanagon on July 19, 2012
The other day while replacing the upper control arm bushings on the van I wondered if the spring could be removed without using a spring compressor (Bentley shows compressor being used). I asked on the Yahoo syncro group and a couple of listmembers said it could be done, and they have done it. So today I had a go at it, and at the same time try out the spring spacer I made.
I have to warn you, while this procedure does not expose you to the same dangers as using a compressor , there are dangers to life and limb. That might sound like hyperbole but it isn’t. Please take care if you do what I am about to describe, take it slow, think, be cautious.
Also, what will be described was done on a van with stock springs and with a modest spring spacer. I do not think that it will work with longer springs or thick spacers.
Ok, on with the show. Van jacked up and supported by some solid 8X8 shorts, wheel off, sway bar drop link disconnected, radius rod/arm removed (inner adjusting nut not moved). The lower shock bolt loosened (22 mm socket).


Upper ball joint disconnected, those 2 socket cap bolts.


At this point I was not sure how this was all going to work, seemed like the spring perch would hit drive shaft.

Plastic cap removed from shock shaft end, 17 mm nut loosened but not removed.

Bottle jack supporting shock through hole in lower control arm.

Shock bolt was driven out easily.

And look at how clean that bolt is. I’m lucky, while I have some nasty rust on body, most if not all of the “mechanicals” are in great shape.

When the bolt was driven out and the bottle jack released, the lower control arm fell down. I did not expect this, of course in hindsight I should have.

The 17 mm nut was removed from top of shock and then shock and spring fell out.

Slight digression here, comparing the orange spring (2 white stripe code) from my ’82 diesel westy with the newly removed syncro spring. 20 mm difference between them. Confirms IG16 Wiki data.

And what do you know? The spring pads are different after all. Same part number (although writing this now I recall the syncro spring pad part number has an “A” suffix).
Shock fully extended with syncro spring.

Shock fully extended with orange spring. I would say a shock shaft extension would be need to use this spring in the syncro.

Side by side comparison.

I had to make some slight adjustment to the collar of my spring pad spacer to make it fit the syncro spring pad. Needed to reduce collar diameter a few millimetres

My T-handled tool in through access hole under seat to engage and guide shock shaft up through hole in shock tower.

The shock spring combo needed to be drawn inward to allow shock shaft to go up through hole in tower. I used a ratchet strap.

Here it comes, I’m using the bottle jack to push against the bottom of the shock. Lower shock bolt is installed.

You have to guide the shaft so that the step on the shaft does not get caught on edge of hole.

There you go, installed with spacer. You can see “shadow” line on spring pad that shows how much was in tower without the spacer. I did not re-attach sway bar or radius rod, but did put on wheel and drop van to ground. I bounced van as best I could and measured hub to fender distance. It looks like the spacer did the trick, now 19.25″ at front, 19.125″ at rear. Very preliminary measurement, probably will be a little different after driving.

So then I took it all apart again and removed spacer. I only have one spacer made, but the exercise was worthwhile – I can remove spring without a compressor and I refined my spacer to fit right.
And a bonus, I think I found my pesky squeak – it might be the bushing between sway bar drop link and the sway bar. I had made my own bushings from polyurethane skate board wheels, I greased them during this work and now squeak is gone.
Pat Bay at its best
Mike and Stu setting of in the old CL-11.


Vanagon – syncro front spring pad
Posted by albell in syncro, vanagon, vanagon mods on July 17, 2012
I think I mentioned in my post about upper control arm bushings that I was considering further tomfoolery with the front suspension. What I have in mind is a modest front ride height increase – 1″ at the most – to compensate for the weight that the camperisation added to the original tin top. Currently I have approx. 19″ from wheel centre to fender edge on the rear (one extra stock spacer above rear spring) and 18″ from wheel centre to fender at the front. You probably know all the approaches to ride height adjustment, and no doubt have your preferences. I’m going to have a go making some spring pad spacers, similar (but not identical to) what Futbus in the UK sells.
I discovered that the spring pad is the same for both 2WD and syncro, so I could make a spacer to fit the 2WD stuff I have on hand. Here is the spring pad, underside that fits onto end of spring. Yup, that orange paint is there again. BTW, the spring (from ’82 westy diesel) had 2 white paint marks in middle of coils. The closest match I have found is the 2 beige mark one listed on the IG16 Wiki page about springs here. Do you get the idea that I am tempted to try these spring out on my syncro despite the 20 mm or so longer length? I am, but I want to have springs side by side on bench to confirm length differences. IG16 chart says it’s 20 mm diff, and that would translate to a 33 mm ride height increase (all things equal, ie spring rate). That is a tad more than I am shooting for, but so close as to worth trying.
Oh BTW, “x” amount of lift at spring translates to approx. 1.66 “x” at wheel. Slightly different multiplier at rear. The IG16 Wiki explains more.

You can see how the spring fits into spacer and the remnants of the tape that holds spring to spacer during installation.

So back to the additional spacer idea. I had this doughnut shaped bit of aluminium, was going to make some other goofy thing out of it, but never did.

I wish it was thicker stock so that I could have had a longer collar.

As is, I made the spacer 16.75 mm thick, and the collar 8 mm. The stock was originally nominal 1″ thick. I made a little bit of an effort to radius the top corner to mimic the stock rubber pad.


And the rubber pad pushed onto the collar of the aluminium spacer. This pic could be a little confusing, there is an aluminium disc under the spacer, more salvaged scrap.

Whoa! There’s that orange spring.

Pad and spacer on spring.

I probably will use some adhesive between the pad and the spacer. Seeing as I am just trying to bring ride height back close to stock tin top specs, I don’t think I will need to extend the shock shaft at threaded end. More on this to come later.
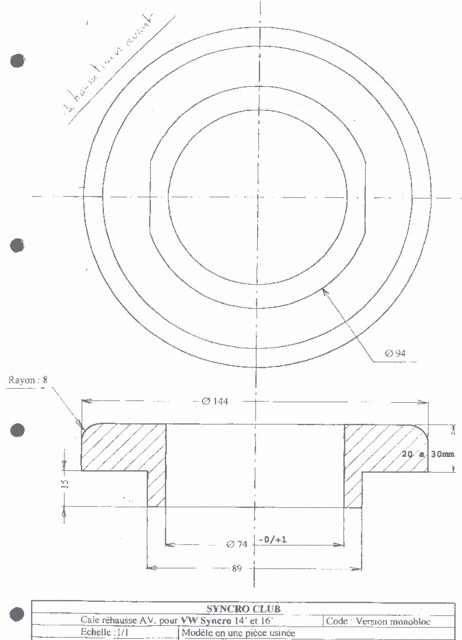
Addendum may 2017
Here is drawing I found in my files for Beau, pretty close to my estimates I mentioned in comments. Thickeness can be altered to suit of course. Don’t forget the multiplier effect of shim to effective lift.
Vanagon – syncro – VW tool 3141 substitute
Posted by albell in syncro, syncro specific repairs, vanagon on July 17, 2012
As I am planning on fiddling around with my syncro’s front springs and shocks I thought I might need a tool to guide the top of the shock back into position when re-installing. Bentley calls for VW tool 3141, the best pic I could find with a quick search is this Snap-On one. I had some 1/2″ diameter aluminium rod handy, and a M10 X 1.00 tap (same thread as used in pressure sender on engine, I needed one to make my sender relocation manifold). The lathe made making the tool easy, shaft is a press fit into handle and is pretty secure, but I probably still need to blob on a bit of weld on the joint.

End of shaft.

End of old 2WD front shock – it has the same thread.

Tool screwed onto end of shock.

I hope to be able to show you how it is used when I pull the front springs from the van, but I need to borrow a spring compressor before I get going with that.
Vanagon – syncro upper control arm bushing replacement
Posted by albell in syncro, syncro specific repairs, vanagon on July 15, 2012
So on our last trip I noticed a squeaking when suspension moved, noise coming from front driver’s side. I suspected upper control arm bushing so I set about replacing them on that side. It is a pretty straight forward job, and here are a couple of diagrams illustrating where the bushings are.


I jacked up and supported driver’s side front of van and removed wheel. When I detached the upper ball joint I could move the control arm by hand, and the squeak was there. 19 mm nut on one end of camber adjusting bolt, other end is 14 mm socket. Arm off and in the workshop.

Close up of one bushing.

Other side of bushing. There is a good chance these are originals.

Here is one of the new bushings. Vaico brand, I don’t know where they fall in the quality line up, but I got them in trade for some used vanagon parts. There is a great Samba thread on UCA bushings here.

I wondered if an O-ring would help keep any grease in.

Then I tried some silicone over the O-ring, a variation of what Tencentlife did in above mentioned Samba thread. I ended up removing the silicone and adding a second O-ring.

Now getting the old bushings out. I don’t have a press so I used a bit of aluminium tubing, a biggish socket, and an old 2WD control arm bolt, and a heavy hammer to drive the bushing out.


Look at that clutter. Workshop is in a real sorry state.

Old bushing out.

Bore of UCA where bushing fits. On the syncro it is a simple press fit, no spot weld needed.

Using a vice to press new bushing in.

Part way in. Ok, you’ve noticed that I painted the UCA. A very casual crap job and wasn’t needed (original paint still good), but I had a can of orange paint and I thought it might look cool. Overnight drying time was not enough, paint still soft, came off here and there. Perhaps I should lock up the paint.

A bit of pop can in UCA to keep a large socket in place while bushing driven home.


And the other bushing pressed in.

Out at the van, rear of support where bolt goes through and eccentric washer sits.

Front of support.

Rear eccentric washer in place. It was a fiddly job offering up the UCA into correct position and not have the washers fall out.

But in it went finally. Everything re-assembled. Guess what? I still have a squeak!

Next post will deal with camber adjustment and perhaps finding the squeak.
Vanagon – pop top hinge bolt replacement
Posted by albell in vanagon, vanagon mods on July 15, 2012
File this under “design elegance – fail”.
Quite a while ago I fooled around with homemade substitutes for the truss head bolts used on the pop top. The bolts which invariably end up rusting and staining the fibreglass. However I never did get around to replacing the hinge bolts, I had this notion that I was going to incorporate some sort of clever plate that would double as a roof rack mount. Well I never did do that and this morning I set about to make some simple washers. I used some aluminium round stock and some phillips head M6 X 1.00 stainless machine screws and produced clumsy, but effective, truss head substitutes. I suppose a good excuse is that I needed to make 8 of them and I really could not be bothered beveling the washers. Perhaps I still can make a roof rack mount and incorporate these clumsy things.
Important note: one has to be careful that the bolts/screws used are only long enough to just go through the 10 mm nut on the backside of the hinge. If too long, the bolts will hang up on the hinge when the pop top is lowered.


Trip – Camper Creek watershed
Just back from a couple of days exploring the area NW of Port Renfrew. My wife and I made a trip there back in May but bad weather limited how much exploration we did. This time it looked like our summer had finally arrived so we headed out there to see what was what. Turned out the gate on Grierson main was locked so we could not make it up to the nice view point we camped at back in May, so we headed west on Camper main and found a spot just on the southern edge of Walbran Provincial Park. Yup, another campsite on a logged off area – we joked about writing a book “Slash Camping on Southern Vancouver Island”.
But the view was magnificent, looking over the logged area of Camper Creek watershed, to the south and west the virgin forest of Pacific Rim National Park (West Coast Trail), and Juan de Fuca Strait and Washington to the far south. This panorama doesn’t show the park boundaries, but just to orient you, Port Renfrew is pretty well behind that dip on the left.

I’m not going to go on and on trying to defend our habit of camping on logging spurs, we’re just different, ok?

A bit of haze was coming in over the straits as the sun set.

Next morning, thick marine cloud had arrived.


We packed up and headed down the slope and further west, exploring spurs and dead ends. All the way to the Pacific Rim National Park boundary. On the way we found another logged view point. You almost can see our first night spot back up on the ridge to the left, middle of pic, narrow vertical grey logged area.

About 950 metres further west is the National Park boundary, it is logged right up to it.

I don’t know why I take pictures of giant stumps without some object in frame to give an idea of size, but I do. This cedar stump really is bigger than you think.

Had a look at Sandstone creek.


And then back up to to the previously scouted campsite.

It really wasn’t that bad. See the cloud still on the deck in the background?


The low cloud made the sunset quite spectacular.


The cloud started to form around us after the sun went down.

And in the morning, we got the cloud full on. Damp and chilly.

On our way back home, we stopped at a spot on the Gordon River, a few km upstream of the marina.

All in all a pretty good trip. No one got hurt, no van problems, no run ins with bears (plenty of bear poop around), and plenty of food and drink. What more can you ask for?
Addendum: some more pics from trip.
We often came across signs of cedar shake block cutting, folk salvaging something from left over wood. On this trip it was all Red Cedar, on our previous trip in the area we saw Yellow Cedar shake block cutting too.


Apart from locked gates (mostly to restrict access to active logging areas – protecting machinery), many roads are “decommissioned”. Can take the form of large ditches and gravel berms across road, or taking out bridges. The latter shown in this pic, and a tree across the road to stop folk before they go over the edge.

My quick and dirty levelling ramps worked fine.

One of our two dogs looking noble. We don’t usually have any problems with them and the local wildlife but they have chased off a bear on another trip.

And here he is, dog tired.

As I mentioned before, lots of bear poop around. I think the bears are feeding on Salmon Berries.

Another shot of the marine cloud and West Coast Trail boundary. Where I took the pic the temperature was in the mid to upper 20’s C. Next day when we were in the cloud it was around 14 C. We were sympathetic for the hikers on the trail, they probably had no idea it was so nice and warm 150 metres higher.

Not the biggest slugs in the world, but pretty big.

Some of the sandstone outcrops.

Sunny day brings out the TR6
Posted by albell in other cars on July 5, 2012
Still some around here, and even those silly black bumper bumpers don’t spoil a classic design.

Chrysler Royal Coupe
Posted by albell in other cars on July 5, 2012
Found at a family get together. I think it is a ’48, to tell you the truth I forgot to ask.
Vanagon – oil pressure sender relocation
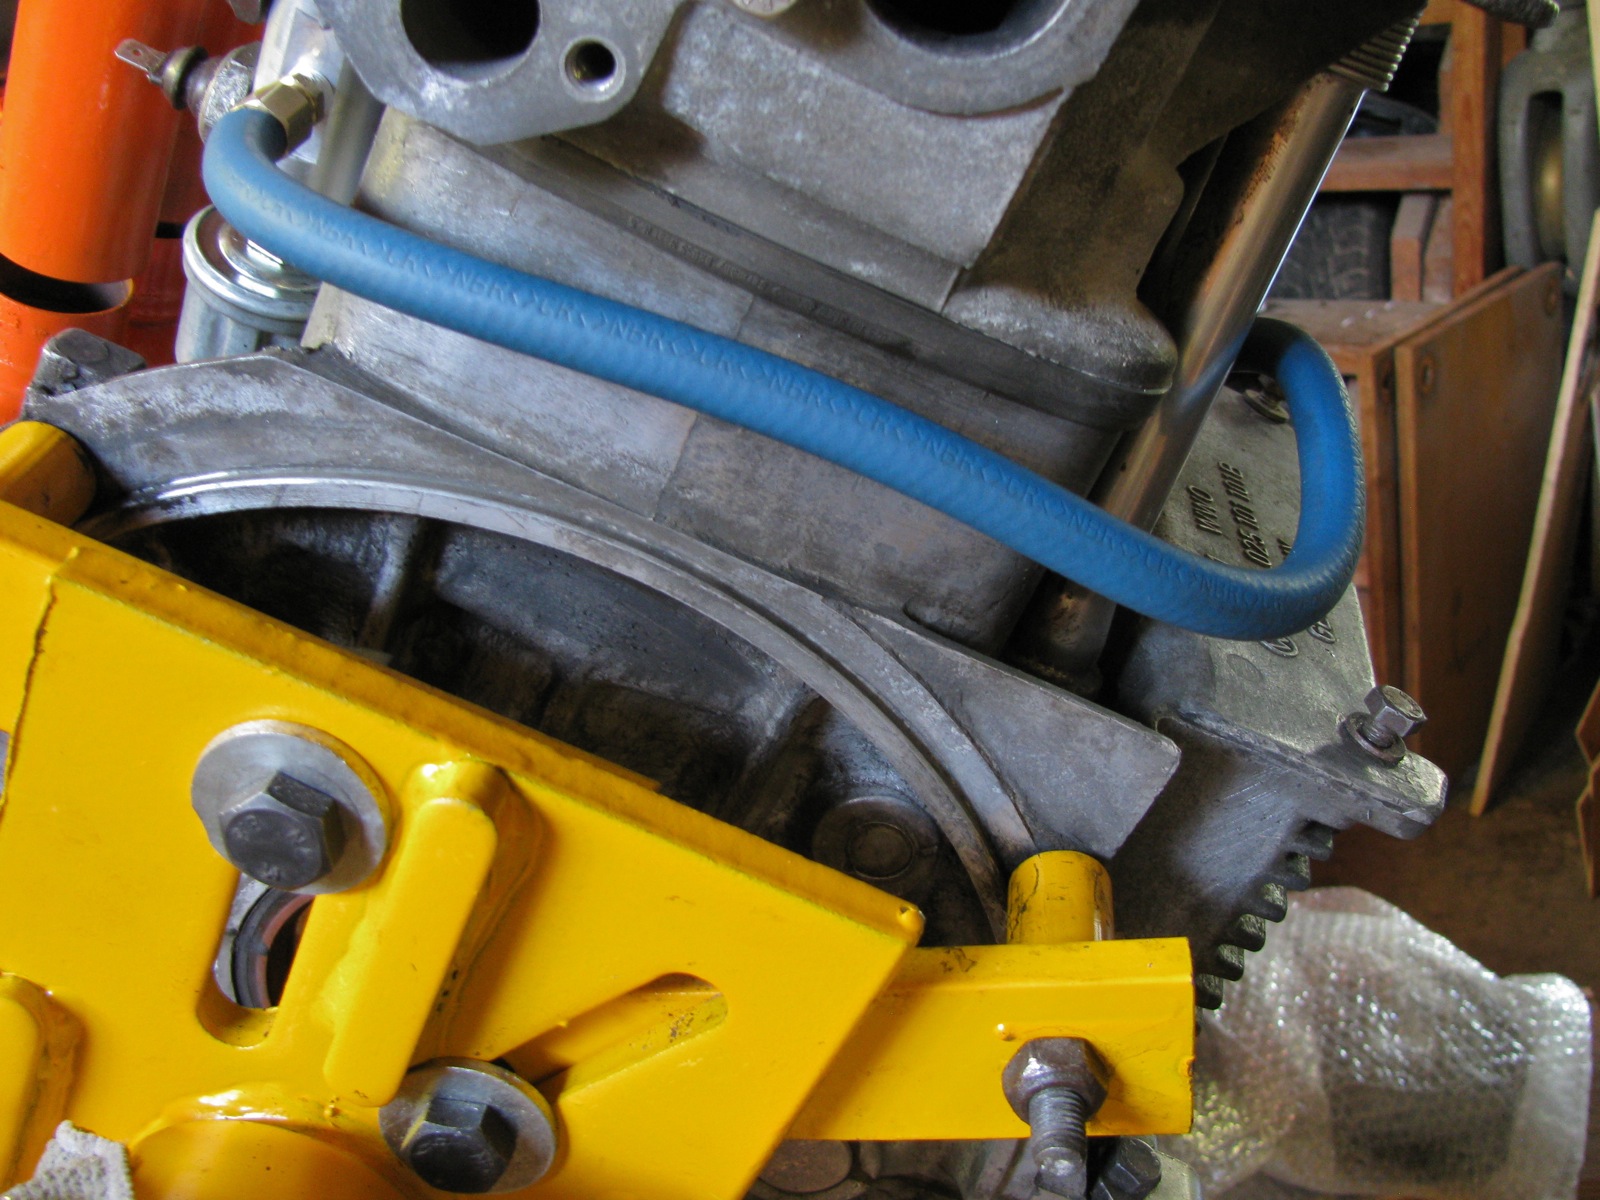
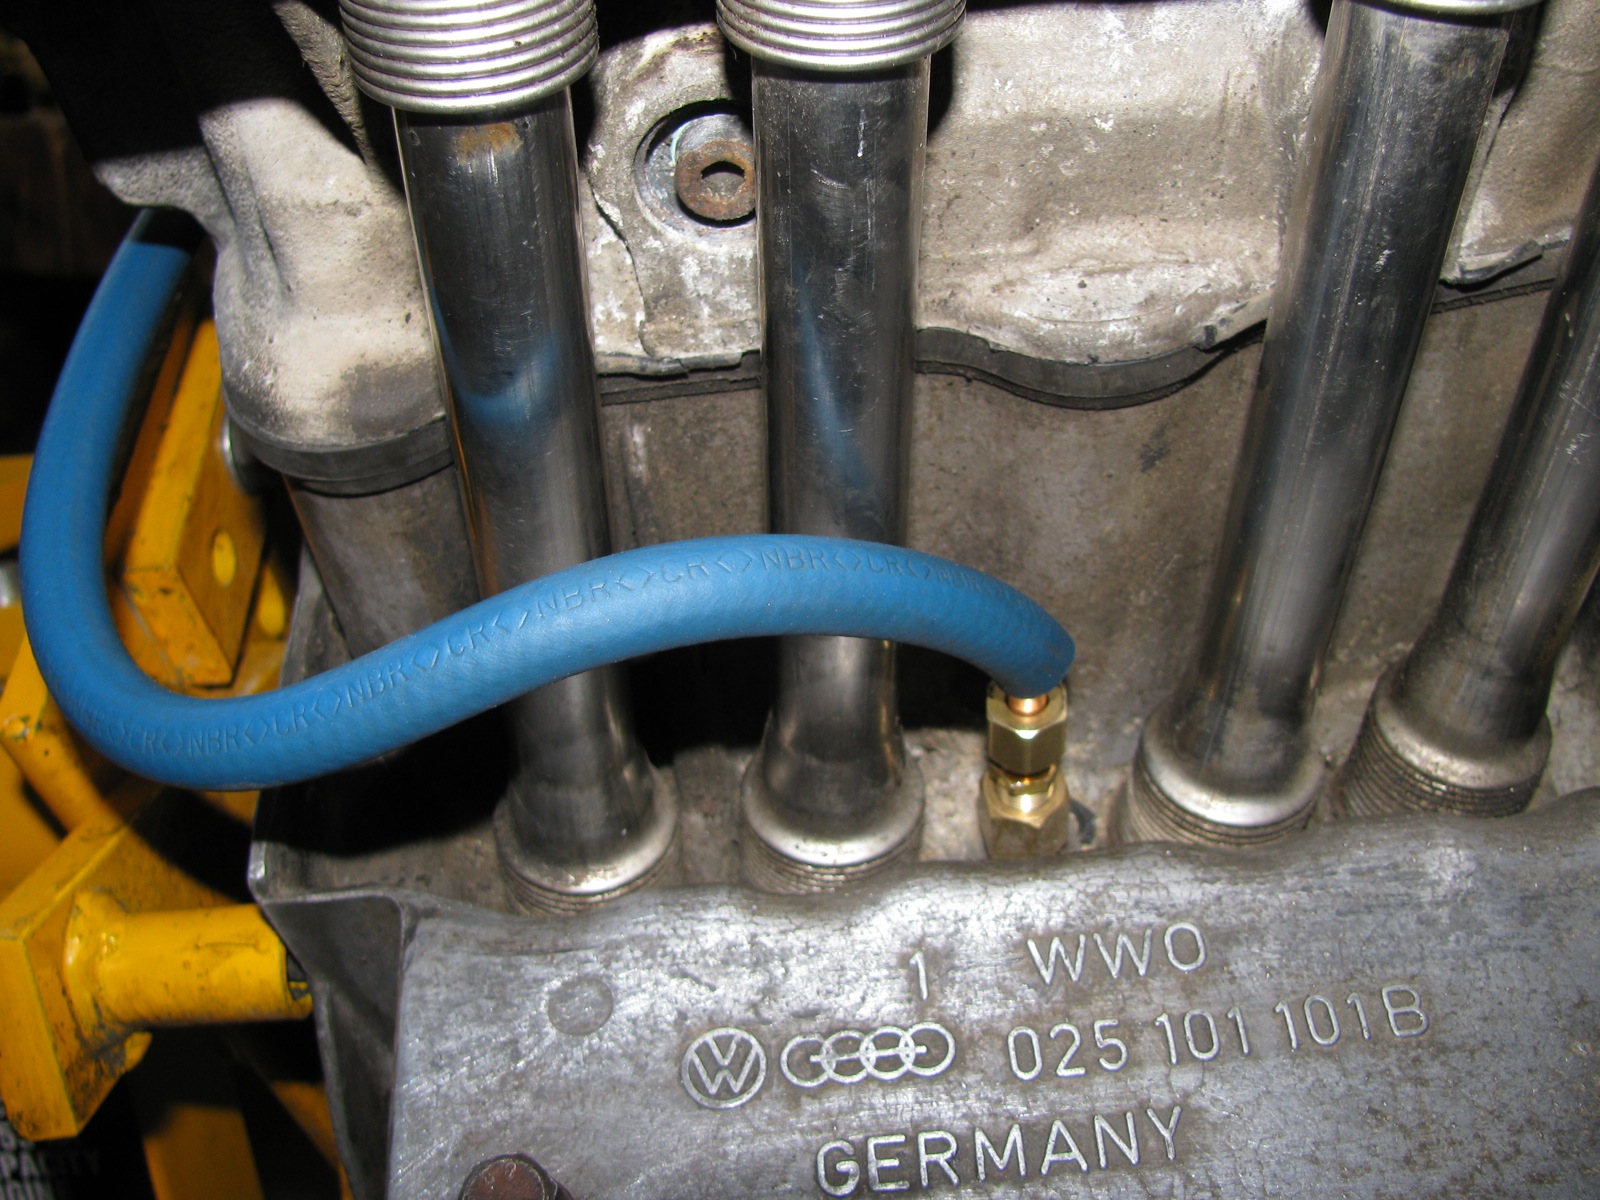
Posted by albell in vanagon, vanagon mods on July 5, 2012
Been fooling around with relocating the high and low oil pressure switches so that I could add an oil pressure gauge sender and an oil temperature sender. There are commercially available kits to do this, but once again as I am cheap and keen to use the lathe, I made my own version (heavily influenced/inspired by Tencentlife’s work, shown here). A bit of aluminium rod, machined some flats and tapped some holes, some 1/4″ soft copper, compression fittings and a bit of fuel line to cover the copper. I used my spare motor to mock up install, probably needs more tweaking in the line, and will perhaps have to make a hole/slot in the rocker shield. Relocating the rearmost (is it the low pressure or high pressure? Can’t recall – ok, low pressure sender on left side, between pushrod tubes, high pressure sender on rear, below and to right of oil filter mount boss) sender frees up that spot for a temp sender.