ATA – cemetery
Posted by albell in around the airport on February 17, 2011
Right next to where I take shots of VIH helicopters, the Kamov and Jet Rangers in recent post, there is a small graveyard, (google map ref). Its the Brethour family plot, a little info here, and here. Took some quick snaps, not very dramatic as the light was flat.
ATA – more VIH helicopters
Posted by albell in aircraft, around the airport on February 16, 2011
I’m not going to even try and identify what “Jet Ranger variant” those are. Kamov in the the background looking small. Active sky eh?

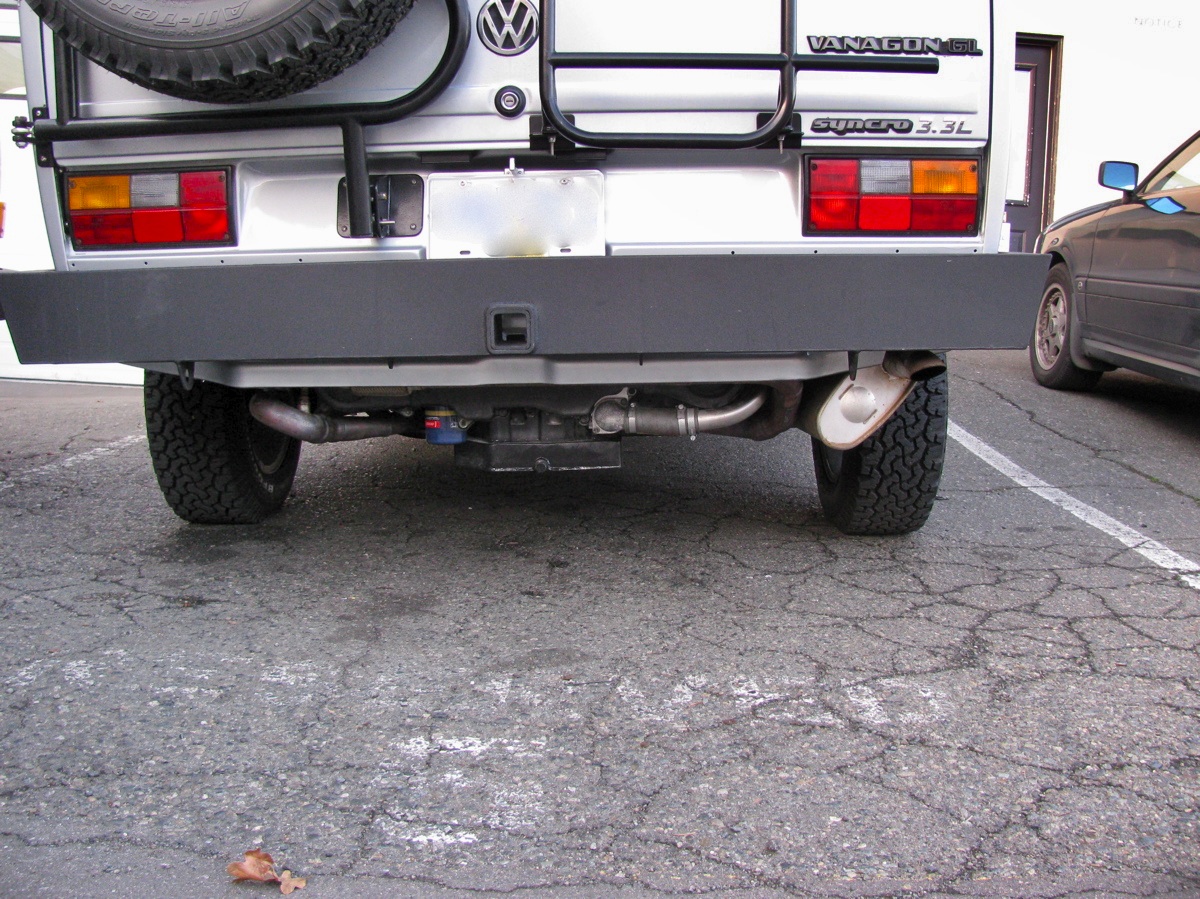
Vanagon syncro propshaft balanced – verdict
Posted by albell in syncro, syncro specific repairs on February 16, 2011
As I mentioned a couple of days ago, I had my prop shaft balanced and I finally have it installed. I drove about 10 km with the front diff. mounts loose to allow it to “settle in”. Today I tightened them down and I can report that the propshaft is pretty smooth. Of course your kind of hyper vigilant in this sort of situation, and I can feel a very very slight vibe at around 60-70 kph, a little like having deep lugged tires. I’m happy with the result.
Augusto Monaco
From Wikipedia:
“Augusto Camillo Pietro Monaco (March 15, 1903 – November 4, 1997) was an Italian engineer, best known for his racing cars from the early 1930s.[1]
He was born in Buenos Aires where he earned a degree in engineering before relocating to Turin in the early 1920s, where he made his automobile engineering contributions
- 1927 Monaco-Baudo with Antonio Baudo, a 1-cylinder 500 ccm side-valved engine[2]
- 1932 Nardi-Monaco with Enrico Nardi, a front-wheeled 1-cylinder JAP-engine (998 ccm, 65 bhp) nicknamed Chichibio, and winning several hillclimbs[3]
- 1935 Trossi-Monaco with Carlo Felice Trossi, a 16-cylinder (250 bhp, 3982 ccm) racecar, never winning anything due to an unsuitable 75/25 weight distribution.[4]
Since then he declined an offer to join Fiat, and among several engineering projects, was involved in developing synthetic diamonds, a swiss-patented invention (1948). He moved to Livorno in the early 1960s, where he worked on hydraulic systems until his retirement. He passed away in Livorno, 1997.”

More cowbell
Update: its the “White Triplex”, see Wikipedia entry.
That surely can’t be the petrol tank in the back there can it?

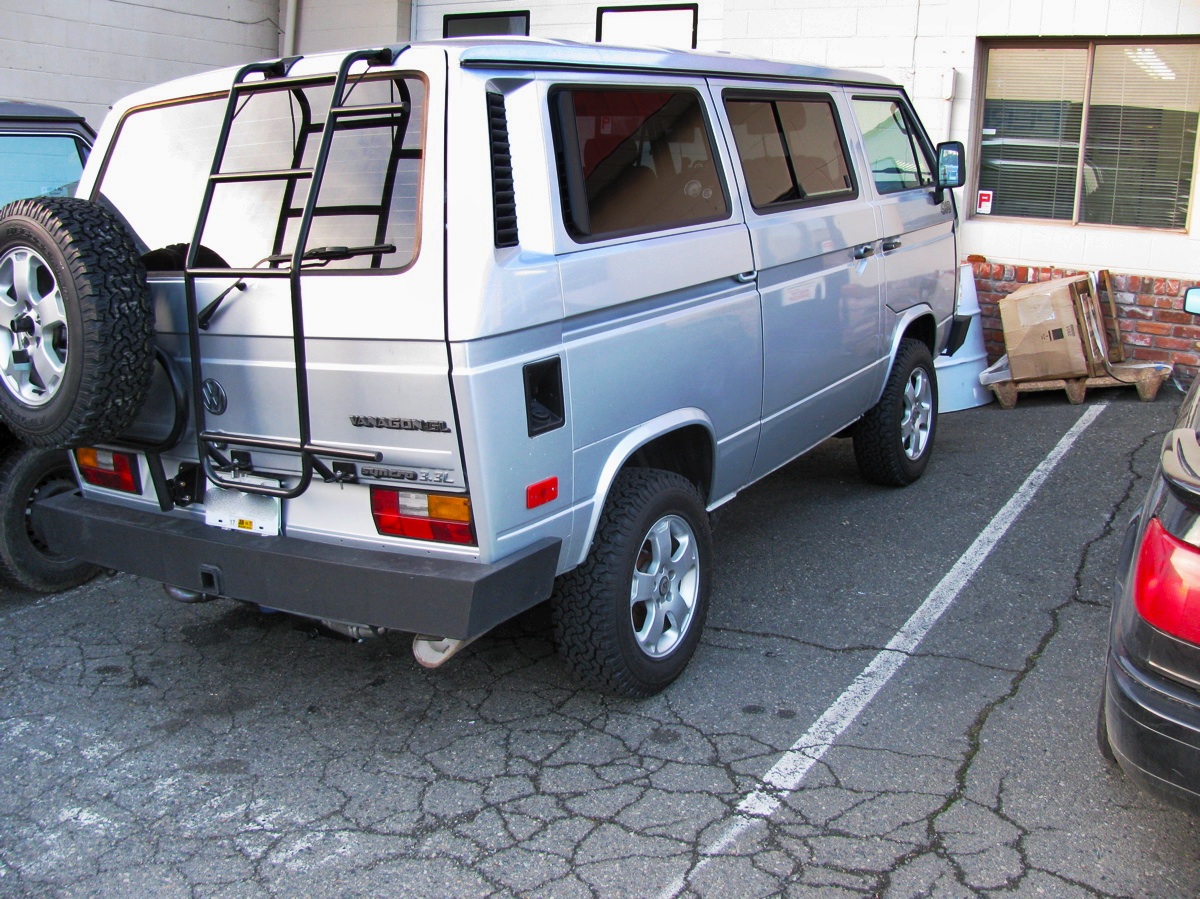
Vanagon heater hose insulation
Posted by albell in syncro, vanagon, vanagon mods on February 15, 2011
While I was under the van installing the newly balanced propshaft, (prelim. verdict is good, but I haven’t tightened up front diff. mounts yet. Letting things find their happy place), I wrapped the heater lines to the front heater with some pipe insulation. Why did I do both the feed and the return? Well to be honest, I didn’t know which was which. I still haven’t figured out the coolant path through the added hoses that the Webasto heater brings to the party.
The pics make it look like the hoses hang low, but they don’t. White cable ties are all I had. Who cares anyway, its under the fricken van!


Update, 13/05/2011. I’m not happy with the way the insulation is handling the abuse under the van. For one thing, the foam under the cable ties has compressed so that the ties needed tightening. Also the foam is ripped in places, from road debris. I need to find a tougher material to put down there.
Syncro propshaft balanced
Posted by albell in syncro, syncro specific repairs, vanagon on February 14, 2011
I finally had my propshaft professionally balanced by local driveline rebuilder/balancer. The tech took off the factory weights, welded on new ones (washers) and also took out a slight “hump” in the shaft. It was balanced to within 0.001″ run out at each end. I repainted the bare spots and I’ll install it today if the rain stops.


Porsche 917K plans
Amongst other things, look at the pedal placement, I think perhaps the 908 had them even further forward.

What’s the connection?
One of those tiresome quizzes… what’s the link between this picture of Duncan Hamilton/Tony Rolt driving Jag C type (#18) in the 1953 24 hrs le Mans and a Vanagon Syncro?
")
1965 Targa Florio
J. Arnott sent me the link to this video of the 1965 Targa Florio. For sure, a different era.
Doka Magnum Edition
You’ve probably seen these pictures elsewhere, but here they are again.
More info, from T3 wiki, thanks for the heads up Ooznak:
- „Magnum“ (DoKa) hat nichts mit dem Multivan „Magnum“ zu tun und wurde ausschließlich nach Schweden geliefert. Als besondere Merkmale hatte das Modell die Rechteck-Doppelscheinwerfer des Caravelle Carat mit der in Schweden vorgeschriebenen Scheinwerferreinigungsanlage und Stoffsitze mit Sitzheizung.
Google translated as:
“Magnum” (Doka) has nothing to do with the Multivan “Magnum” to do and was only delivered to Sweden. As special features of the model had the square twin headlights of the Caravelle Carat prescribed in Sweden with the headlight washers and heated seats with cloth seats”
Mmm, but the Doka in the slide show has round headlights…
H6 Subie powered Syncro
Seen in passing. Nice van, but I’m surprised at how low the oil pan appears.
Homemade pressure bleeder
Posted by albell in vanagon, vanagon mods on February 9, 2011
This is what I use to pressure bleed the hydraulics. A 4 litre Nalgene polyethylene bottle with a presta valve in shoulder and a bulkhead fitting in cap. Other end of tubing connects to bulkhead fitting attached to an old brake reservoir cap. The 4 litre bottle is pressurized to about 7 psi with bike pump. You do have to top up reservoir every so often when bleeding, but its not much of a chore. The 1 litre bottle collects the bled fluid.

Brake flex line – inside the old one
Posted by albell in syncro specific repairs, vanagon on February 9, 2011
I was advised that it was a good idea to replace the brake flex lines while at the same time I was replacing the calipers as the lines degrade over time. I don’t doubt that they do degrade, but my old line looks pretty good.

Reverse light switch replacement
Posted by albell in syncro specific repairs, vanagon on February 9, 2011
Back up lights wouldn’t come on, checked to see if I had power at the switch, yup, jumping the wires lit up the back up lights, so switch must be broken. The switch on the syncro is on the left hand side of the transmission, right beside a protrusion. Its an easy repair, 19 mm wrench, less than 5 min.


The old switch, the round end moves in and out:

New caliper for otherside
Posted by albell in syncro specific repairs, vanagon on February 9, 2011
Replaced the front right caliper too, and that side brake flex line. I ran out of daylight to replace the left side flex line, I’ll do it soon. Notice the anti-chafe areas seem to be not positioned right… they could not be moved on the line, but one at least is rubbing against the suspension upright and doing its job.


Replacing that buggered caliper
Posted by albell in syncro specific repairs, vanagon on February 5, 2011
I bought a rebuilt caliper to replace the one I buggered up the other day. Its a pretty straightforward install. The new caliper came with a bolt for a banjo type fitting for the brake line, but no worries, the flare connection fits properly in the threaded hole. There was one minor hang up, the new caliper slider hit the brake backing plate, see the front (left) part of the slider hitting the backing plate?

Another view:

So I cut of a bit of the backing plate:

And then it all went together fine and I pressure bled the brake:

Had a look at the other side, here is a shot of the broken nipple (soaking in a rust buster type fluid):

I wanted to bleed this side via the hydraulic line connection, but I couldn’t shift that union so I thought it wise (!) to soak the joint in rust buster and get back to it later. I got enough brake pedal with the rest of the system bled. Here is a shot of that same side and see how that caliper slider clears the backing plate:

Last thing was to bleed the clutch hydraulics. No air came out ( surprisingly I had clutch function before bleeding), but a fair bit of dirty fluid:


At the wreckers
Went to Malahat Auto Wreckers thinking they had a good condition caliper (they said so on their website), but no, they didn’t. I did get a couple of muffler hangers that were in good shape and an antenna (I tend to bend them when I go on old logging roads). Also picked up a delay dim interior for Brett – I’ll email you.
While there I took a couple of picks of some wrecked JDM imports. There are more of them than there are Vanagons. One Vanagon of note is a white 86/87 panel van. Black bumper still in decent shape.


MB Silver Arrow
The shape helps me forget the brake caliper fiasco.

Bleeding failure
After refurbishing the pedal assembly I had to bleed the brakes. The rears went ok, but I broke the bleeder nipples from both front calipers. I swear I didn’t wrench hard, was a short wrench and the buggers sheared of easily. Here is pic of the front right, stub of bleeder gnarled a bit as I had a go with vice grips.


I tried spiral type bolt extractor but no luck. I then started to drill, carefully, not full diameter which is 7 mm, and not full depth. I was worried about damaging threads and also the conical base of the hole that forms the seal with the conical point of the bleeder. I then hit it with lots of heat, hoping the shell of the bleeder would separate from the body. No such luck and I got more frustrated and drilled wider and deeper.


I ran a tap down the hole and managed to get some threads restored, but in the end I drilled out too deep and damaged the conical seat at the base of the hole and a new bleeder screw would not seal. Double bugger. Tomorrow I am off to the local wreckers to get a couple of used calipers. What a pain.
Vanagon dash removal, pedal assembly repair, and heater core flush
Posted by albell in syncro, syncro specific repairs, vanagon on February 1, 2011
I’m just about finished with this project. I decided to pull the dash and have a look at both the heater core (I didn’t have as much front heat as I thought I should have) and to fix a squeaky clutch pedal. Removing the dash has been covered elsewhere, a good reference is on Ben’s Place website. Once the dash is out, the heater box can be removed (clamp off coolant lines). One tool that makes this possible is a phillips bit socket on a long extension. Some of the screws holding the heater box to the van can be rusted in tight, so take care. The heater box is then split along the seam, there are spring clips to remove first (and welded plastic tabs if box has not been split before). Then the heater core comes out and I cleaned it inside an out with a hydrofluoric acid based aluminium cleaner. I diluted the cleaner, it was a pretty strong stock solution. Flushing with the cleaner produced a lot of black sediment, I’m hoping that getting rid of that stuff will improve the heater’s performance.
Dash off and heater box out:

Core before cleaning:

The other side:

And a shot of one side after cleaning and installed in box:

Also took the opportunity to squirt some oil on one end of the heater fan. It did feel easier to spin after even this casual oiling:

With the dash off its relatively easy to pull the pedal assembly out (after draining brake fluid etc). I have a spare assembly that I rebuilt and talked about in this post, but I decided rather than swap over the units I would rebuild this one. As in the other one, this assembly had a worn hole in clutch pedal and worn clevis pin.

But also, the clutch rod was bent. Wonder how that happened? Maybe previous owner had replaced clutch master cylinder and didn’t insert pin correctly and the first time pedal was depressed it bent the rod before it popped into place?

I took the chance and straightened it out, then I enlarged the hole in the clutch pedal and clevis to make it round rather than oval, and turned a new, oversized, (and roughly finished) pin.

Cleaned everything up, greased, and reassembled.

The pedal feels a whole lot better. Now the chore of putting it all back into the van. Nothing special to report here except to note that it is easier to reattach the clutch line to the clutch master cylinder if the mc is disconnected from the pedal bracket. Oh, and a heat gun is needed to soften the plastic vacuum line to the brake booster to get it off, and to put it back on. The dash is back in place and tomorrow I’ll be reconnecting the electrics and flushing the hydraulics.
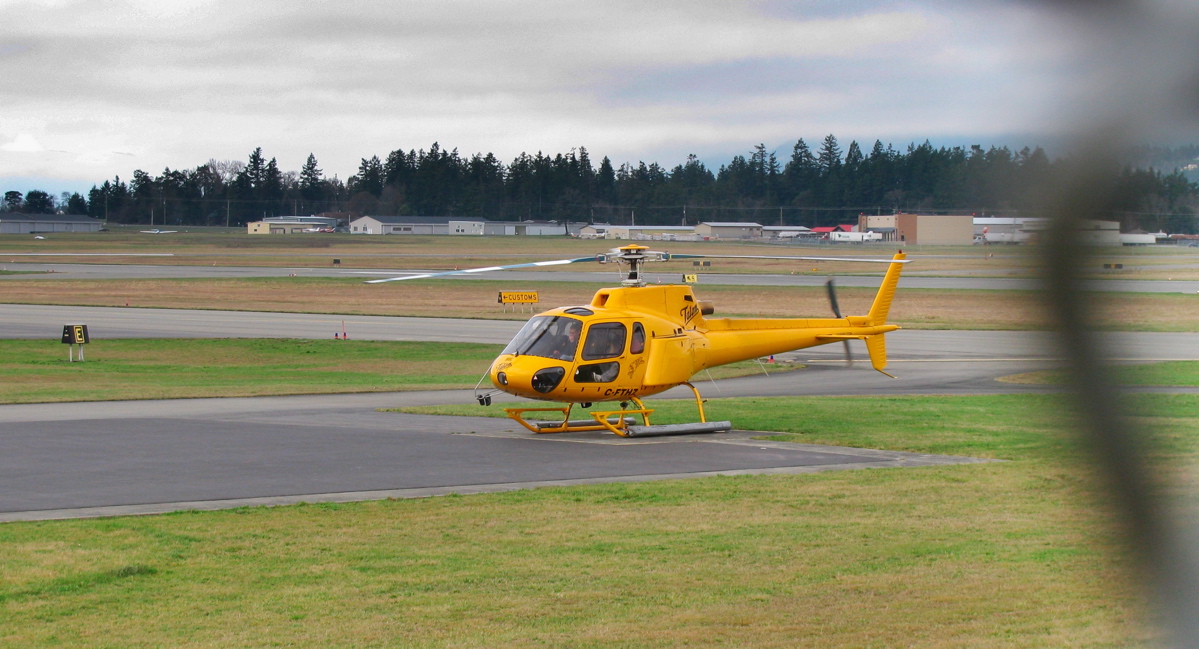
ATA – Eurocopter AS-350
Posted by albell in aircraft, around the airport on January 28, 2011
After my confusion last week identifying the Alphajet, I’m a bit hesitant with this one… Eurocopter AS-350, right? Not the twin engined AS-355. Its a pretty lame picture in any event, sorry.
Vanagon window regulator repair
The window on the driver’s side door on my ’86 Syncro came adrift from the winder mechanism yesterday. I wasn’t really surprised, it had been a bit wonky ever since I got the van. Today I took the door panel off and set about repairing the window. I didn’t take pics of the disassembly, but I took a couple of pics of reassembly to make up.
First, a diagram of the scene:

The regulator comes out with a bit of a struggle, but once out I took it to the bench where it was obvious why the window mechanism had failed. The picture shows the broken part (on the left, parts placed together), plus a couple of spares from my ’82 van. Notice that this piece (as is the winder assembly) is “handed”, ie different for each side.

The replacement part, with plastic guides in place:

Another problem was a missing plastic guide that sits in that rectangular hole in the above part. The plastic bit is fixed to the moving part of the winder mechanism. So I set about getting a guide from my spare assembly:

Maybe that metal part just twists off?:

Oops, I guess not:

But at least I have the plastic guide. Breaking the assembly showed that it is held together by 2 tabs on the “winding screw” projecting through the metal part, trapping the the plastic guide, and the tabs are peened over to secure. So he I go taking the same part off the regulator that I want to repair:

Tabs pressed together:

And the part freed:

Start of reassembly:

On and tabs spread:

The final result:


I guess I should mention that I cleaned the entire assembly and re-lubricated with grease. Now back out the van to re-install. I used a spring clamp to keep the window glass up and out of the way. Here is the assembly clamped on the face of the door to show the orientation:

Wiggling and tilting etc, it goes in:


That vertical track is secured at the top, and at the bottom on bottom edge of door:

The plastic guide tube (which contains the “winding screw” when the window is wound down, is curved and secured by metal tab on door:

Bolting glass carrier to regulator. Don’t tighten bolts up until you wind window up and down a couple of times. Note the hole at top of door that allows access to forward bolt:


There is a little felt pad glued to the outer door skin, I suppose its to eliminate the window rattling at some part of its travel. I glued it back on with double sided tape:

The window winder now works. It was a bit squeaky so I added some more lubrication by squirting some oil down that plastic extension tube. I think the “winding screw” may be worn in parts as the window does not lower smoothly at part, its sort of herky jerky. I’ll look into that some other time.
BAE Hawk or Alphajet?
Posted by albell in aircraft, around the airport on January 21, 2011
What did I see the other day? Was it a pair of Hawks from CFB Cold Lake or were they Alpha Jets from Top Aces Incorporated?
Close up of what I saw:

Again:

And parked:

Wikipedia sourced image for the Hawk:

And Wikipedia sourced mage for the Alphjet:

They were Alphajets.
Here is a pic of Top Aces Incorporated Alphajets

More old tool info
Posted by albell in vanagon, vanagon tech papers on January 21, 2011
Some more vintage stuff.

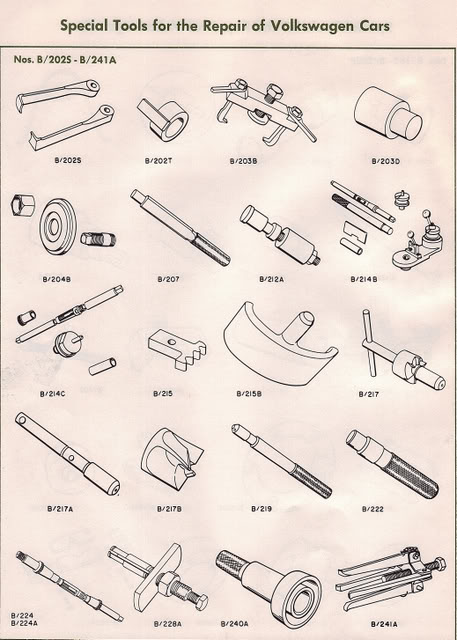
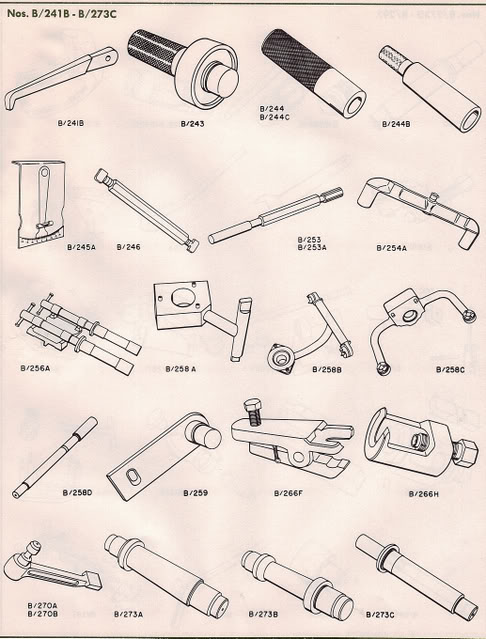
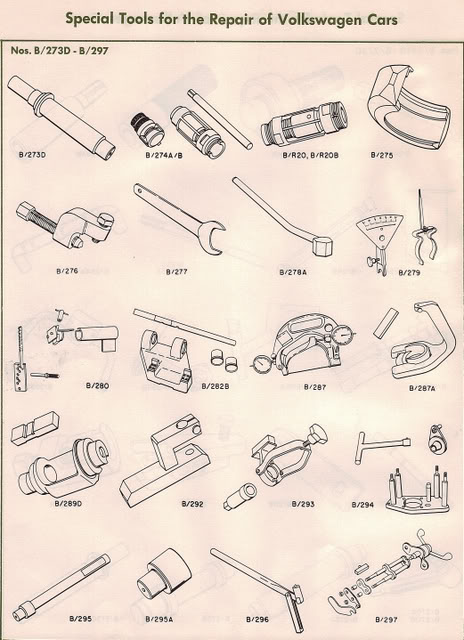

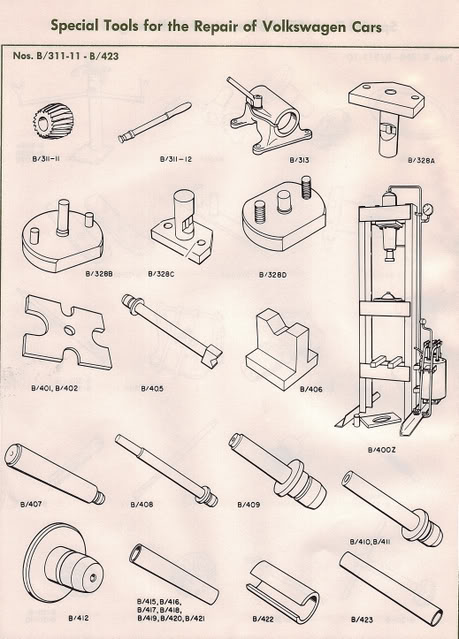
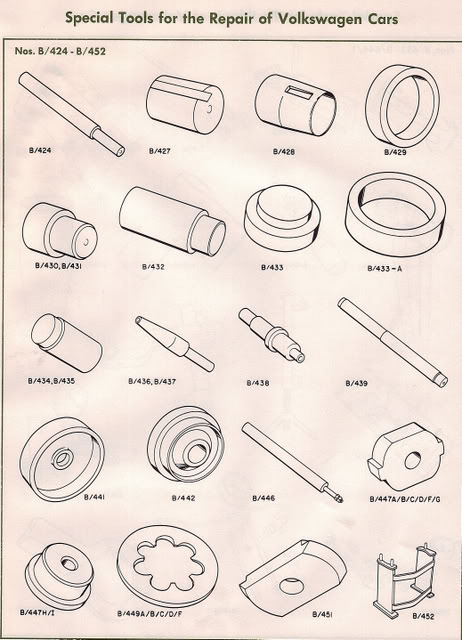


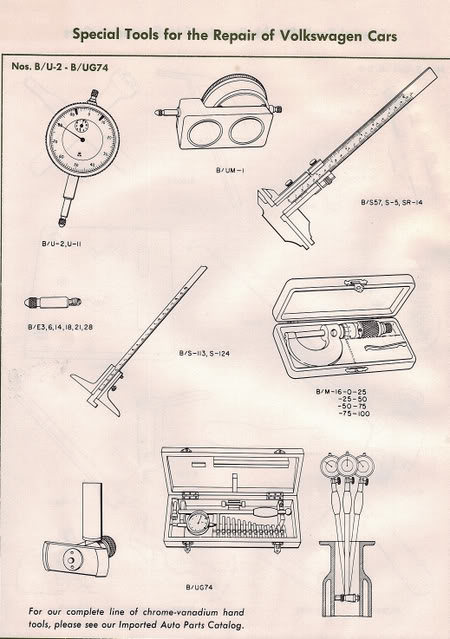
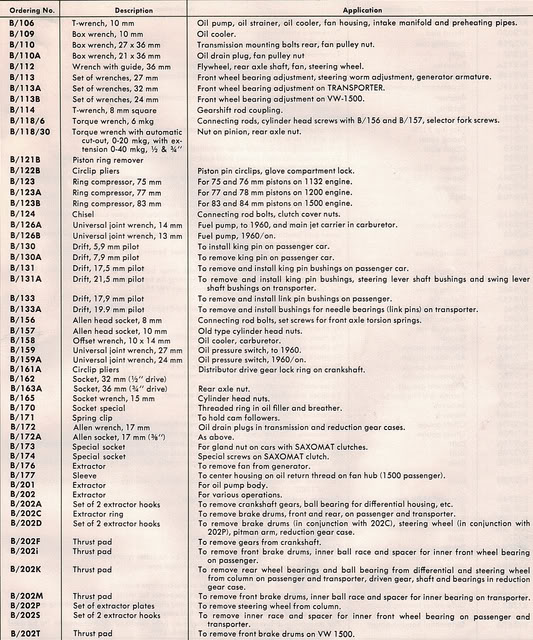


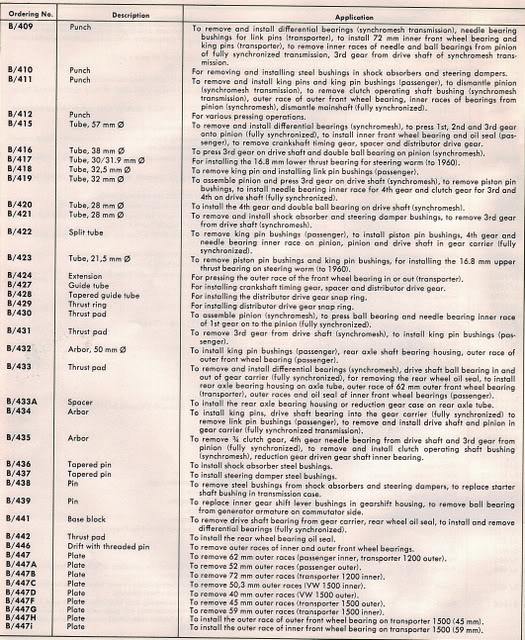
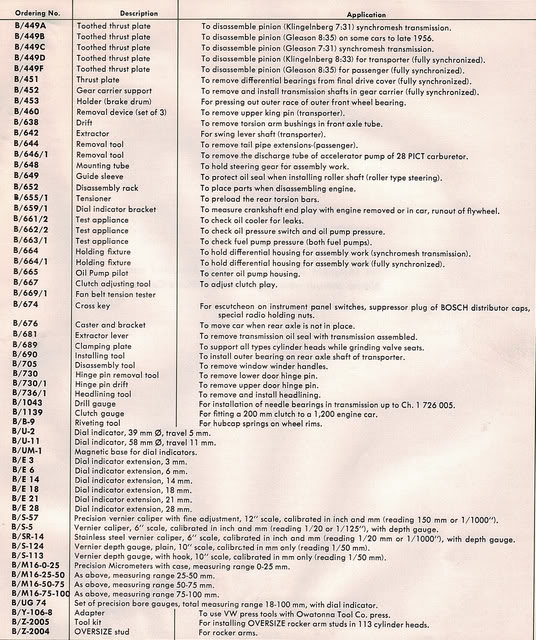
Shop made tools
Posted by albell in vanagon, vanagon tech papers on January 21, 2011
Might be useful to some VW enthusiasts (pdf, from 8 – 18 MB each)
Aux. Battery connection to fuse panel
Posted by albell in vanagon mods on January 19, 2011
Probably like a lot of you Vanagon Westy owners, I have been powering my interior lights, radio, and cig. lighter from my auxiliary battery by running a (fused) wire up and into the bottom contact of the #3 fuse spot (fuse removed) on panel. This works ok, but its sort of a kludge. I looked at the wiring diagram and noticed that there is a spare connection on “E” multiprong connector, “E3”, that goes directly to the circuit that fuse #3 powers. I have a bunch of scavenged wire pigtails that have the molex-type connecter on one end. Connect one of those pigtails to the aux. battery wire, and pop the other end into “E3”. Fuse spot #3 is left without fuse as before. Diagrams below might help, I should make an annotated one… crudely annotated diagram added.


ATA – AlphaJets, not BAE Hawks
Posted by albell in aircraft, around the airport on January 19, 2011
Edit: corrected myself, of course they are Alphajets. Apart from anything else, parking at the VIH building and not over at 443 sqdr. should have told me they were not Hawks from CFB Cold Lake, right?
Saw the pair landing yesterday just after I left the Aviation Museum. Driving past today I noticed them parked by the VIH buildings.
Landing

And about 30 minutes before take off today

