This post briefly outlines an experimental fix I made to my spare lifting bar assembly. At time of writing, I haven’t swapped it in to the van to give it a good testing, so the jury is still out as to whether the repair works as well as it seems to on the bench.
While I was futzing around doing this repair, Dave commented that I should design something that could be sold as a kit for the Westy owner that doesn’t have access to machine tools, welding, etc. This is a good idea, unfortunately the approach I was taking doesn’t really lend itself to that. But it did give me some hints towards a repair kit.
I think most vanagon Westy owners know by now that eventually the pop top lifting assembly will wear out at the main hinge joint. It’s a poor design, a harsh steel on steel moving contact with no lubrication and insufficient bearing surface. Many other owners have fixed this problem by various means, welding up the worn surface is one example.
Andy, owner of the nice T3 Atlantic, “Wolfgang” (blog linked in list on right side of the page), recently had his lifting assembly re painted. It was his blog post on that and his comments to me that got me off my duff to try this fix.
I have a spare assembly, from my old 82 Westy. It’s galvanized steel, no paint like in the later Westies. The zinc coating has grown the characteristic white fuzz during storage in the barn. Here’s a pic of the hinge that is the problem.
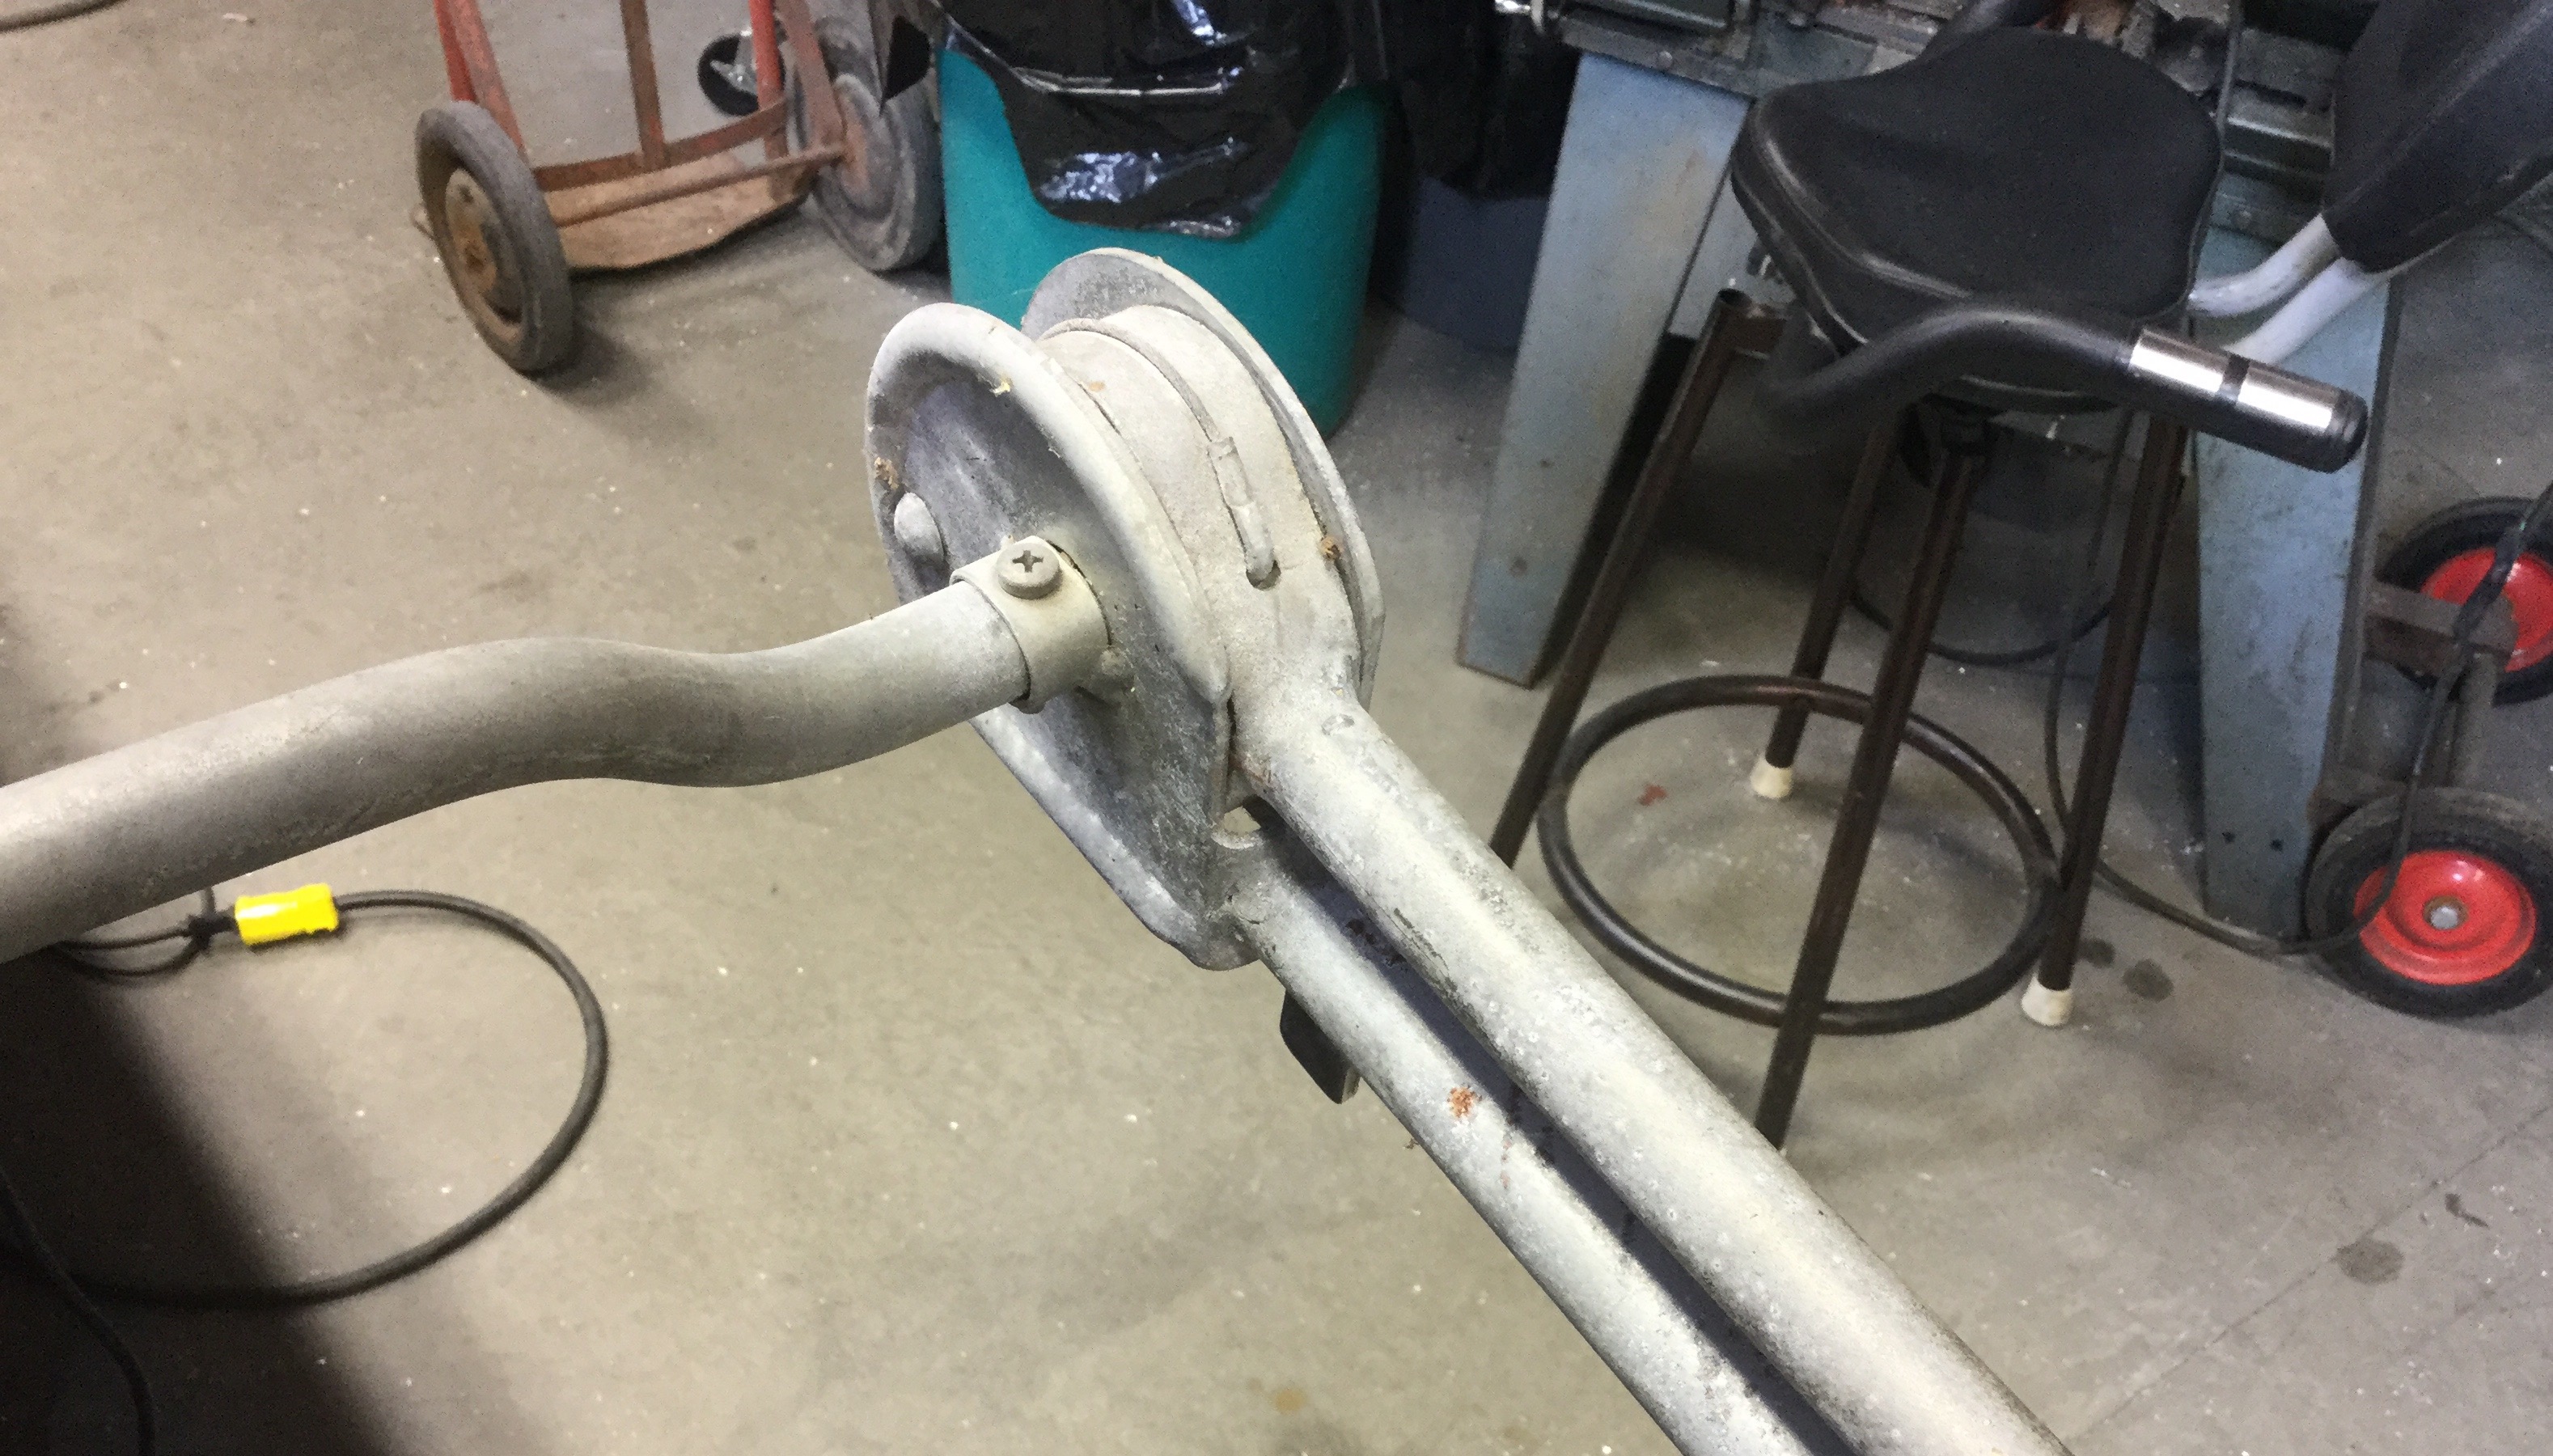
A couple of notes on the hinge. The horizontal bar extends into the hinge through that collar ( with the screw) and near the end it get worn away. There will be a pic of that coming up. The hinge is folded up fully, as it would be when the top is down, and that steel cable you see running up over the round centre section continues down and back into the tube on the bottom where it connects to a spring. Again, more on that later. But as is, the assembly is under tension and wants to straighten out (tubes are tied together out of shot).
Remove the M5 machine screw from each end of the horizontal bar and then pull the bar out of the hinge. Are the ends of that bar worn, Or have you lived a pure life and the bar ends are sound?
One end.

And the other end, even worse.

It’s really easy to take the assembly apart, apart from the annoying spring washers. Clip washers, starlock washers, must be other names for them too. I broke most of mine trying to remove them, but you can find new at the hardware store or auto parts place. When the hinge is relaxed, ie fully extended, and the pin that limits further extension is removed, the end of the spring cable can be detached and pulled out the bottom of the tube. Yes, the foot has been removed from the bottom of the tube. Another pin and annoying clip.

Greasy old spring and cable out.

Ok, back to the hinge. Here we have the pair and its the edges on the “not so round anymore ” holes in the flat bar welded in the ring that wear the grooves in the cross bar. I mean really, what the heck were the engineers at Westfalia thinking?
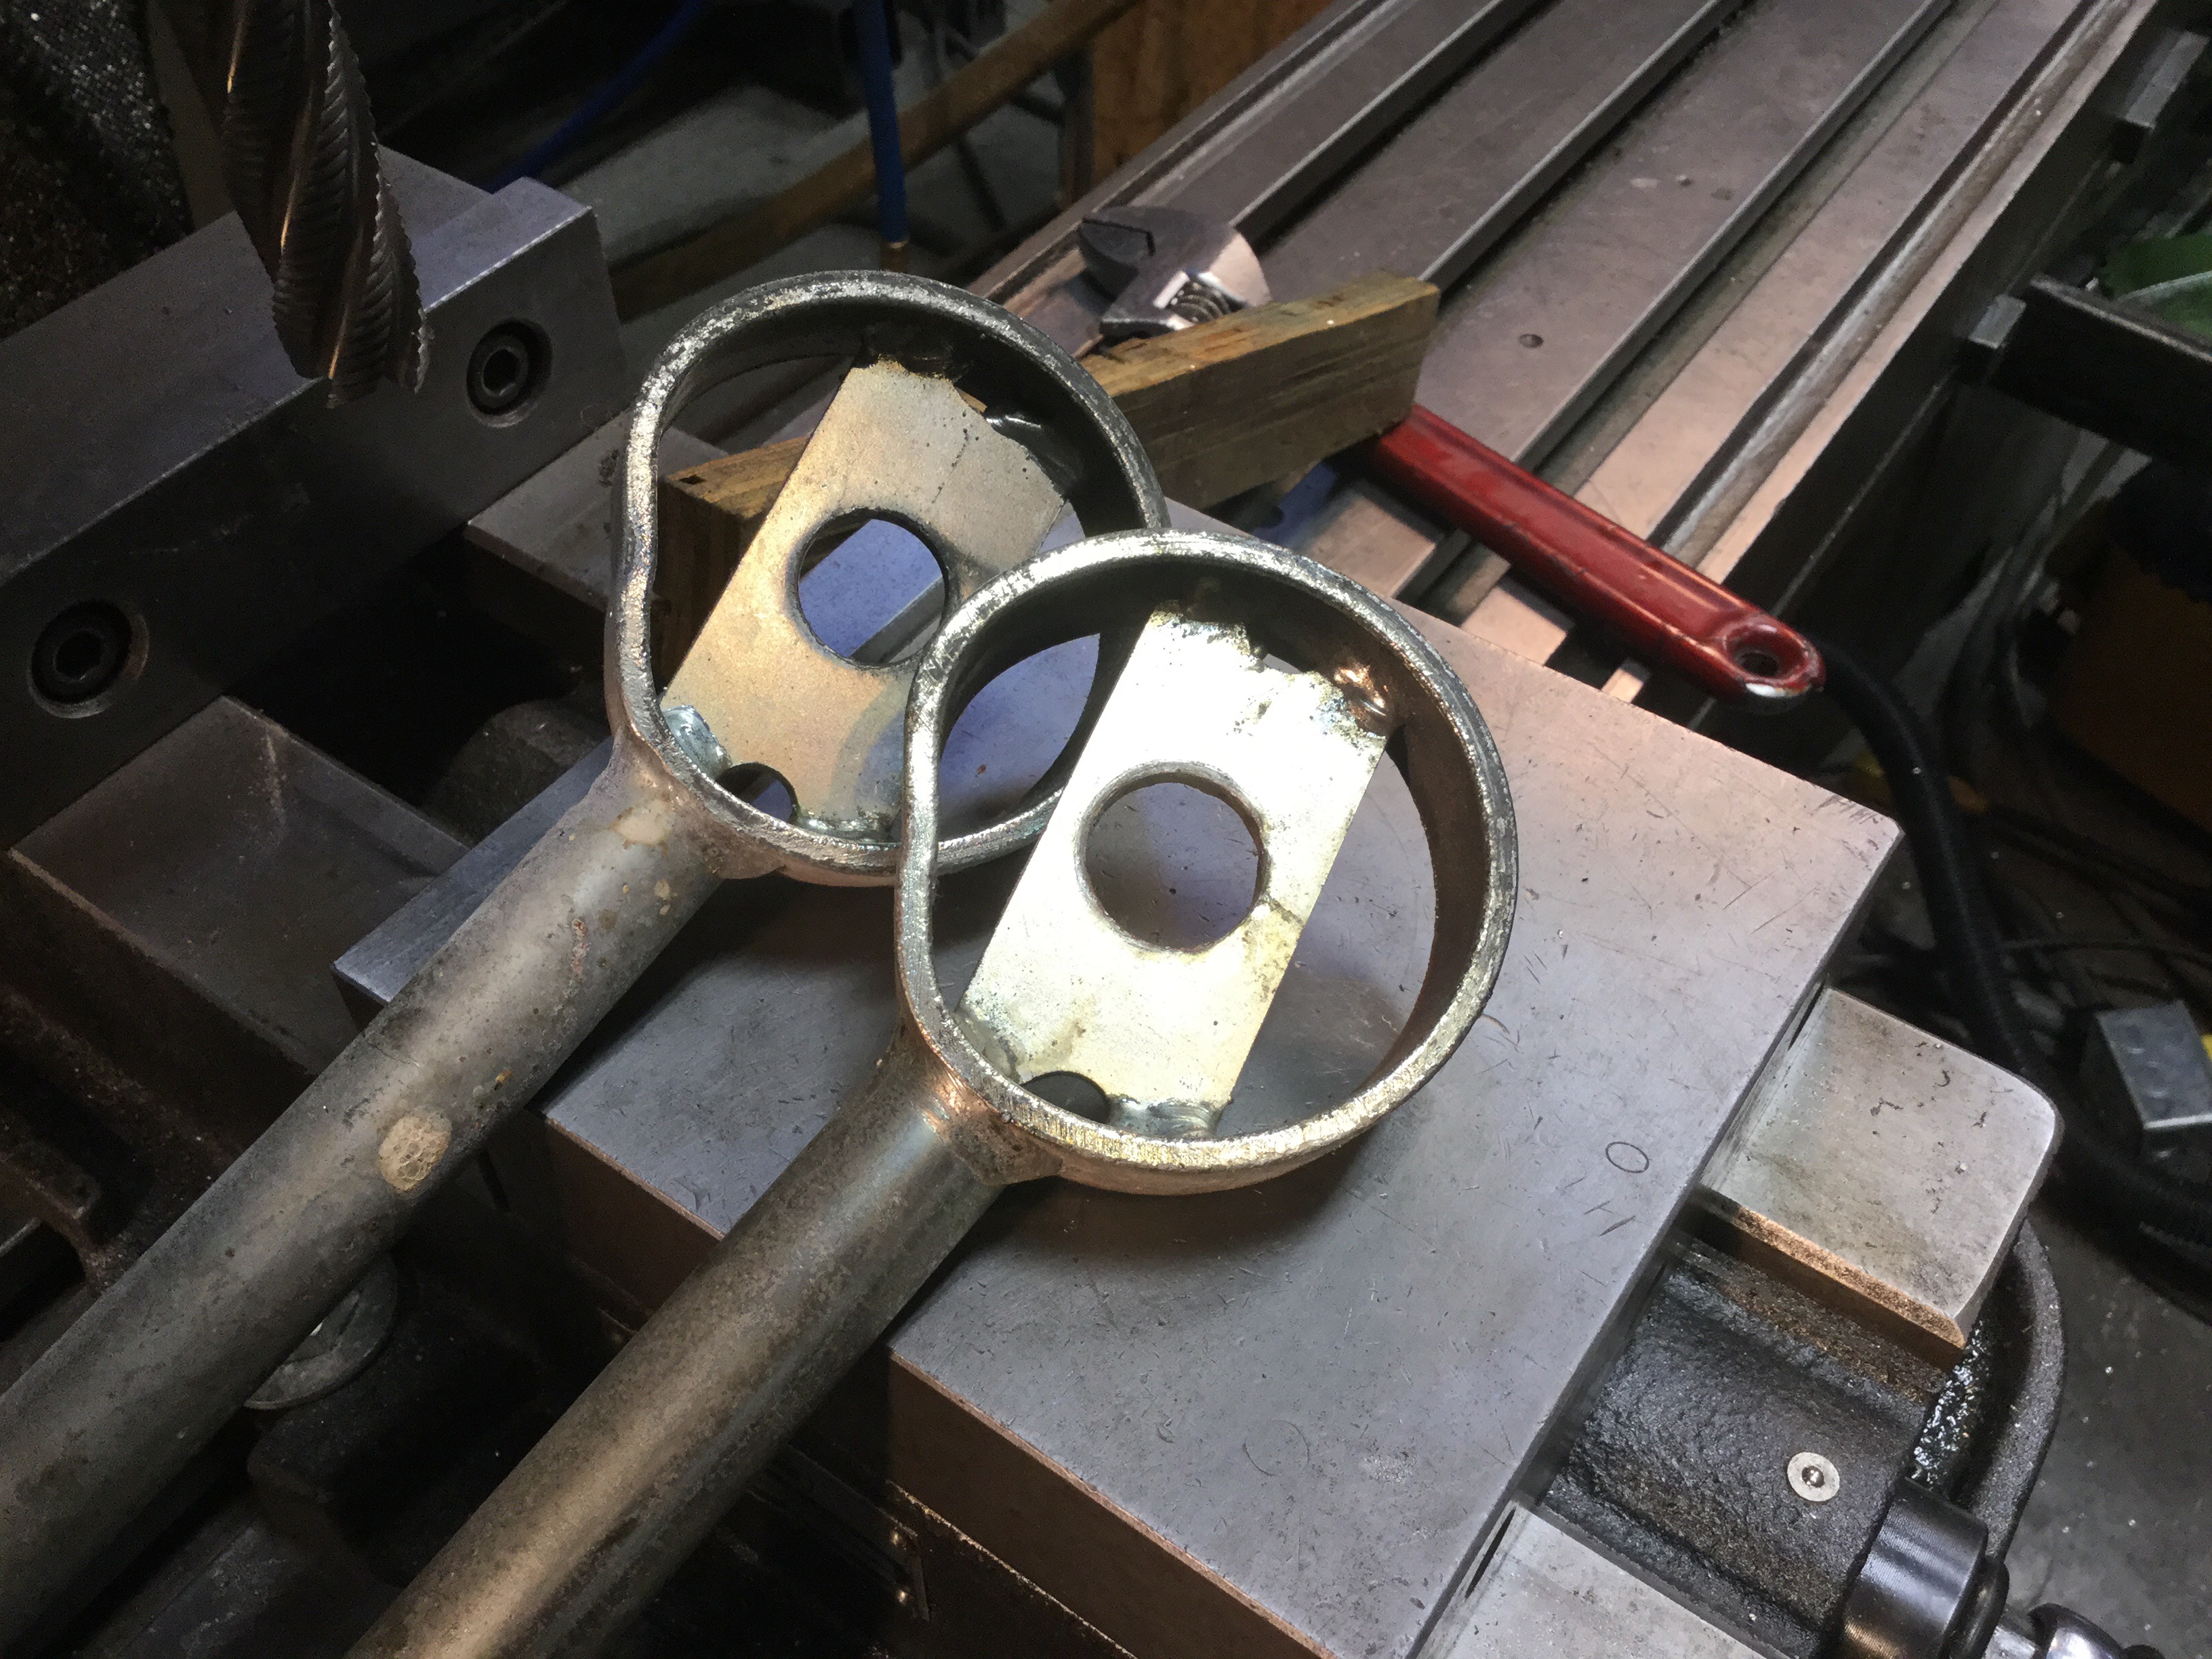
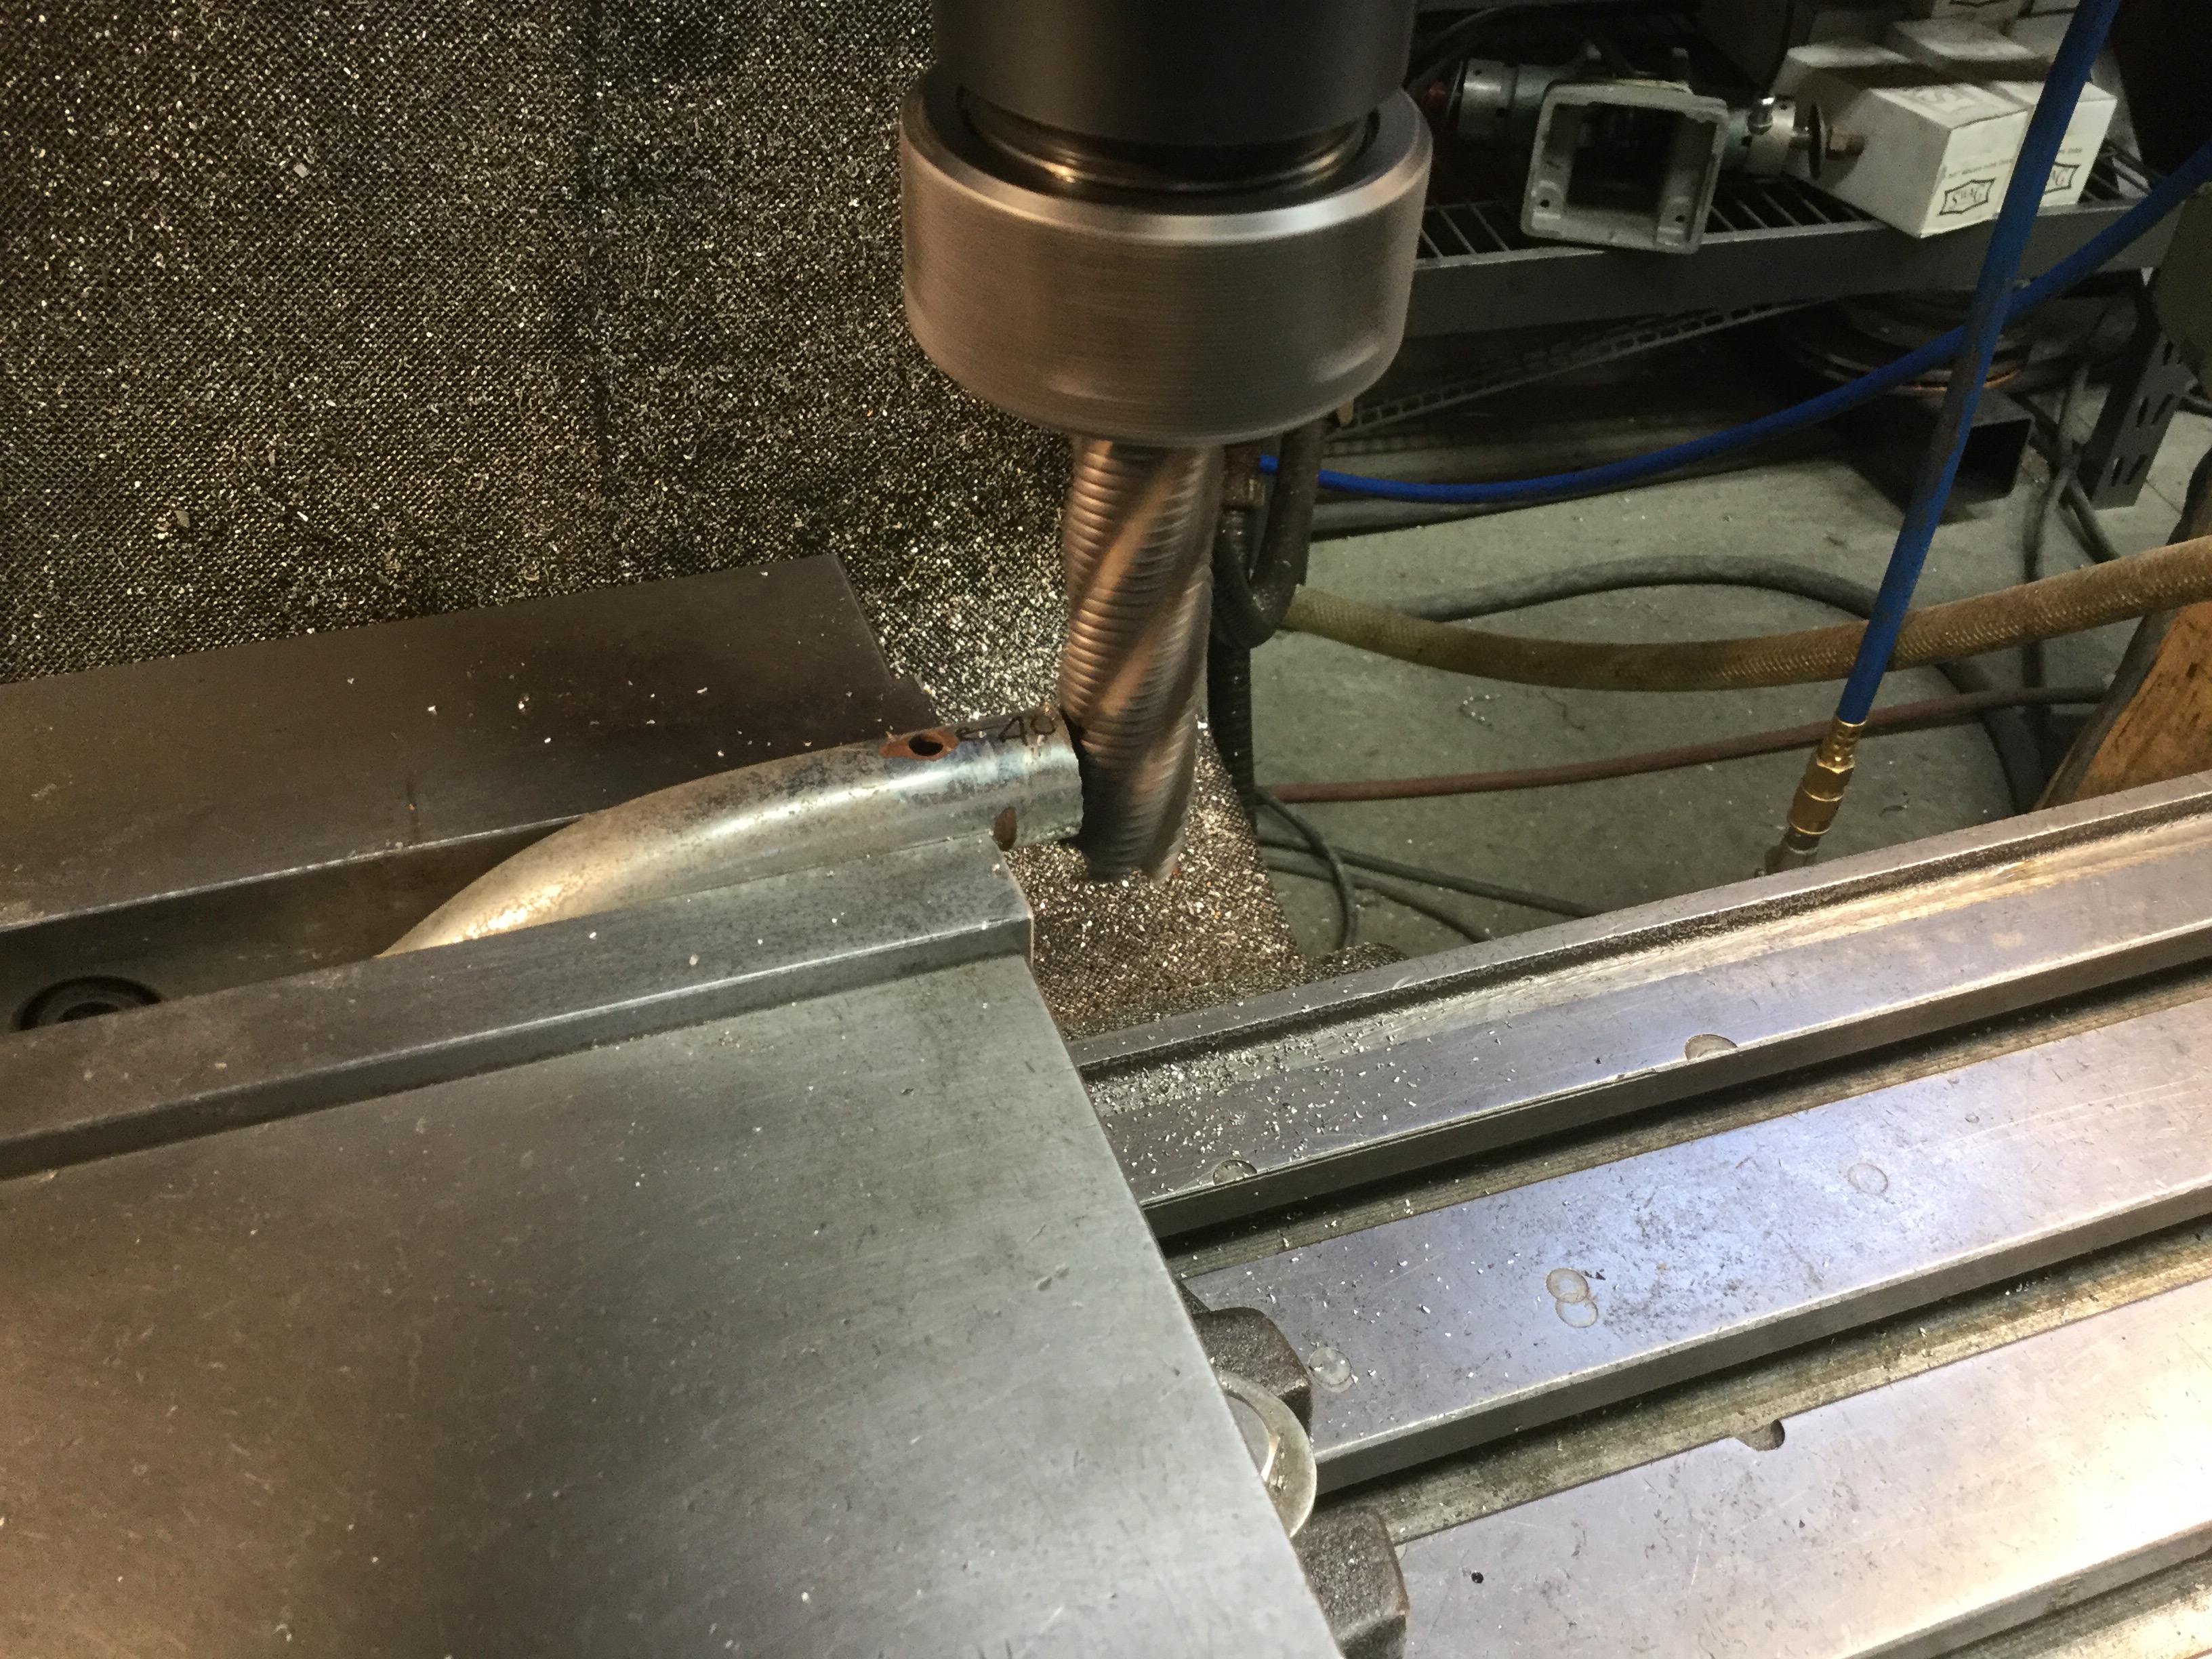
My fix is to bush those holes to create a larger bearing surface. First I had to make the holes more or less round again. 7/8″ endmill was over sized just enough. Truth is, it didn’t complete make round one of the holes, but good enough.
Hard to see the difference, but the holes are now nominally 7/8″ diameter.

Ok, now the bushings. I had a small bit of bronze (or maybe it’s brass) salvaged marine shafting. I had fooled around making flutes on it with the index head. I was learning, wasn’t a great job, had the head offset so the grooves were asymmetric, blah, blah. But there was enough of the stuff to work with.
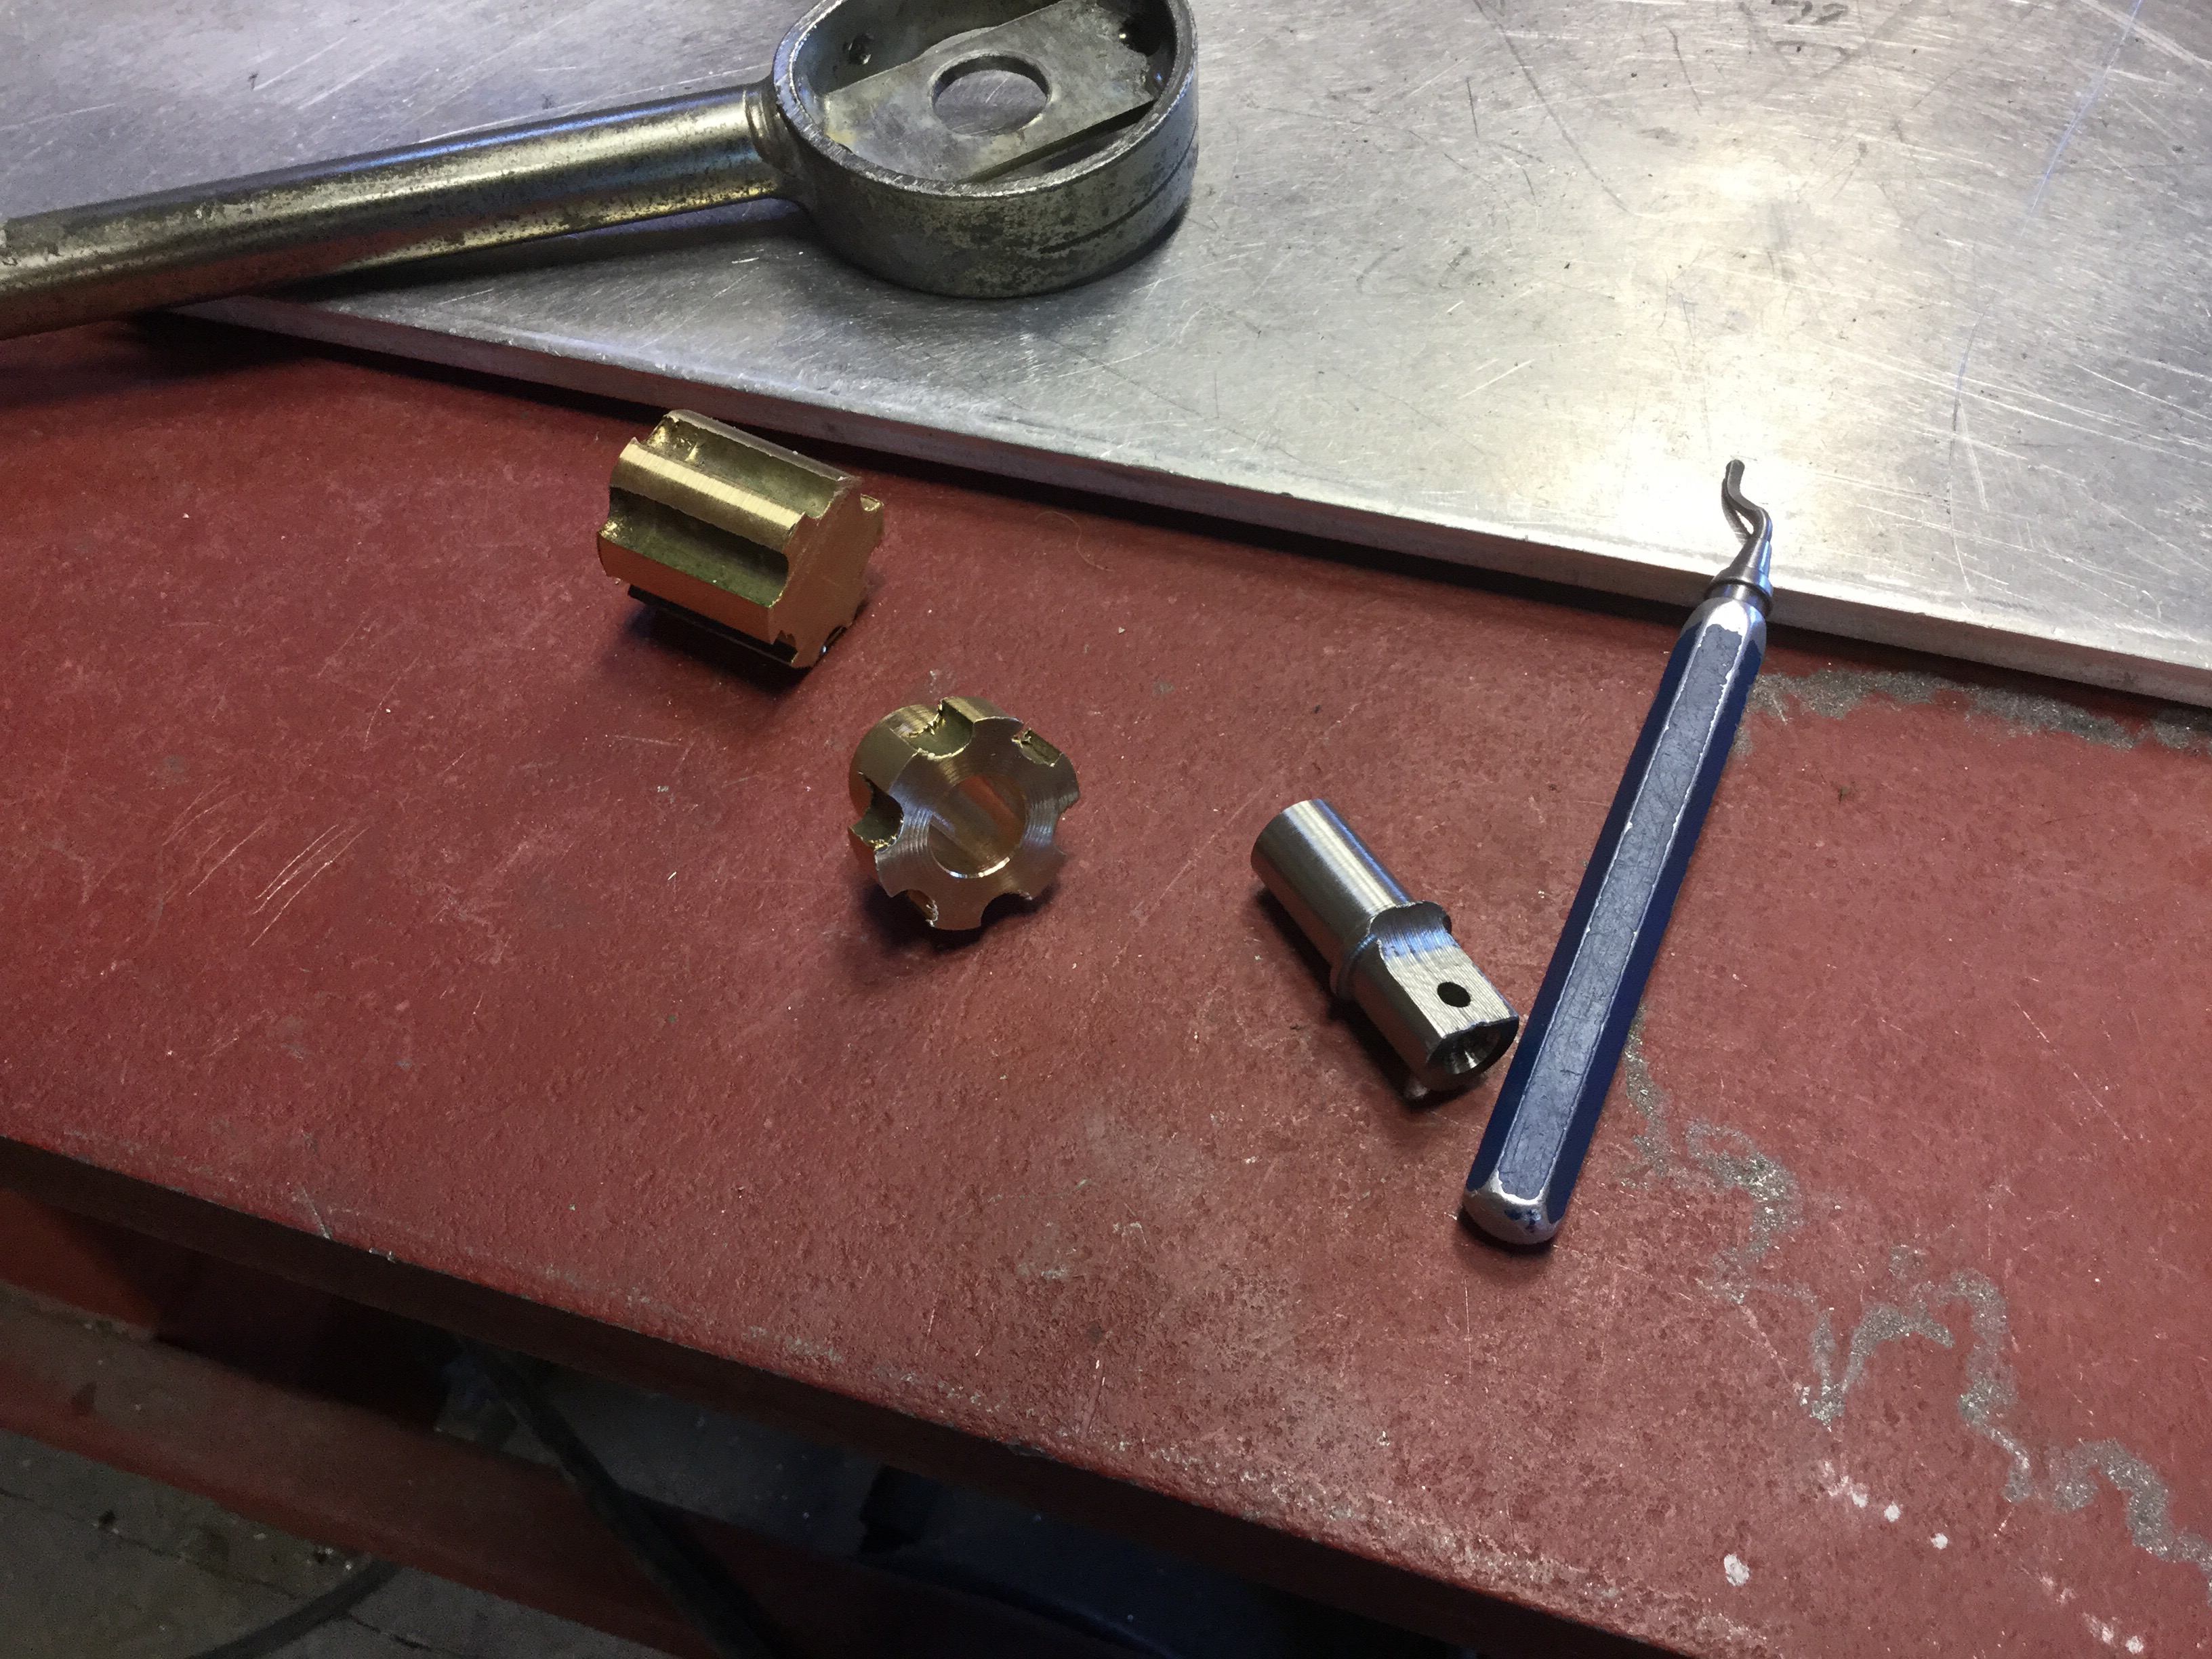
And alongside is the little shaft that will replace the worn end of the cross bar. I reamed the ID of the bushing to 16mm, turned the shaft slightly undersized ( about 15.95mm). The OD of the bushing was left untouched on one end, the other turned down to a press fit for the 7/8″ hole that I milled in that flat bar.
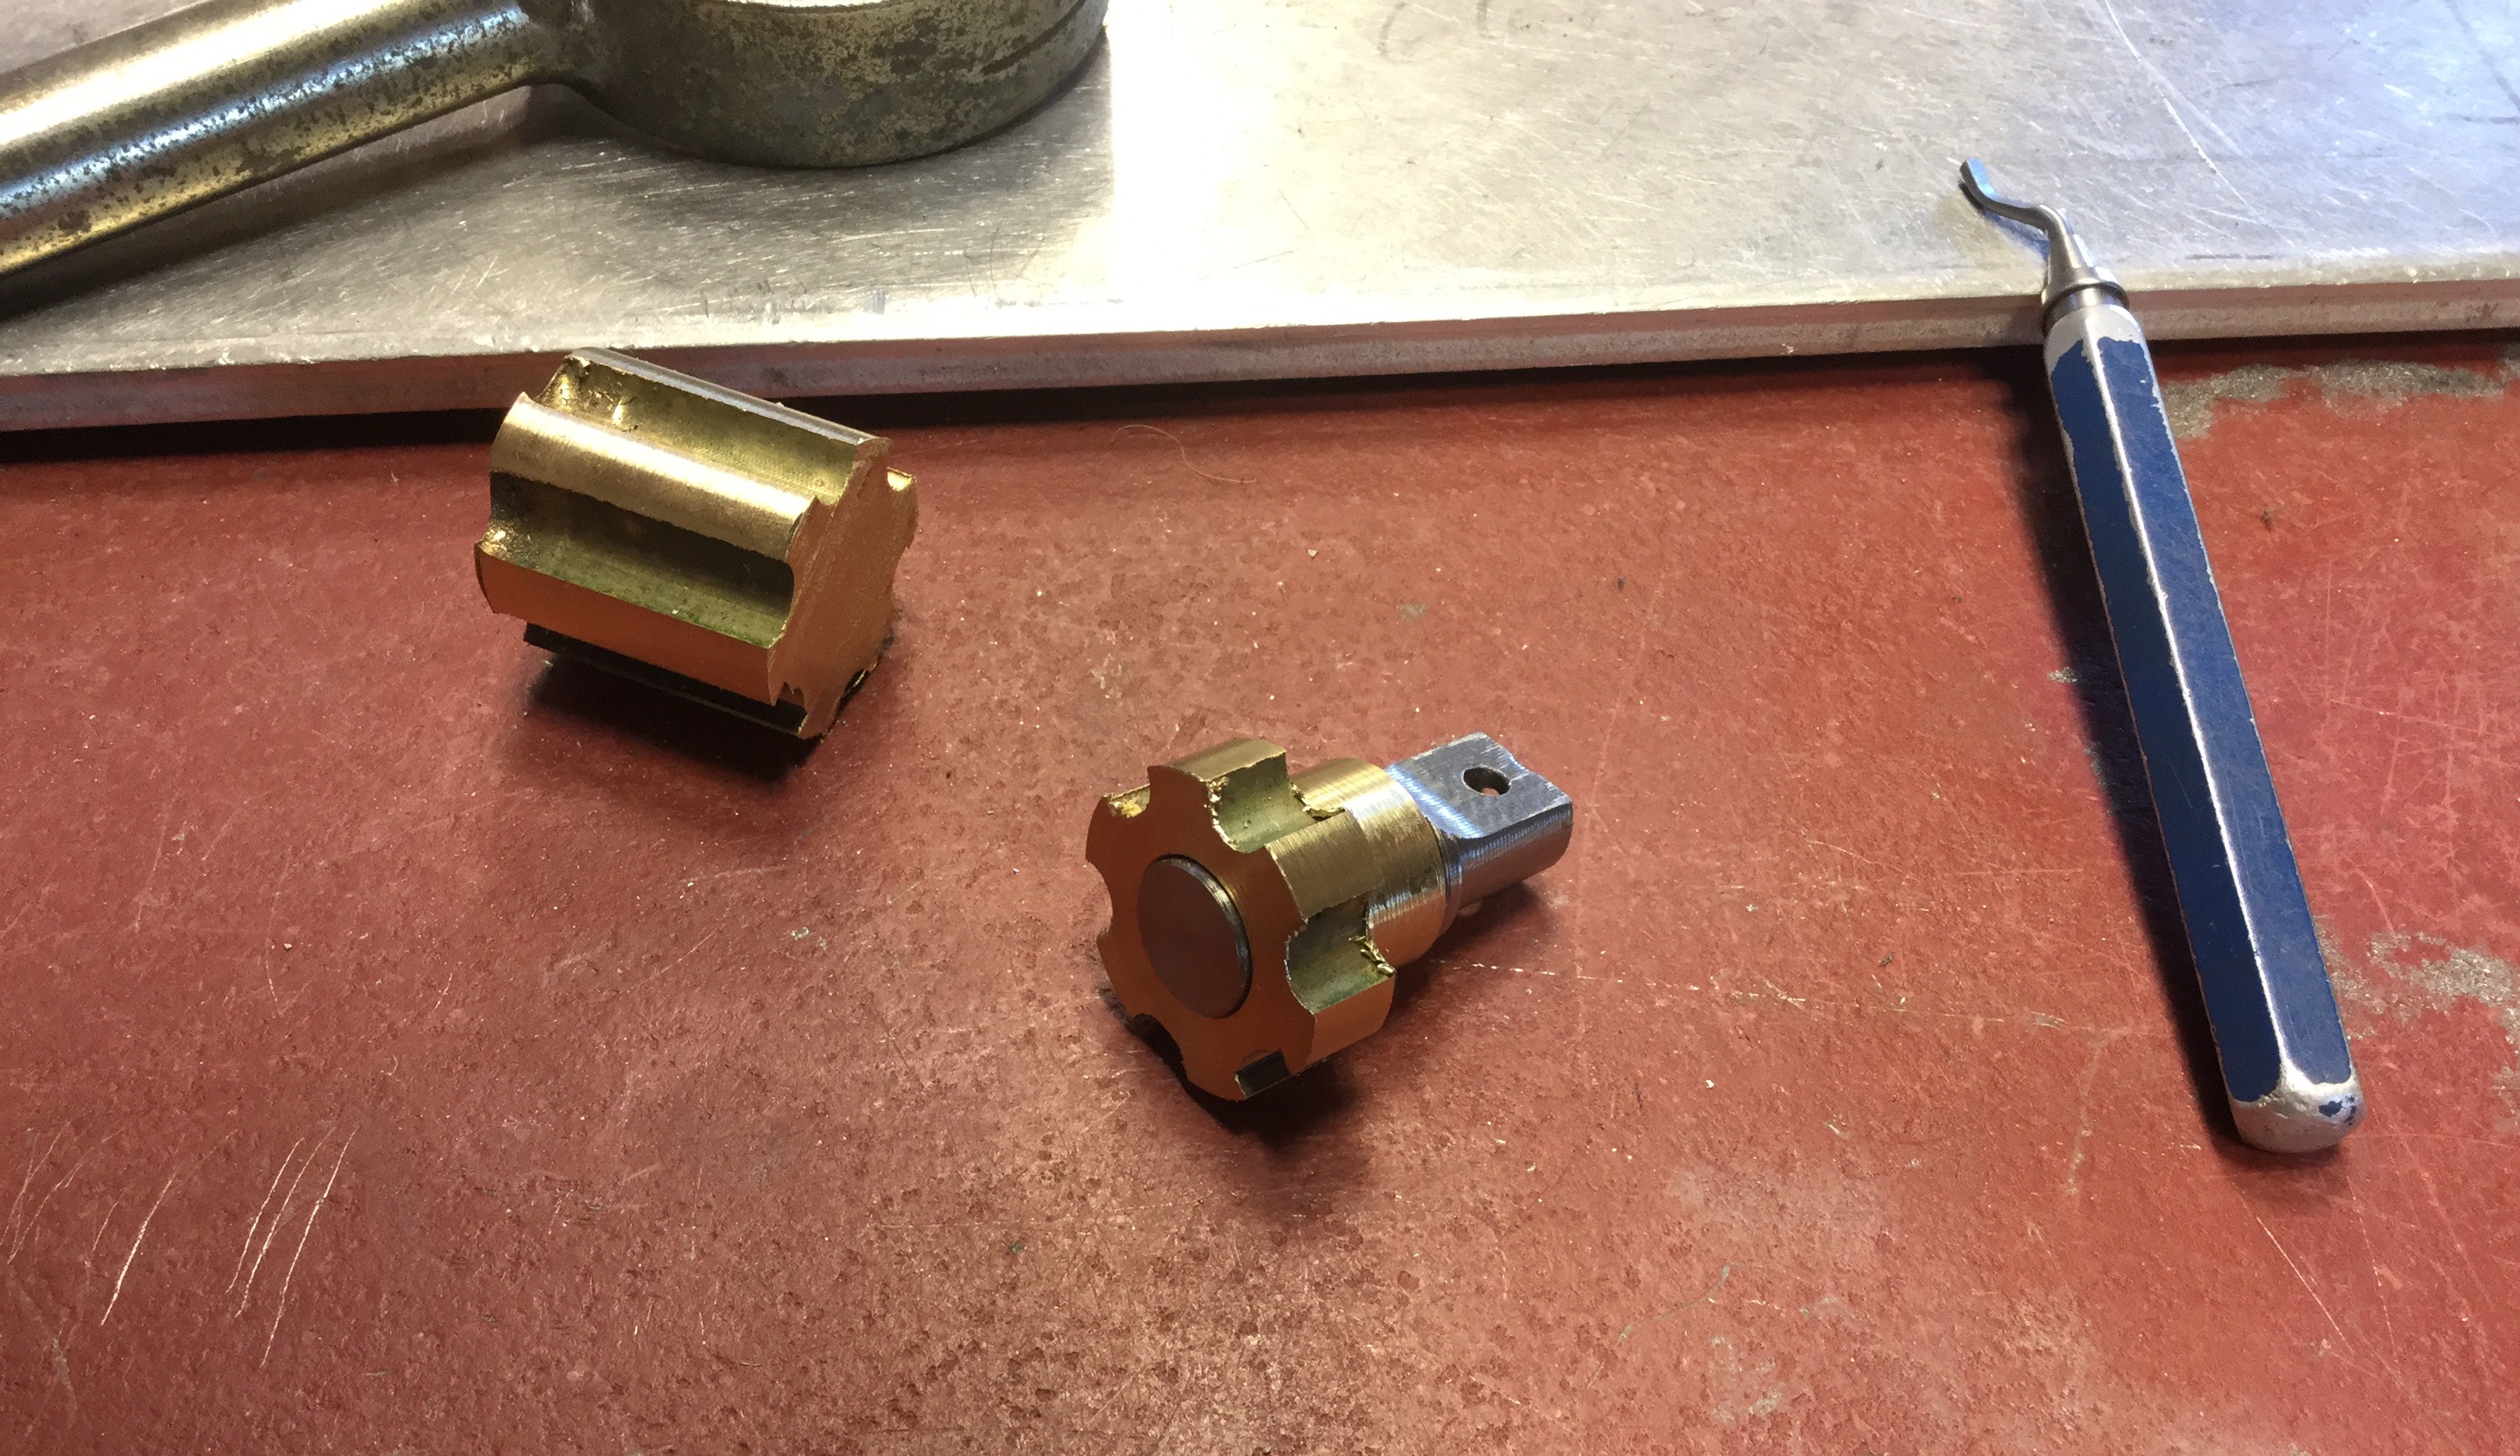
Notice one end of the little shaft has a flat milled on it and a cross hole drilled? That end will fit into the cross bar with the hole lining up with the existing cross bar hole.
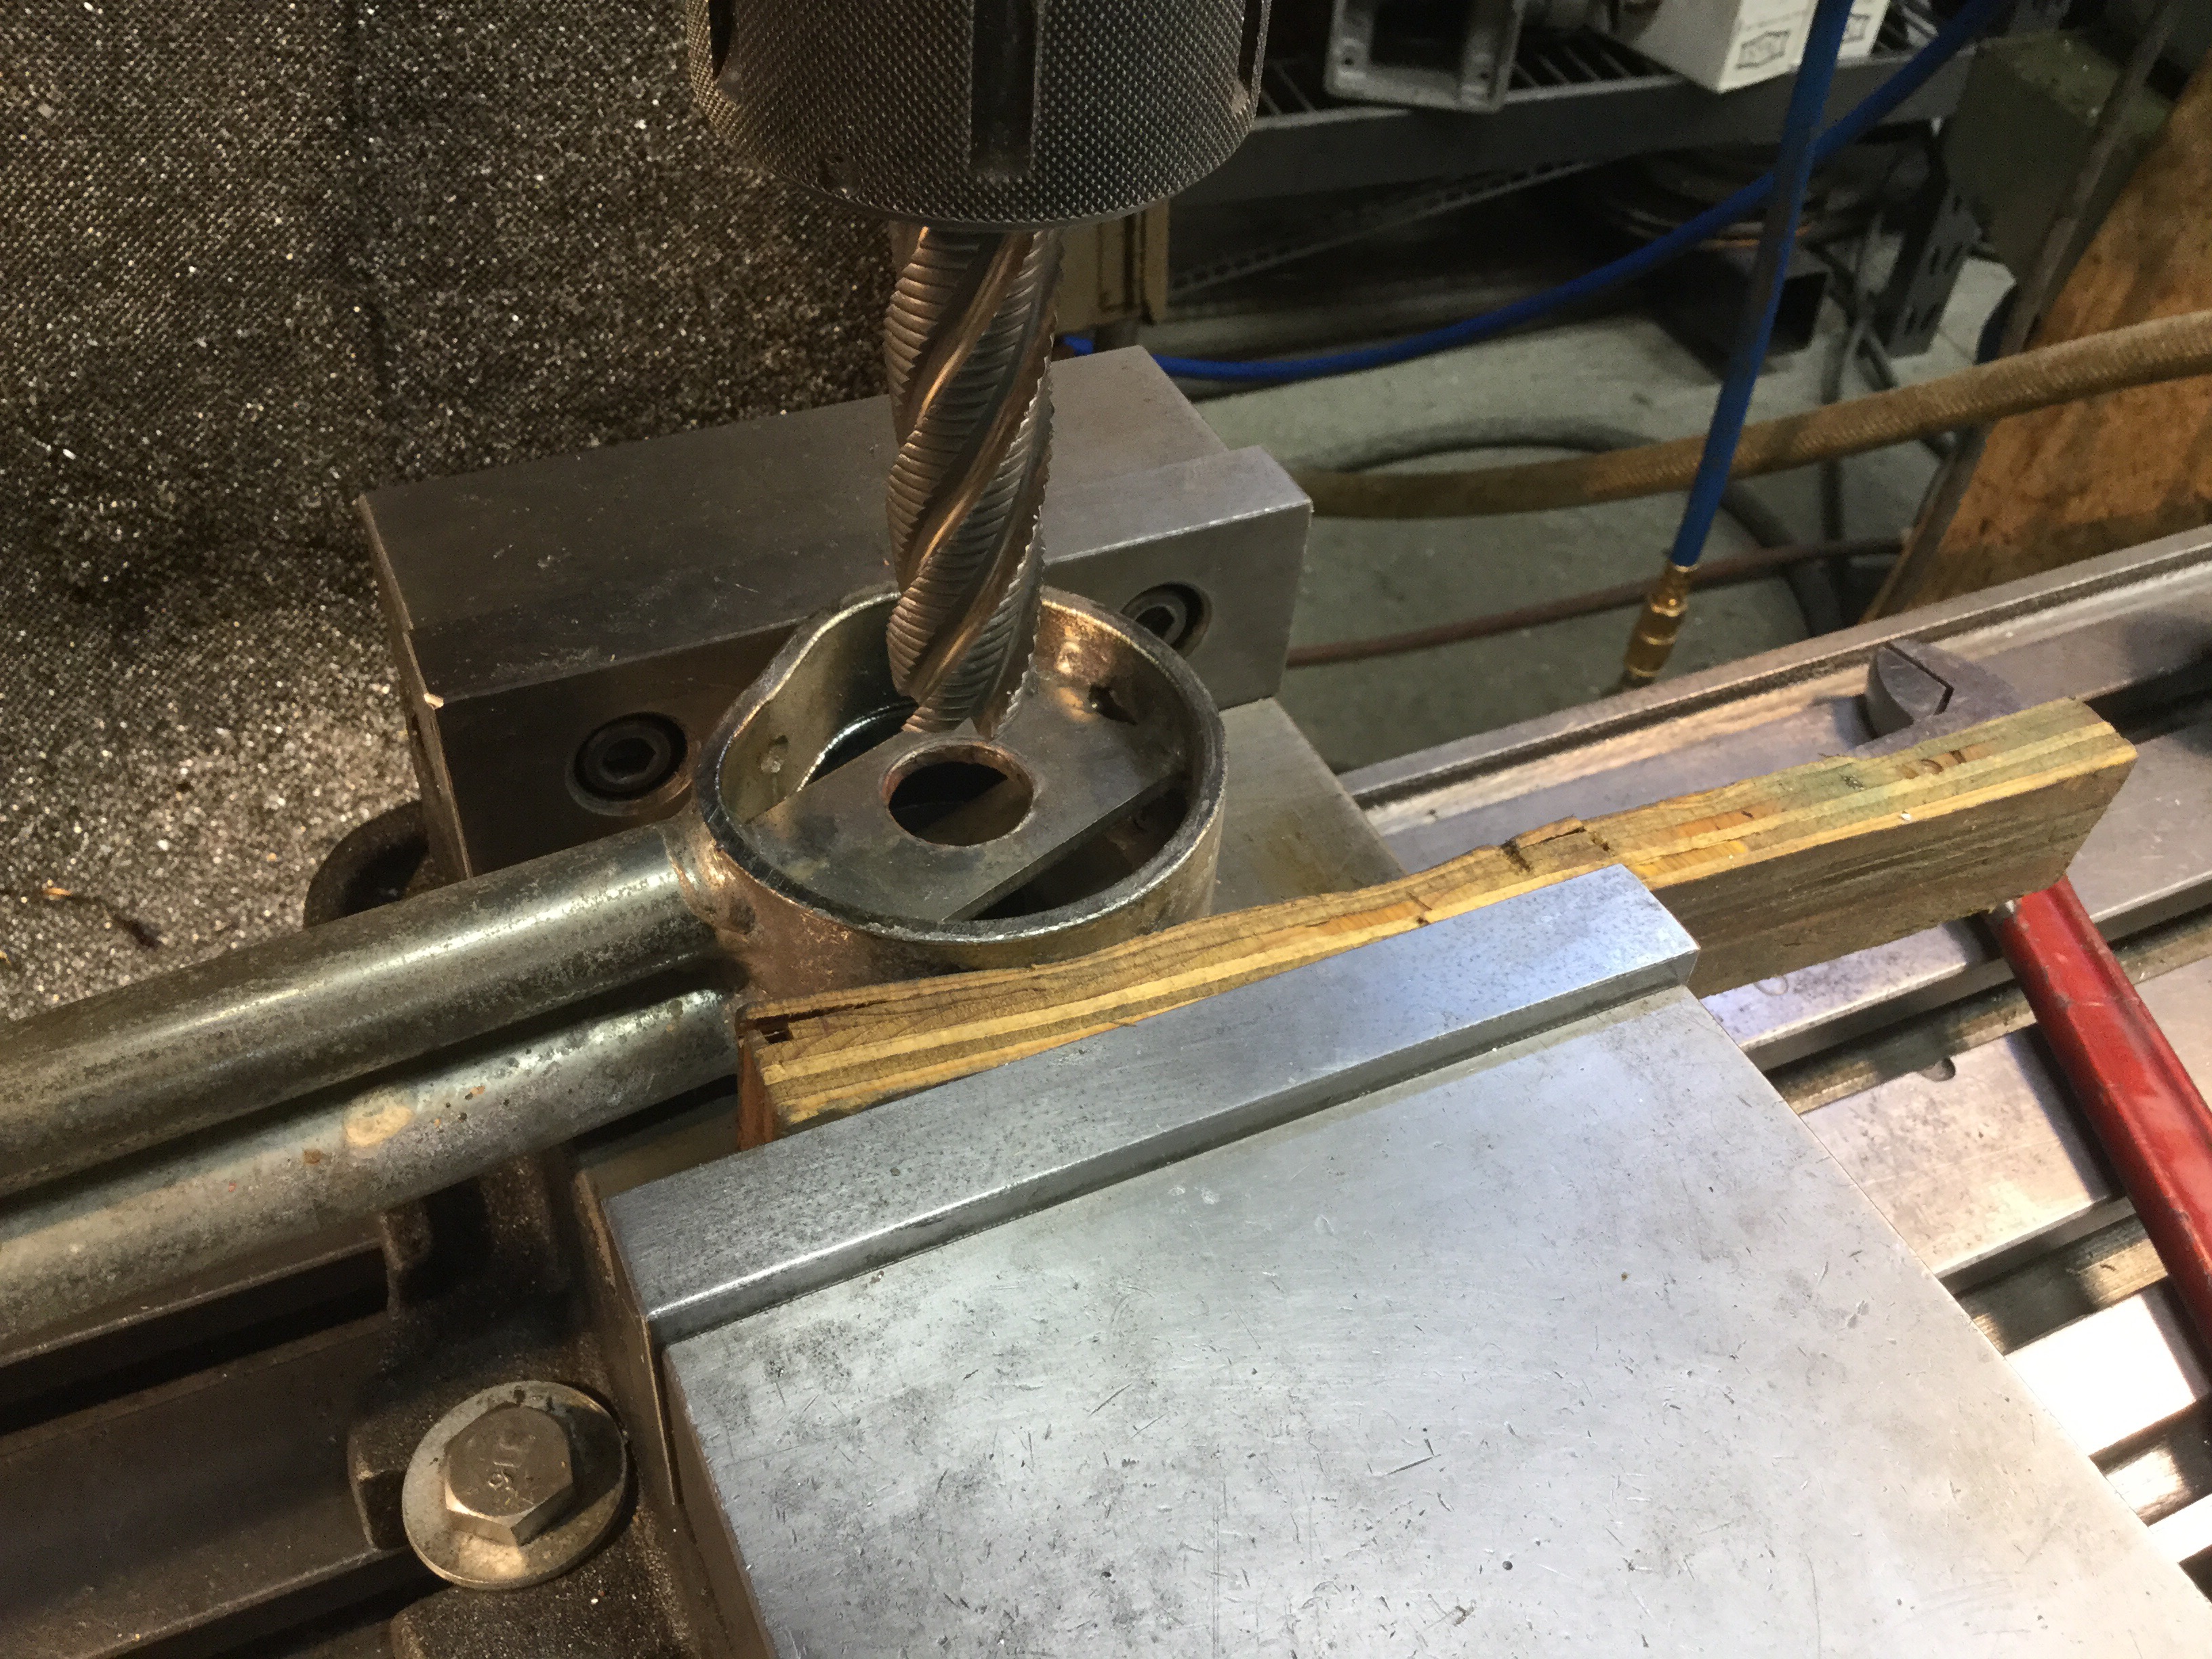
I cut off the worn end of the cross bar and milled back square. Still using the 7/8″ roughing end mill. Oh how I love that tool.
So, and excuse the initial so, so I pressed in the bronze bushings. One pressed home with that satisfying grunt that makes one smile, the other… Meh. Combination of pressing into only 1/8″ thick material and the hole not being fully round ( remember I mentioned one hole didn’t fully catch the mill?). I didn’t want the bushing to be able to rotate in the hole, it would then wear away just like the original bar. The answer? 1/8″ roll pin. Holds the bushing nicely in place.
Beside it is the little stainless shaft that is pushed into the end of the cross bar.
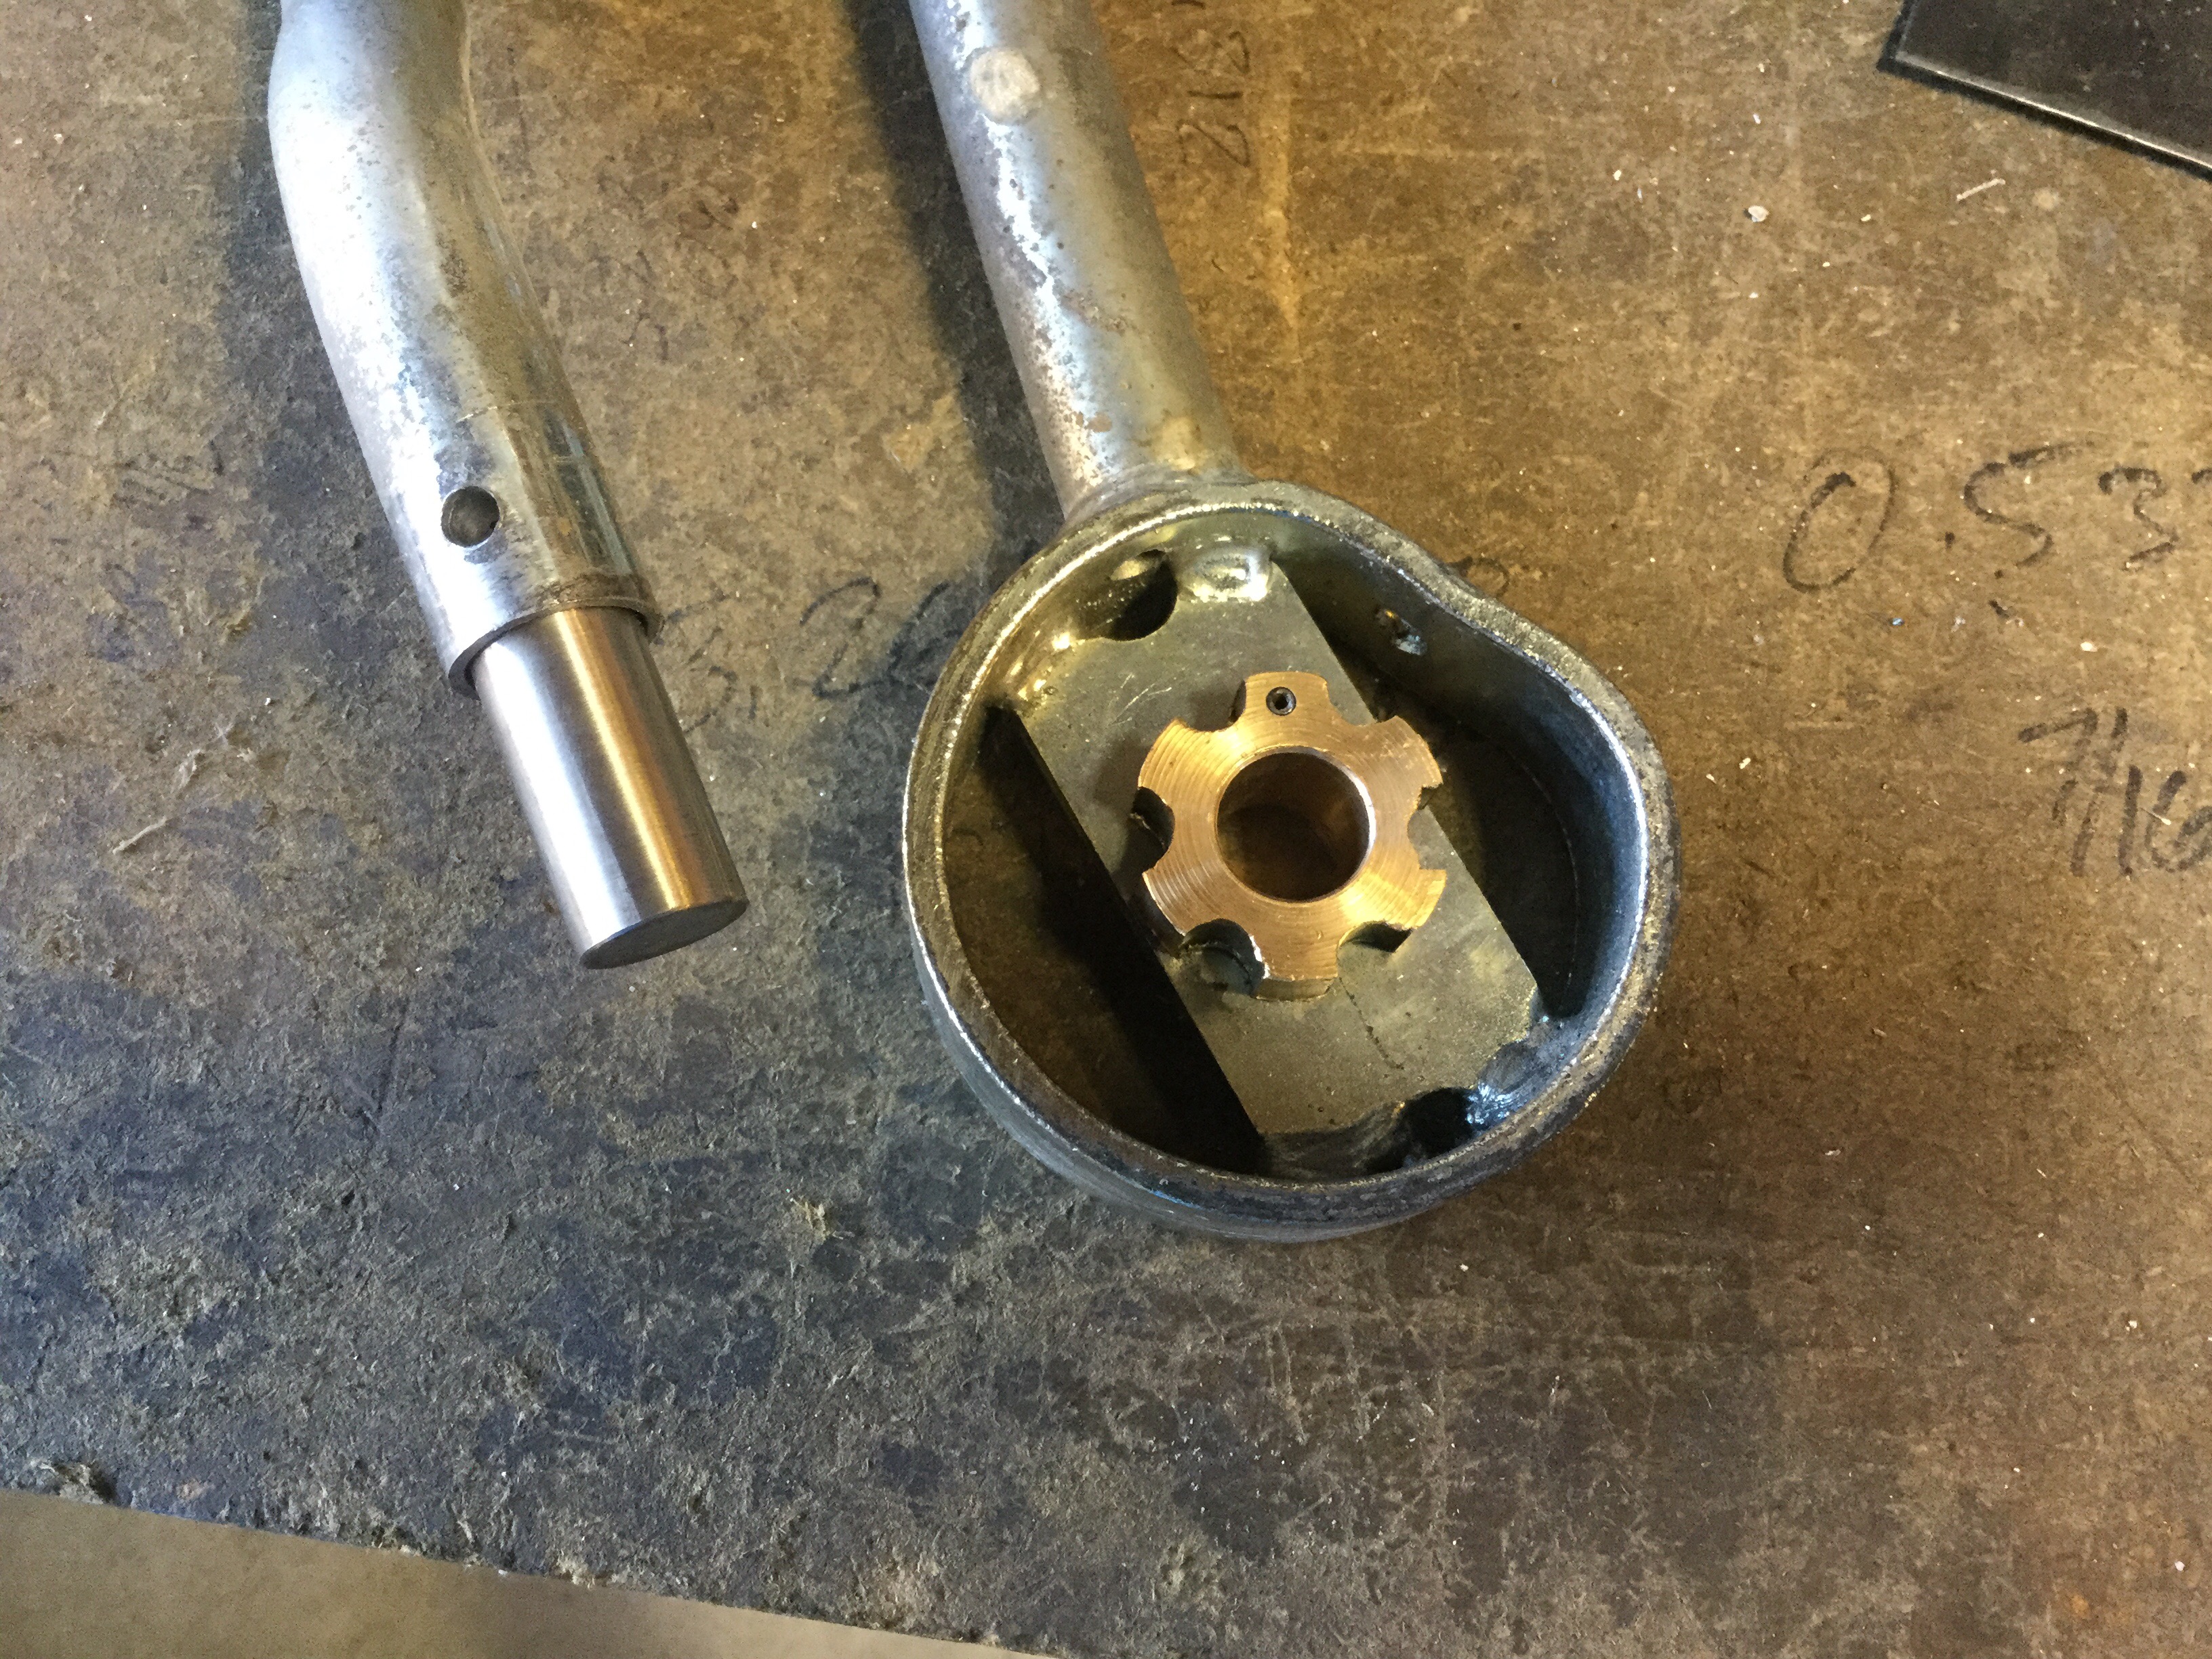
Lubed the shaft up a little with some light oil and put everything back together. The M5 machine screws on the cross bar locates the stainless shaft, it doesn’t move.
Picture taking to forgotten during reassembly, all I can show you is the end of the hinge where you can see the stainless shaft and a hint of the bushing.
But trust me, the hinge action is now nice and smooth. Sometime soon I will install it and see if it lives up to the hype. And, I’ll have a look at the one currently installed in the van with an eye on making some sort of easy DIY kit or procedure.


#1 by daswolfgang on July 23, 2016 - 11:59 am
Excellent, and as always, well documented 🙂 I’m super envious. Mine showed signs of wear, but not half as bad as some I had seen.
#2 by albell on July 23, 2016 - 1:32 pm
Thanks Andy,
I’m curious to see how it feels like installed. But today is filled with yard work. You know, looking thought the various parts catalogues, etka etc, I’ve come across a pop top with out the H bar set up. Just two gas struts at angle ( similar to go Westy outside gas strut lit assist set up. Ever come across that arrangement ? I haven’t in real life.
Cheers
Alistair
>
#3 by daswolfgang on July 23, 2016 - 2:02 pm
I think some of the modern (t4 & t5) conversions I have seen have two has struts. I’ve never really studied them though. You have got me thinking now. I’m going to keep my eyes peeled now and investigate. You know in your article you talk of a diy kit. It’s this so that people can buy the parts to do the conversion themselves? If so I may be your first customer 🙂 . No problem if I have the wrong end of the stick.
#4 by albell on July 23, 2016 - 2:51 pm
Andy
I’m surprised no one else has made a kit. Talking openly about it now means that someone will and another retirement plan of mine bites the dust.
But it’s worth a try maybe, you think?
Yes, I’ve seen the later T4, T5 ( and the small MB campers?) with external struts. Well some of them. Can’t keep theme straight in my mind. Some also have the nifty electric roof raising thing ( linear actuator and clever levers and hinges).
But it’s the two gas strut T3 that is the unicorn. I’ll see if I can dig up whatever reference it is that’s triggering this memory and post it here.
Cheers
Alistair
>
#5 by daswolfgang on July 23, 2016 - 10:47 pm
I think anybody with a Westy T3 campervan that has investigated the hinge on the H Bar assembly, will understand just how badly designed that area of the van is. You could probably understand it if it were only an issue on early vans, but the fact they continued the design for so long even though they must have had feedback from customers with issues. I have no intention of selling my van, and knowing it’s a weak point I see a fix of one form or another happening at some point in the future. I would definitely be interested in your mod if it went into production Alistair. Keep the posts coming. 🙂
#6 by lukebakken on July 24, 2016 - 7:10 am
I would gladly buy a repair kit, if one were made available. As always, your blog is both informative and very interesting, thanks!
#7 by albell on July 24, 2016 - 7:28 am
Right then Luke and Andy,
Thinking that it should need onky simple tools: hacksaw, electric drill, screwdriver, wrenches.
And a tape measure.
I’ll see what I can do, thanks for the feed back guys.
Alistair
#8 by mariusstrom on July 24, 2016 - 10:22 pm
In for a kit. 🙂
#9 by albell on July 24, 2016 - 10:25 pm
Crickey, the orders are coming in fast and furious 🙂
Ab
>
#10 by Pz on July 25, 2016 - 8:42 pm
Innovative an inspiring Alistair.
I’m unsure of the surface the existing cable will now contact/run-on…?
On the fluted side or the smooth side of the yellow metal insert?
I assert, a kit could be made that could be installed with minimal tools.
A step drill would suffice for your wonderful 7/8″ end mill… (me covet your tools:-)
Roll pins work Ok in hand drilled holes.
A tubing cutter and reamer will cut/finish the end of the existing/damaged horizontal cross bar.. imho
A hacksaw and file could substitute if the user had a steady hand.
Brass/bronze/yellow metal inserts. SS small shaft inserts. Roll pins… good to go for another 30 years.
Pz
#11 by albell on July 25, 2016 - 9:08 pm
You’ve got it pretty well figured out. That’s a good approach.
Have to correct you though, the cable doesn’t come any where near the bushing. It rides on the outside of the hinge.
I have another approach in mind too. But I have to try it out before saying anything. It could be completely daft.
Cheers Phil
Ab
>
#12 by Pz on July 25, 2016 - 10:30 pm
My daft, about the cable routing…:-(
The wear on the horizontal bar ends, eeh gads!
From repetitive up/down cycles, the lateral forces must be significant.
Also, with top up during windy conditions. Similar lateral forces are present.
I look forward to your future innovations….
Pz
#13 by albell on July 26, 2016 - 6:41 am
Hi Phil,
You made me realize that I didn’t examine the wear fully. I’m sure others did, but I could’ve determined from the position of the wear on the cross bar at what point in the lifting does the water occur.
I’m going to make a guess that it’s at the last part of the push, where the “legs” go over centre and lock. I have no proof for that 🙂
And lateral forces. Well, I think the cross bar stiffens things up laterally . And of course you need it to grab to raise lower top.
Ab
>
#14 by Tim on July 29, 2016 - 3:41 pm
Ditto on buying a kit. I put a makeshift repair on mine after a tree fell on top and decided to reconfigure. OH! that’s not what I should be asking. MY HEADERS/LIFTERS ARE CLEARLY TAPPING. Had this problem two summers ago, 180k on a 1986 Camper, and took care of it. But now I wonder should I replace the camshaft this time as well. It’s an old enough vehicle that one begets the other is how I’m thinking, but does it make sense?
#15 by albell on July 29, 2016 - 4:12 pm
Hey Tim,
You’ve a wbx motor right? Camshaft replacement means splitting case. If you go in that deep then you might as well do a full rebuild.
Do they clatter all the time or just certain times/conditions ?
Ab
>
#16 by trft on August 4, 2016 - 3:11 pm
Alistair, sorry for the delay. The clutter/knocking is all the time and regular and constant varying only with acceleration. And yes this a water box motor.
It was pretty much a full rebuild two years ago, but I did not replace the camshaft. And one other thing the knocking is “clean” no spitting explosive noises that I had before. This knocking became noticeable to me after an oil change a couple of month ago.
Do you usually change the camshaft when you replace the headers?
P.S. I was going to drag the audio file here. That appears to be rather pricey. Anyway, maybe the sticker shock will have me putting my own blog up as much as I’ve been lurking.
#17 by Pierre on January 19, 2020 - 10:52 am
Hi, When looking at repairing my bar mine broke. I am trying to find a replacement because it has been damage enough that it is not round.
I am trying to find a OEM replacement steel bar. Any idea where I can find one in the US?
#18 by albell on February 23, 2020 - 5:08 pm
Pierre,
Sorry, I screwed up on my comments responding. No, I don’t know where to find bar. Can only suggest the thing you know, try and find a fabricator to make another?
Cheers
Ab