Archive for category vanagon
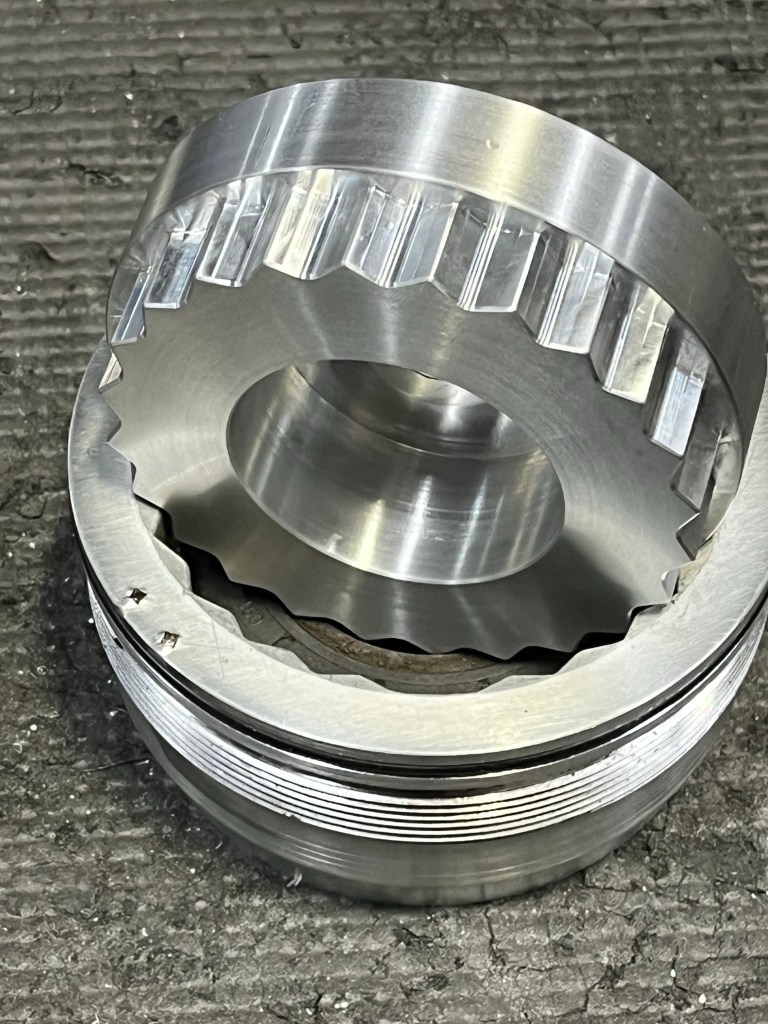
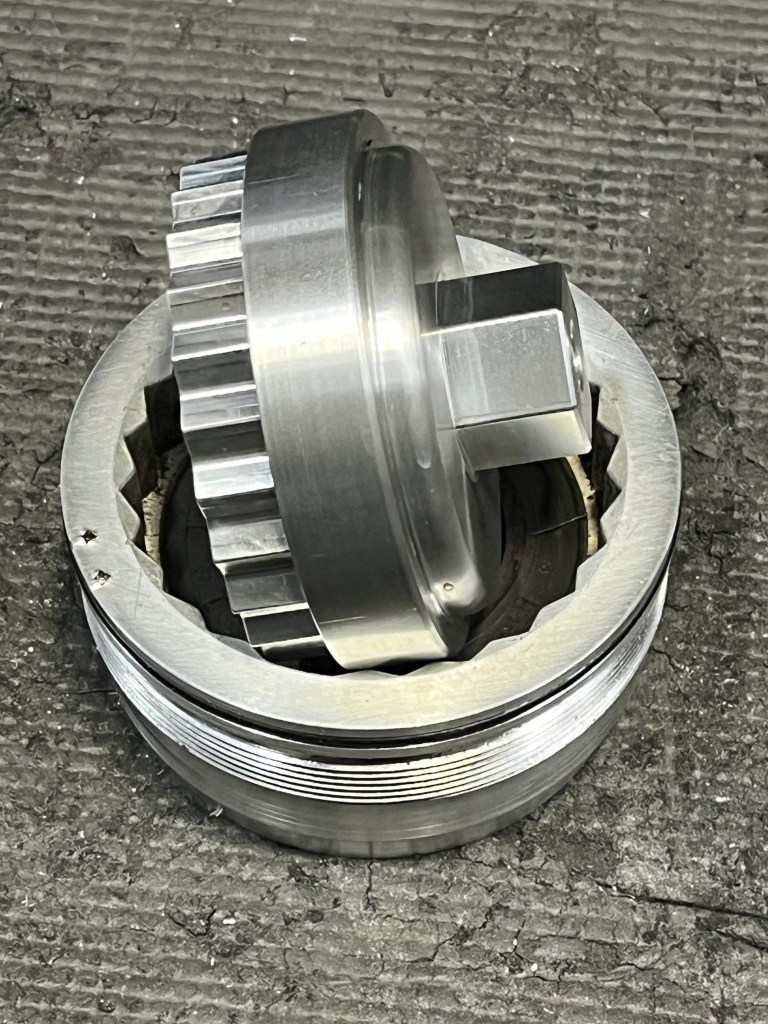
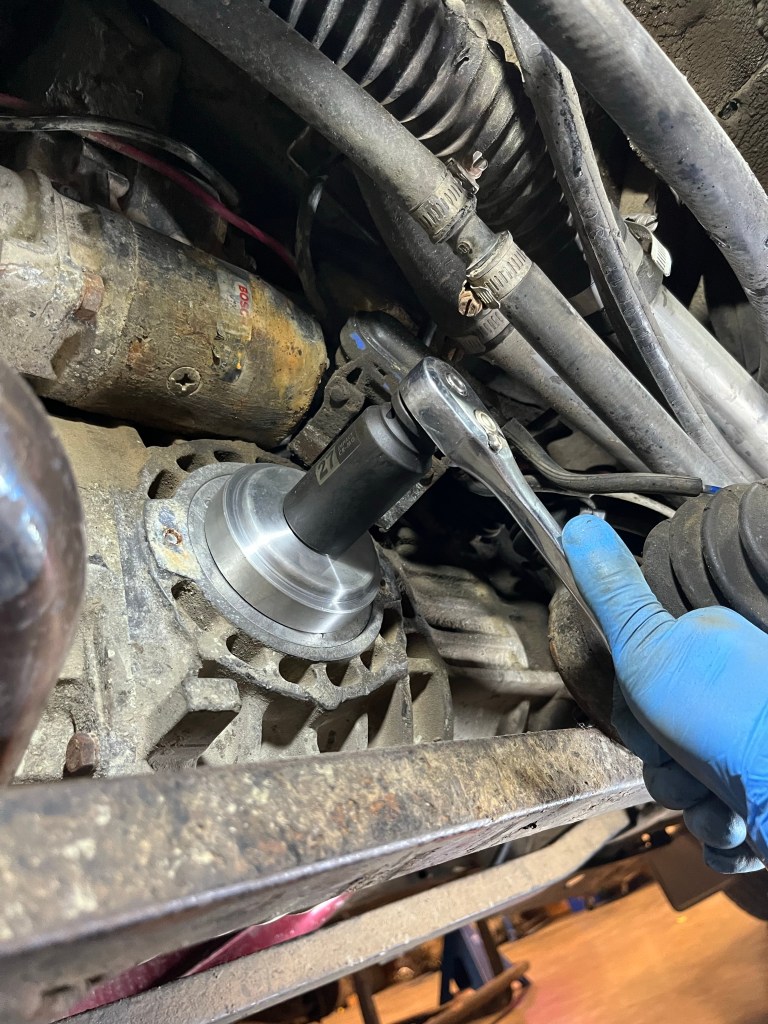
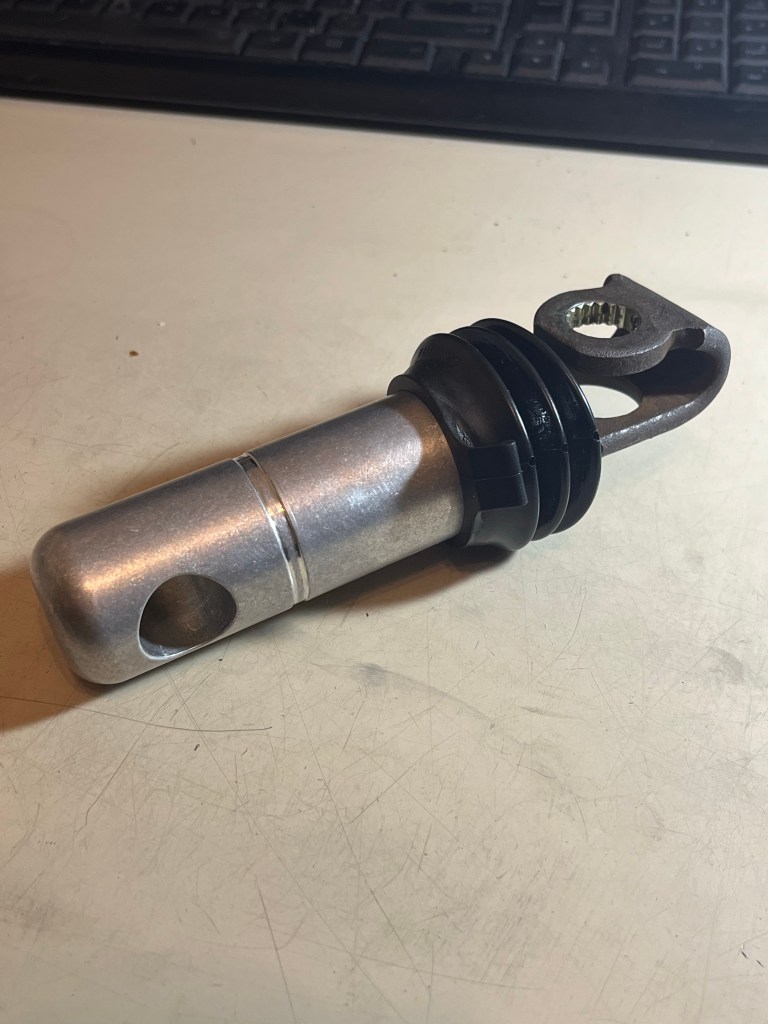
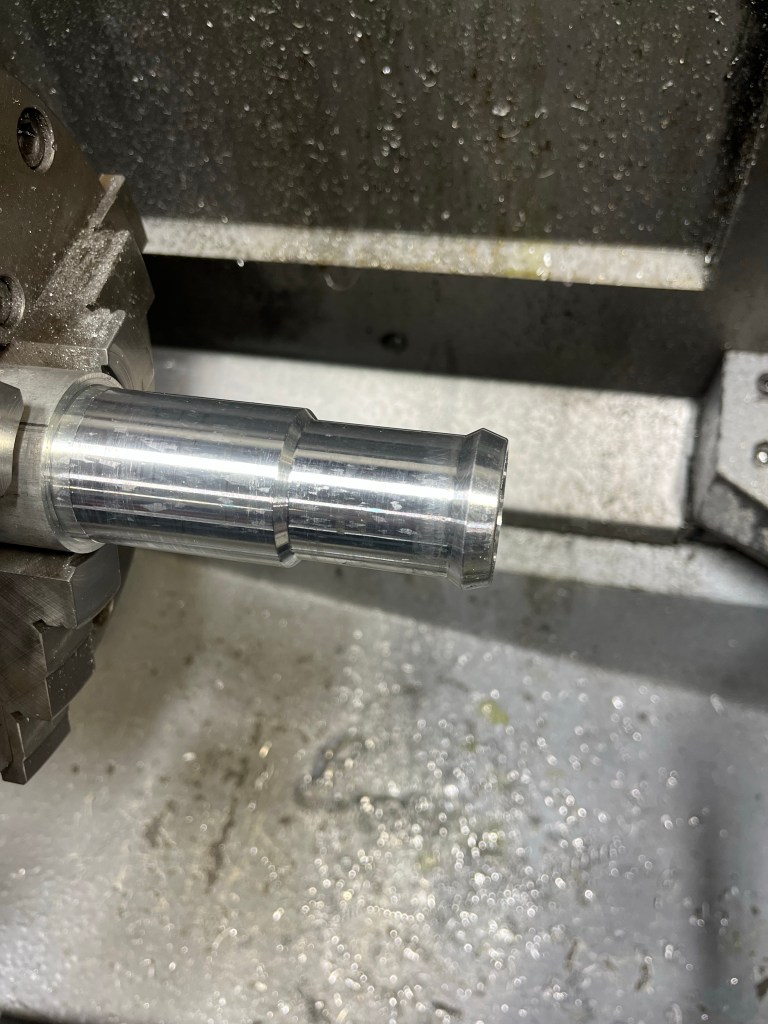
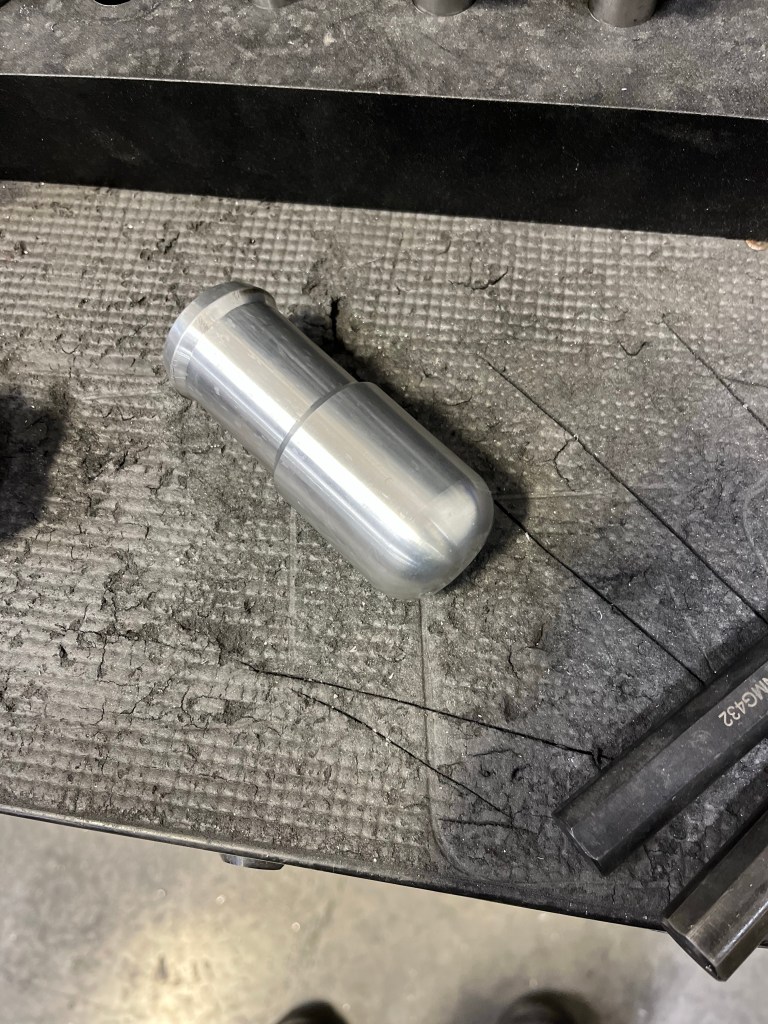
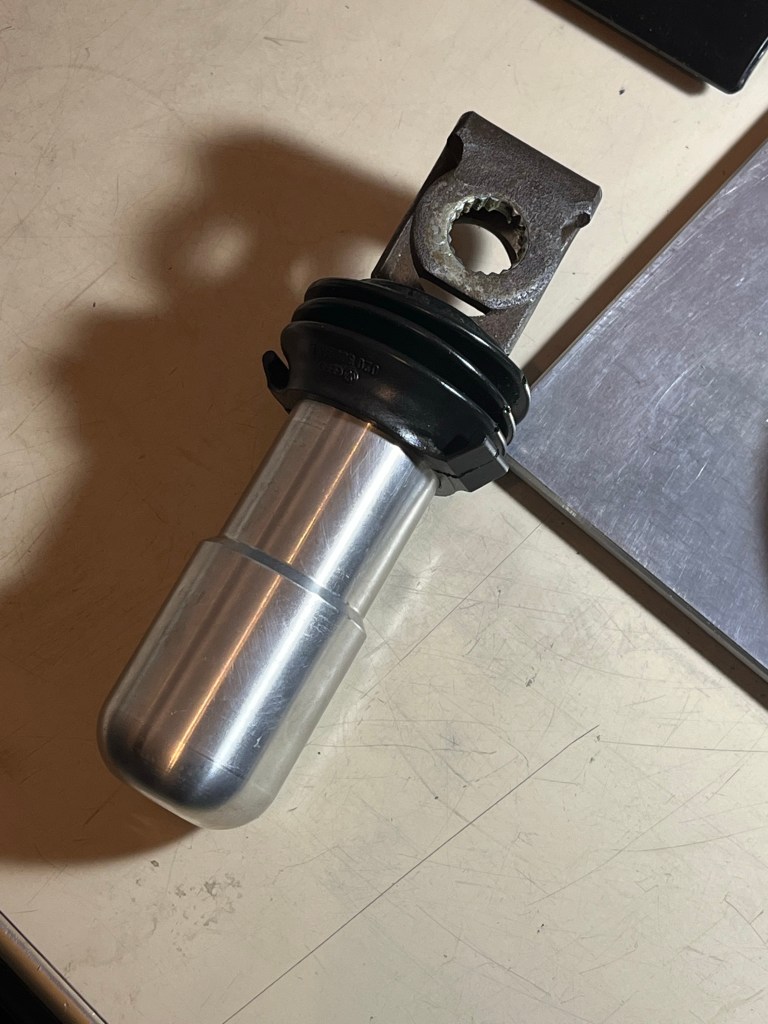
Vanagon – Trans Output flange tool
Posted by albell in syncro specific repairs, tools, vanagon on July 23, 2023
A while back good friend Simon needed seals replaced on output flanges on his Syncro. Other good friend Quentin to do the work. My job was to make a tool to make the job easier.
That’s a spare flange there for the fit test. It worked out ok.

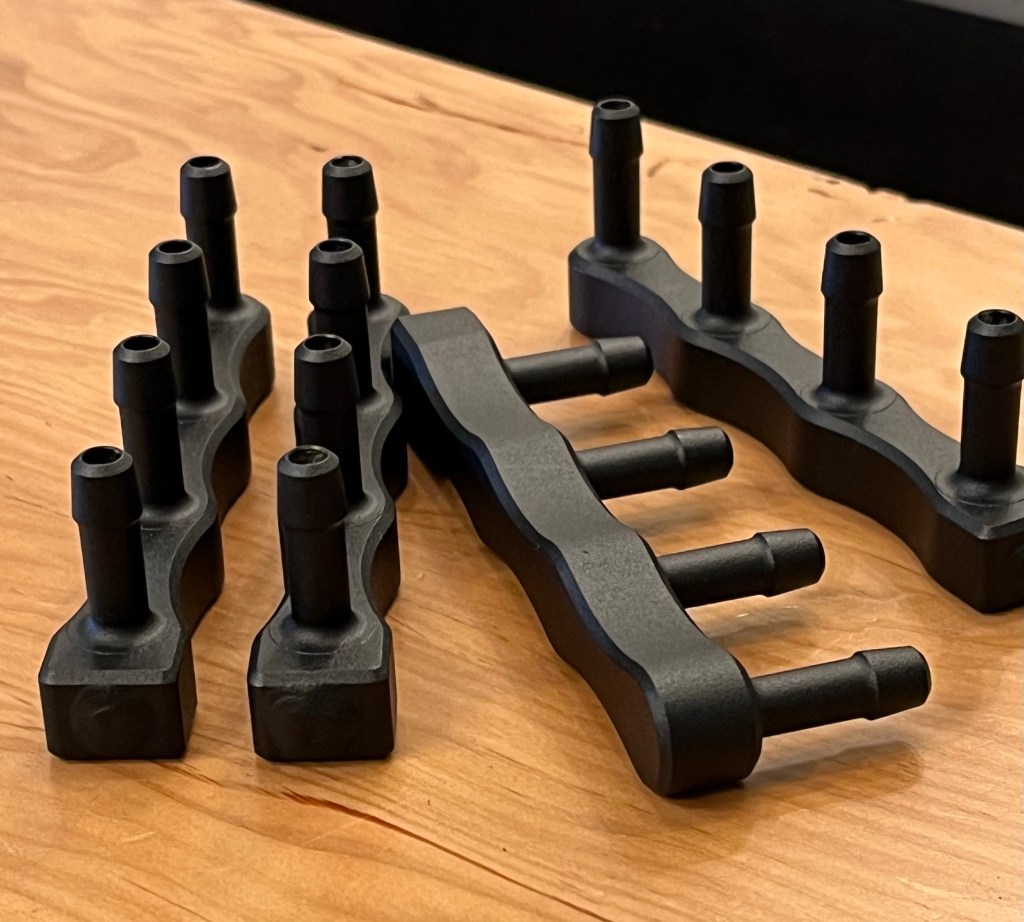
Vanagon – fuel rails
Posted by albell in vanagon, vanagon mods on July 23, 2023
Recently had a go at making aluminum fuel rails to replace the stock plastic ones. I wasn’t really taken with the current choice on the market. I thought they were a bit big. So I slimmed down. Been running a pair on my van for last couple months, and have some others out for testing and critique.
Had some powder coated black and some anodized grey .
Yeah that’s an aluminum copy of the stock shift knob.

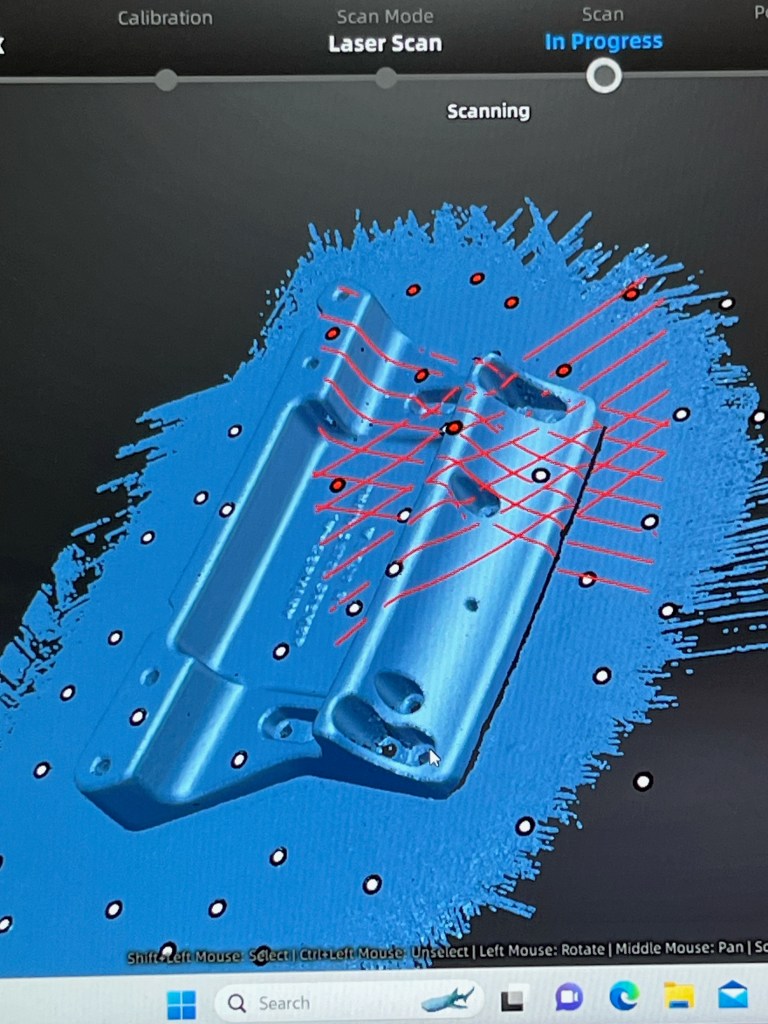
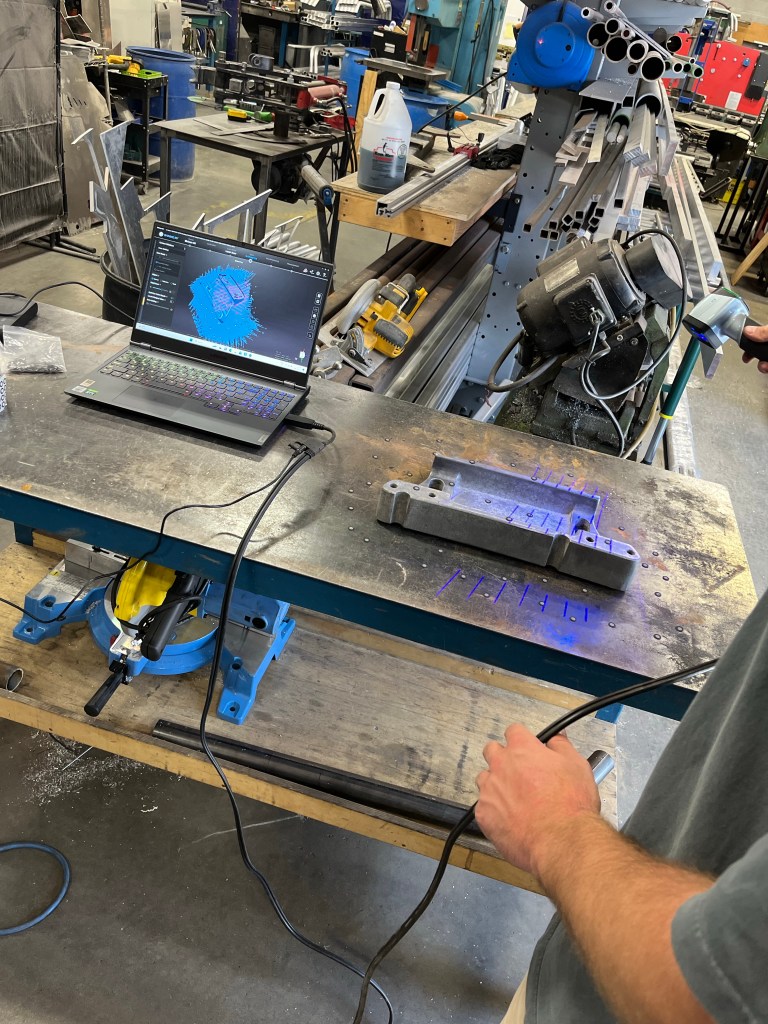
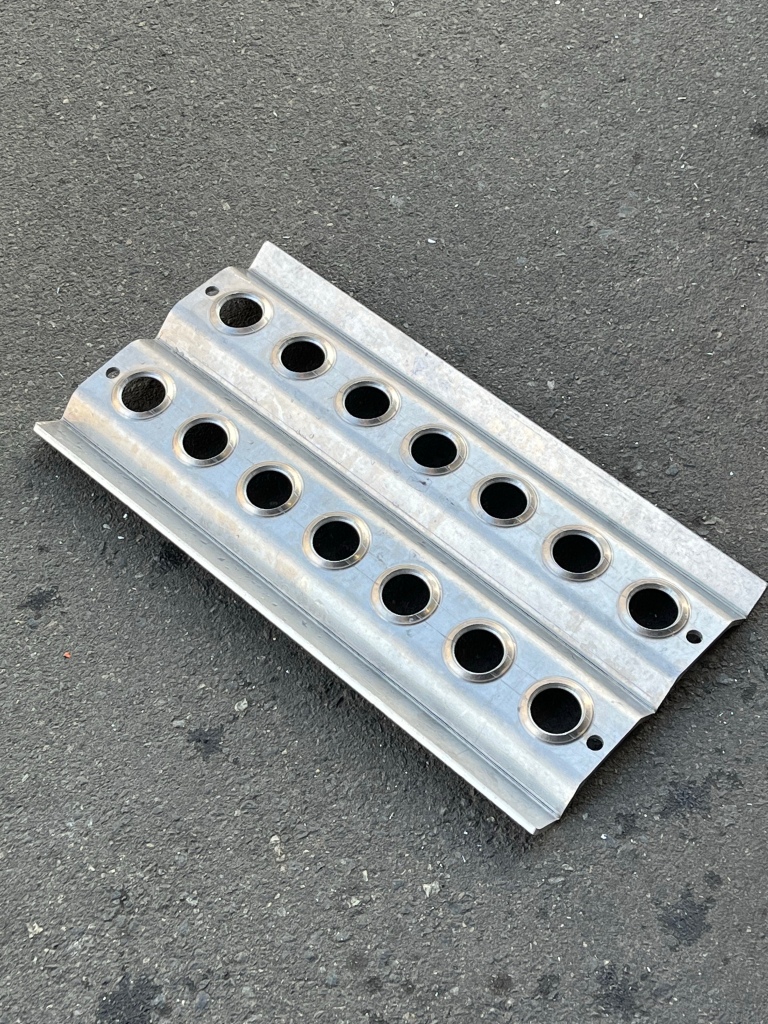
Vanagon – jagdwagen winch mount
Was able to borrow this mount and scan. Kinda rare thing, maybe 70 or so ? Not sure about that. Anyway, actual winch is nla, mounting holes for winch non standard. But thought it would be worthwhile getting it recorded. The cloud point scan hasn’t been processed to model yet


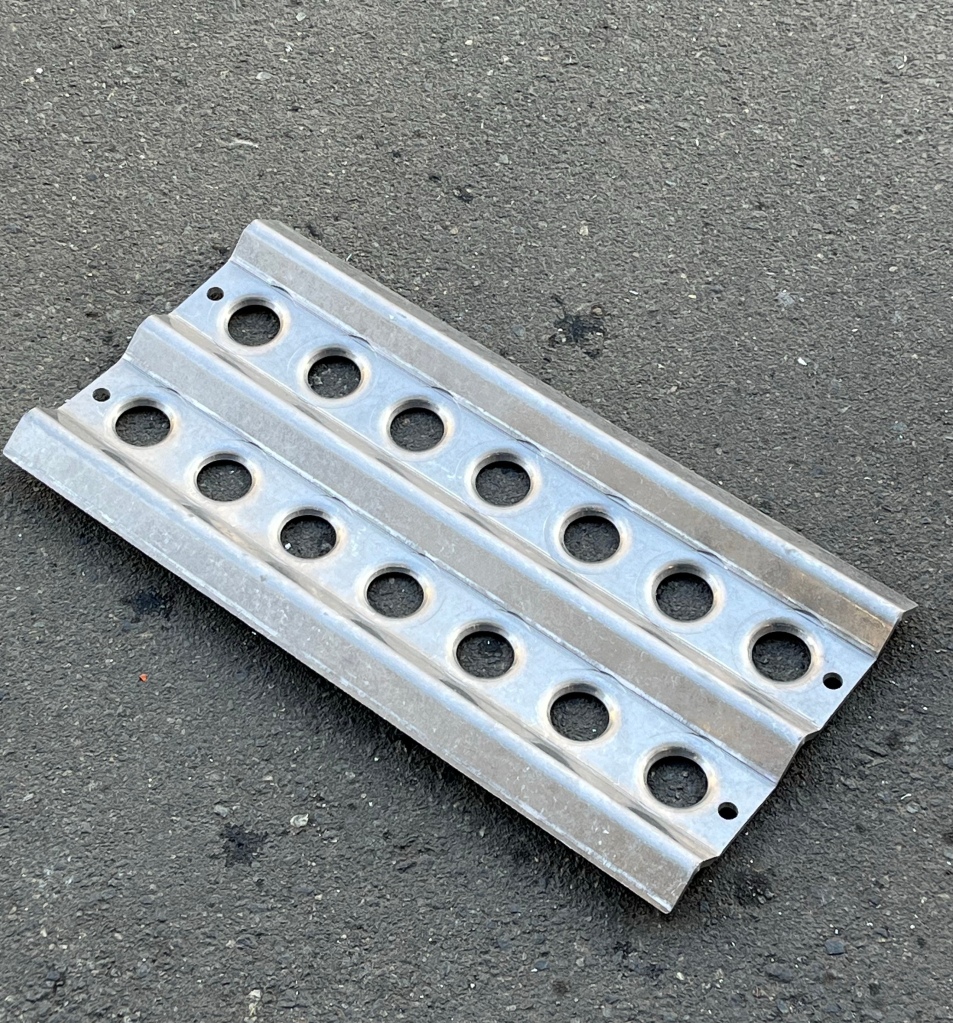
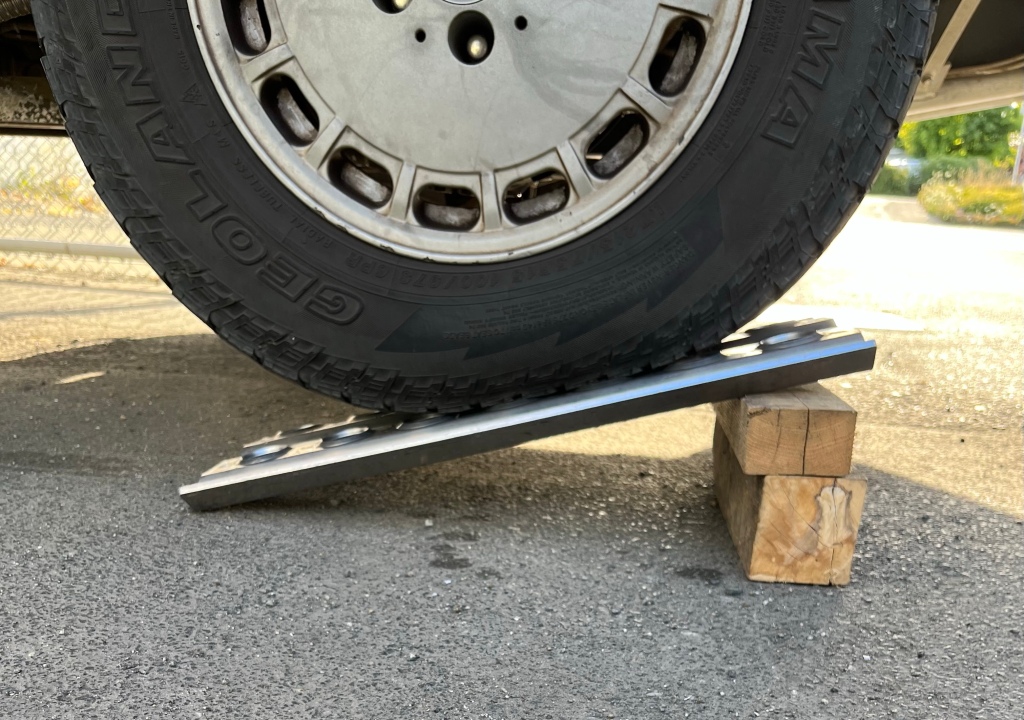
Vanagon – Experiment in aluminum
Posted by albell in metalworking, vanagon, vanagon mods on July 21, 2023
This Friday late afternoon silly project. I want another bridging ladder. I’ve given up on the section of fiberglass waffle board stuff I had been using. It’s heavy, it has large sized grit embedded on top surface ( really annoying to handle) and it really wasn’t thick enough … I think it was only around 34mm thick… would want 40 mm or so.
I thought I’d do an experiment with 1/4” aluminum. Make something about 30“ long and 10” wide.
But I was foiled , weren’t any off cuts large enough ( not going to cut into full sheet for this trial ) . So I scaled down to 22” long.
Ends up being a wee cute little thing. Good enough for a levelling ramp when camping. For scale, holes are 1.5” diameter , and dimpled.
No surprise it’s stiff , short span. I’d like to try again, same width and the Orginal idea of 30” long.
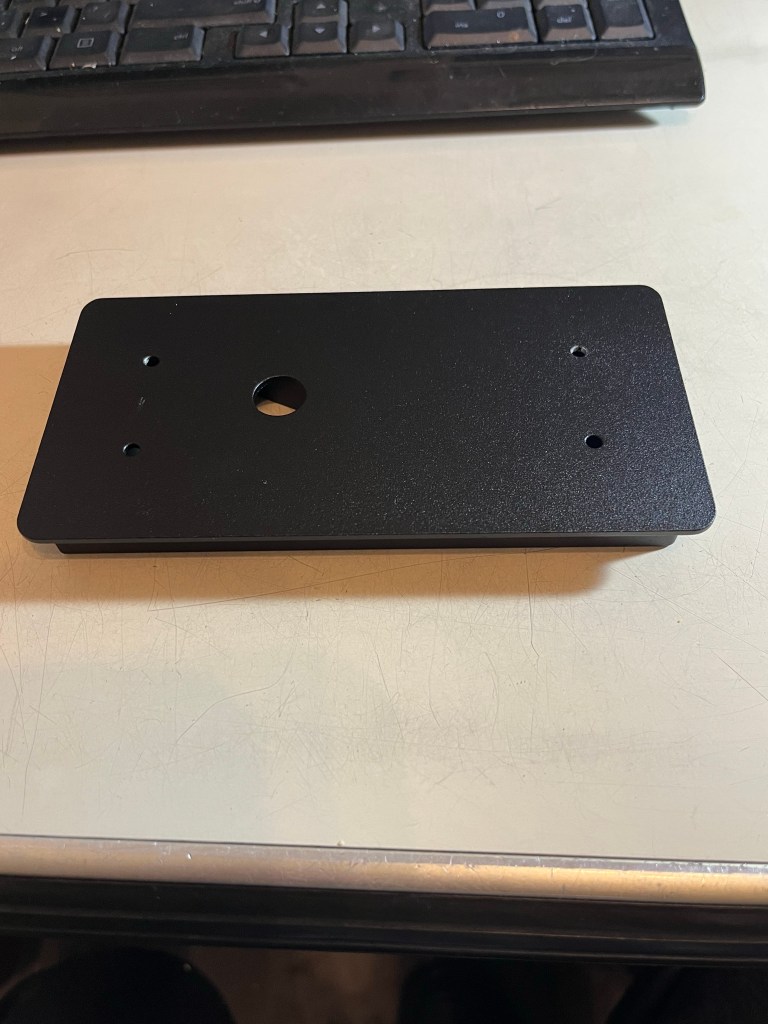
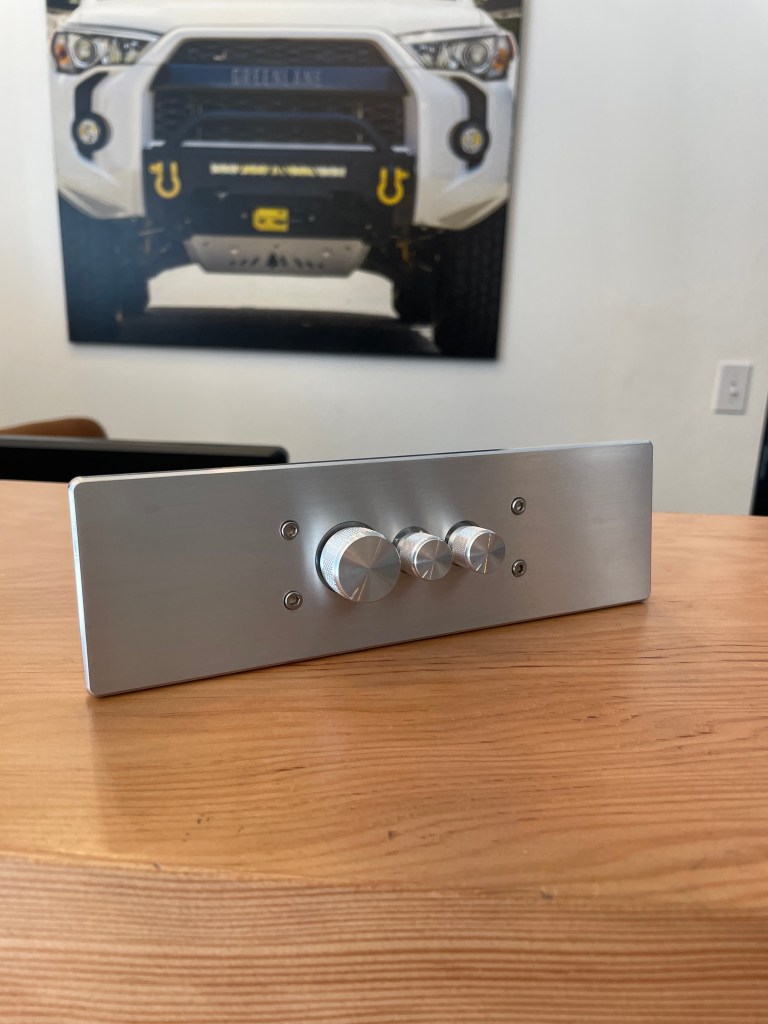
Vanagon – aux switch gear experiment
Posted by albell in vanagon, vanagon mods on December 20, 2022
Starting to install one of those remote switch to solid state relay box type set ups. Just got the mounting plate done so far. Aluminum and slight texture powder coat. Not sure what will be controlled by this. You get stickers to go on the switch pads. I’ll show when done.


Vanagon – what silliness is this?
Posted by albell in vanagon, vanagon mods on December 1, 2022
I’ll show finished later . Later has arrived…
It’s another version of the socket part of the ball and socket linkage back at the transmission. Other versions I made a while back here .
https://shufti.blog/2021/08/08/vanagon-syncro-some-shift-linkage-mods/
The idea of the spiral grooves is to retain some grease … that’s a tumbled finish on the part, gonna paint it. Bore hasn’t been deburred in this pic. The end has a rim to help keep the boot on.

M6 bolt goes up through the shift rod.
End of day today made another, slight changes. Any excuse to use this lathe .
Not finished, but you get idea. More thickness at bottom and a more sexy ridge at top for boot .
There is one thing I haven’t said.. one more step. I’ll show when done.
And done. I’ve done away with the roll pin years ago. The split clamp and bolt better, especially as the shift rod probably worn and the roll pin hole wallowed.


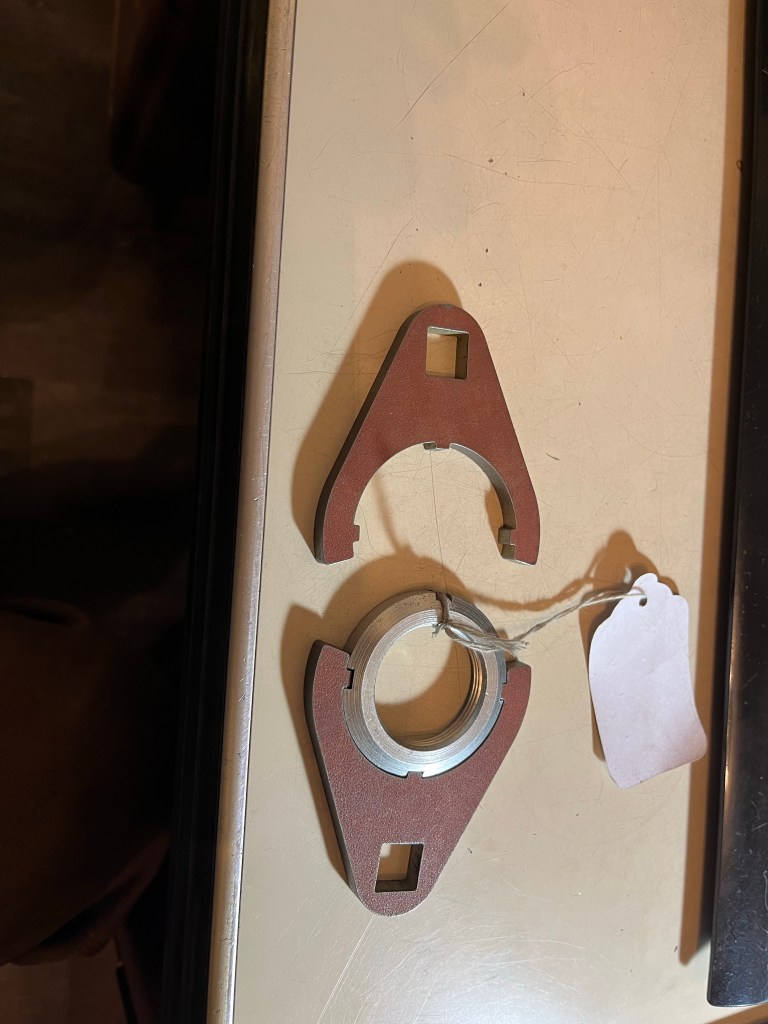
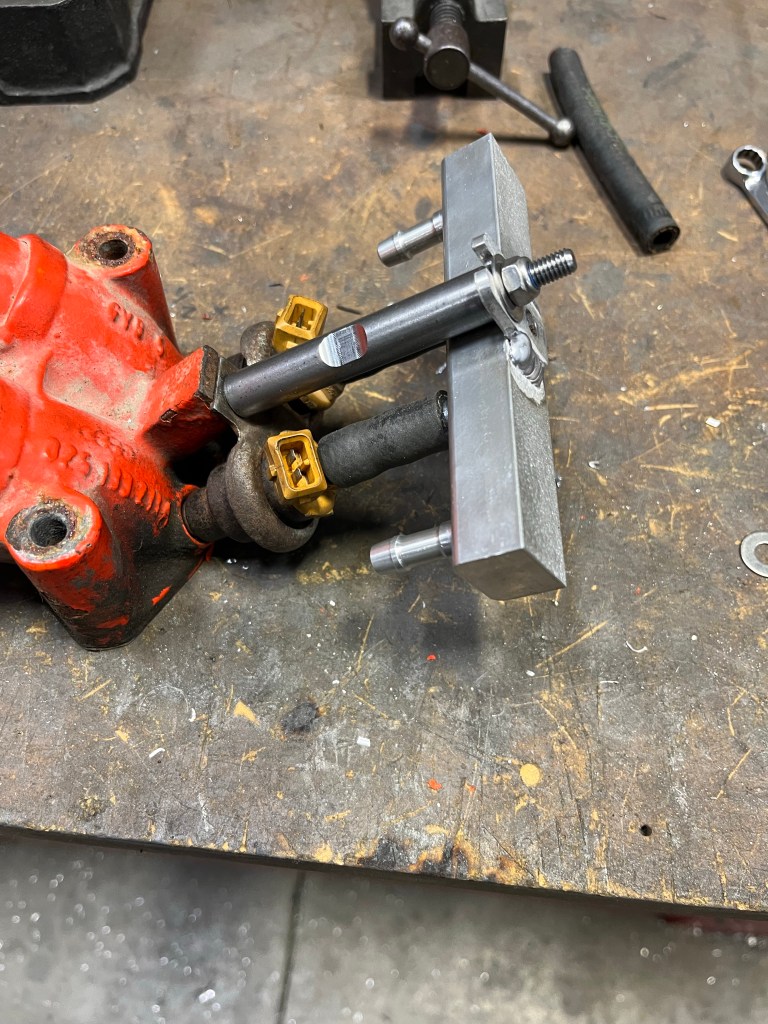
Tools – prototype transmission wrench
Quentin asked me to make a wrench to fit a locking nut, in Syncro transmission. Fits the nut fine, not sure yet if it clears other components in the stack. Has to be tested. The centre of the 1/2” drive hole is 2.000 inches from the centre of the nut when engaged. So you can easily do the calc to adjust torque. It’s a simple thing, waterjet cut 1/4” steel plate.

Vanagon – fuel rail fooling
Posted by albell in vanagon, vanagon mods on November 26, 2022
Made a fuel rail a few weeks ago for fun. Trying out a tool and tool path. No need to do this, lots of commercial options. Last Friday I made a support for the rail, fitted up on old injectors and runners. No rubber on the injectors. And yes I have drilled and plugged , but not welded, the rail. Surprise for me is how sturdy the set up is


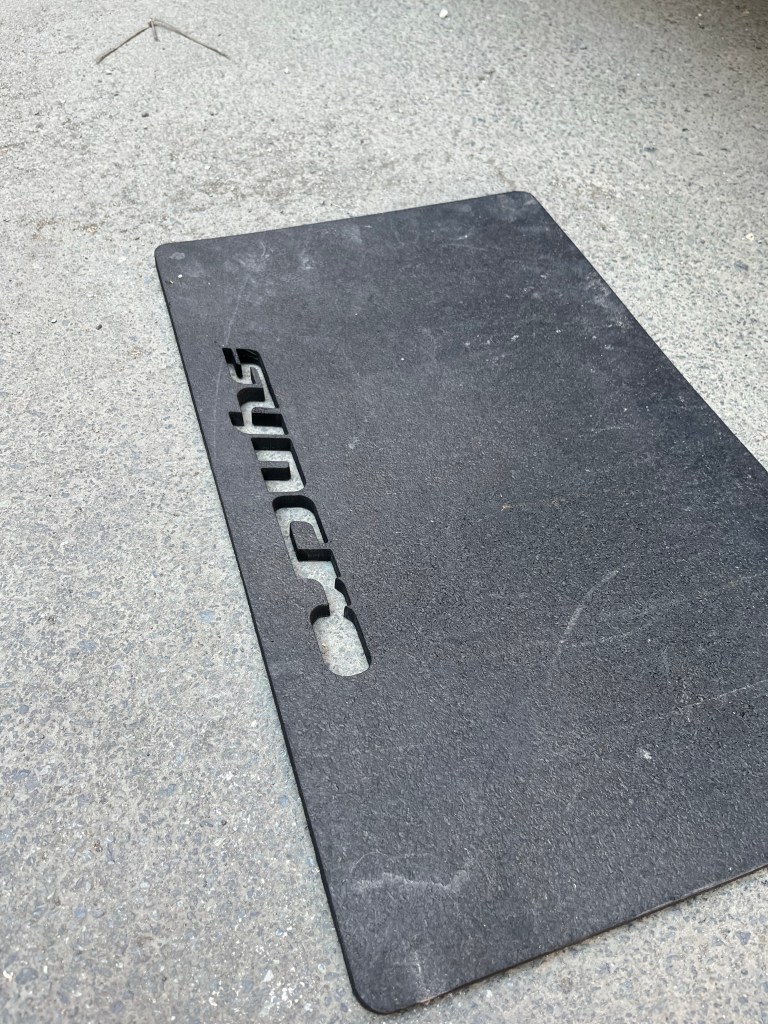
Vanagon – wee door mat
Yes, I could have tabbed the centre of the “O”, but didn’t 🙂 it’s 3/8” rubber

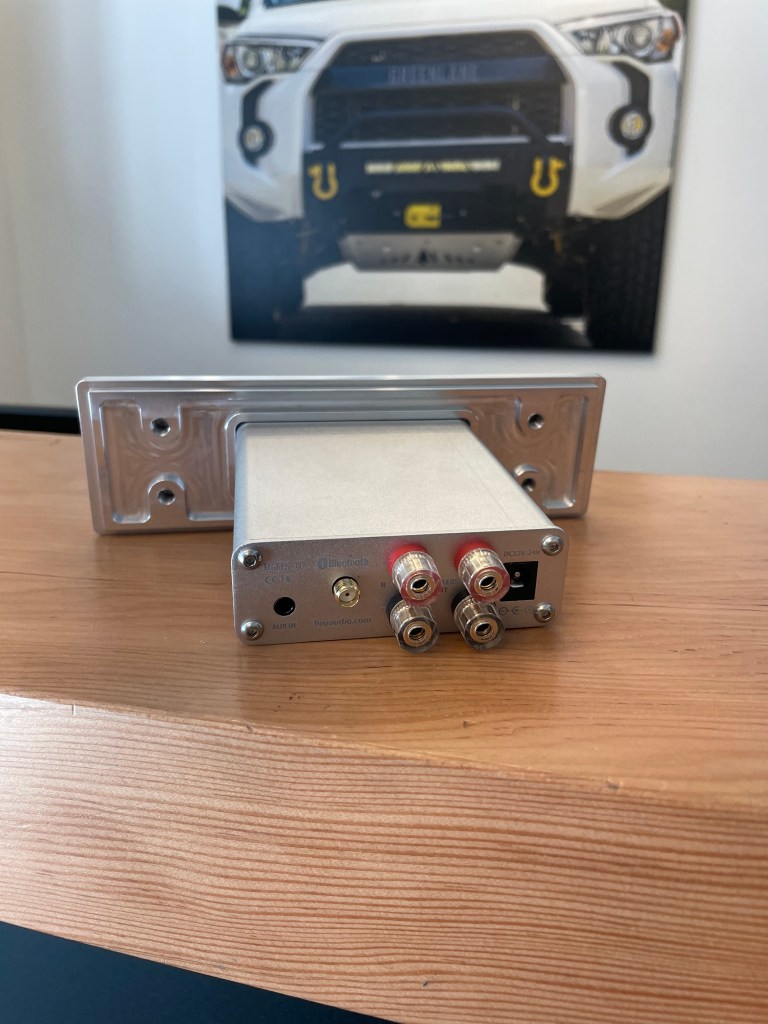
Other cars – single din faceplate for BT amp
Posted by albell in other cars, vanagon on September 11, 2022
For an 82 Porsche. Idea is to mount simple and cheap BT amp in the single din space. It’s installed and works well even without fader. Door and parcel shelf speakers
Vanagon – replaced led strip over the kitchen
Posted by albell in vanagon, vanagon mods on August 14, 2022
Left over from gutter strip replacement. Warmer colour temp. Controlled from same panel of switches as the gutter lights.


Vanagon – new led strip under gutter
Posted by albell in vanagon, vanagon mods on August 13, 2022
Last year the strip I installed under the gutter ( 6 or so years ago?) partially failed… the forward 1/3 failed to light. I got another strip , this time the kind that looks more like a cob led. That is, looking like one continual led instead of discrete elements. Of course if you look closely you can see the led elements, but the effect is of one continuous strip.
Has the same thick clear coating as the previous. Making it waterproof they say. But I noticed when I took the old one off, water gets into it from the backside, the adhesive side. So I expect the same for this one. Mind you the van is outside all year round, and it is wet in the seasons not called summer 🙂
Pic below is in daylight and the strip on. It’s really not noticeable at all when it’s off.

And at dusk.
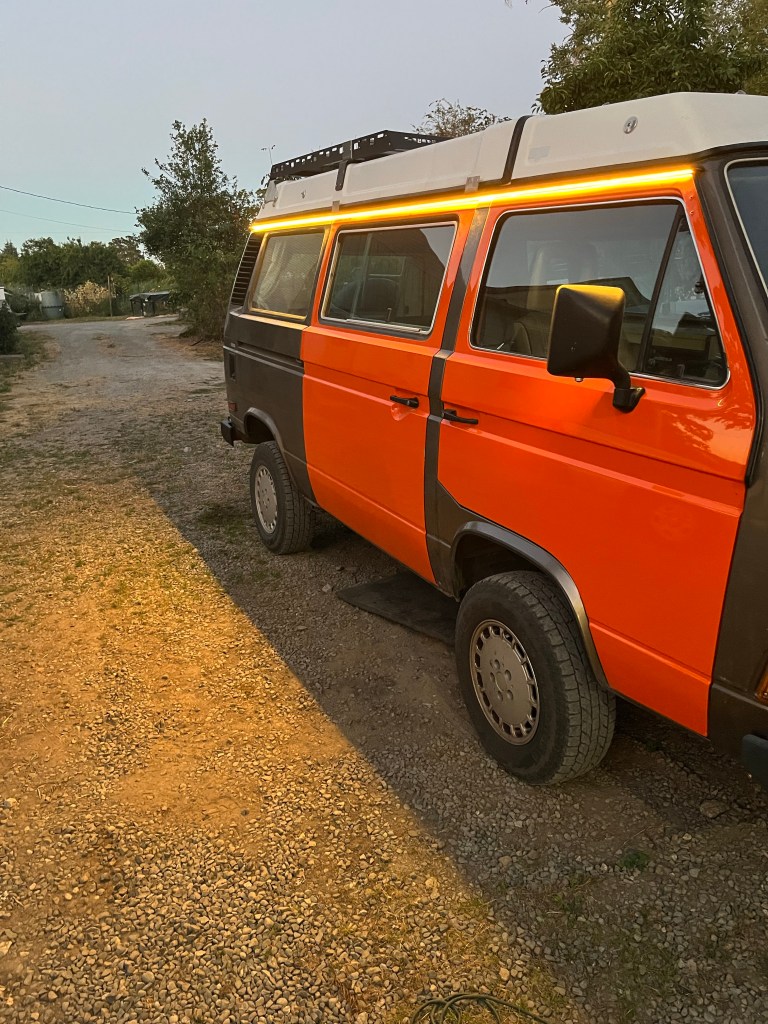
Controlled by the same touch to dim switches as before. Two others do the inside led strips, got one left as spare for something.

It’s a handy mod when camping.
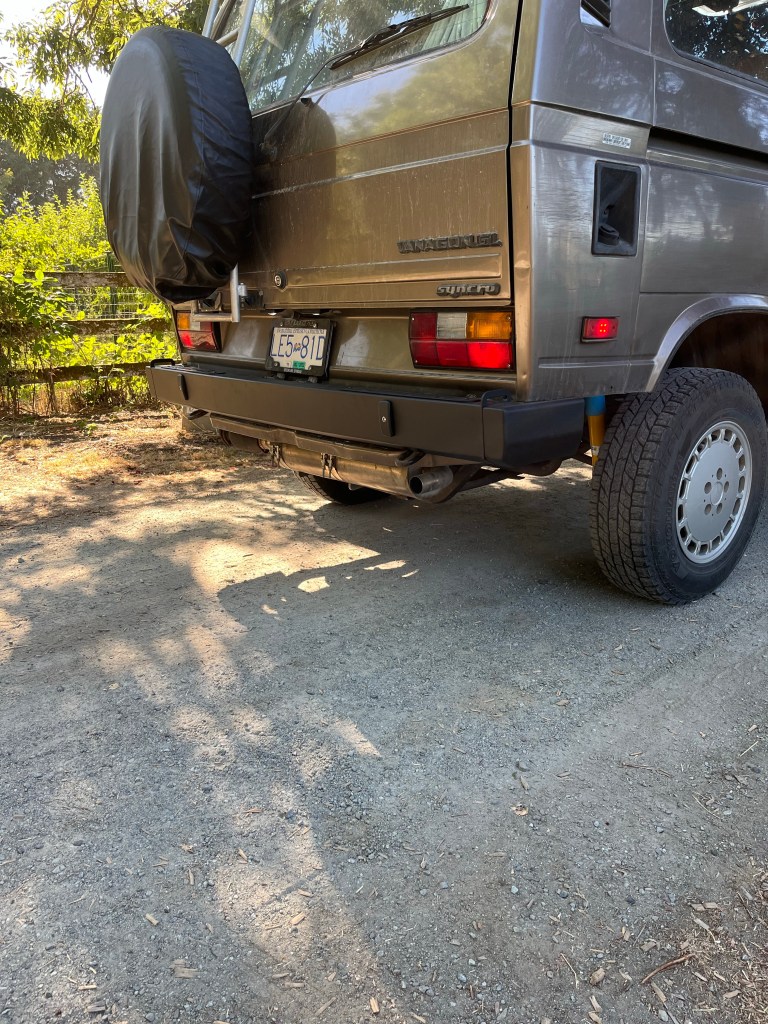
Vanagon – rear bumper done.
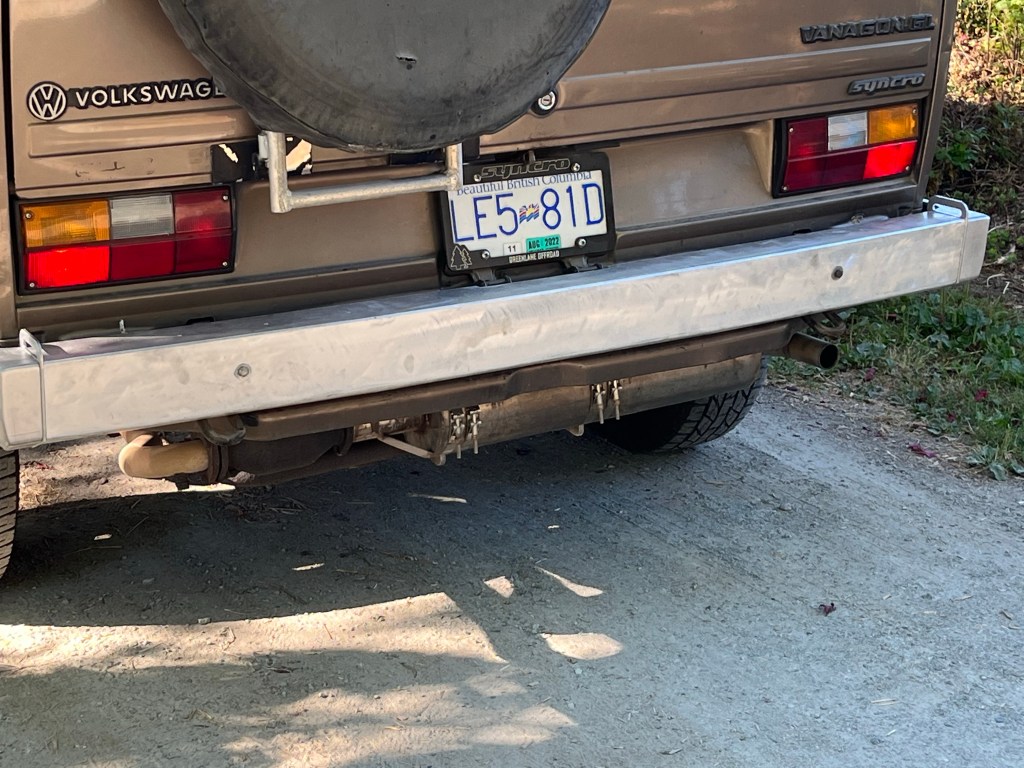
Posted by albell in vanagon, vanagon mods on August 11, 2022
Well pretty well done. I can see things I’d like to change in the next one. But it’s ok. Had a bit of a silly moment and painted it orange. That didn’t work.
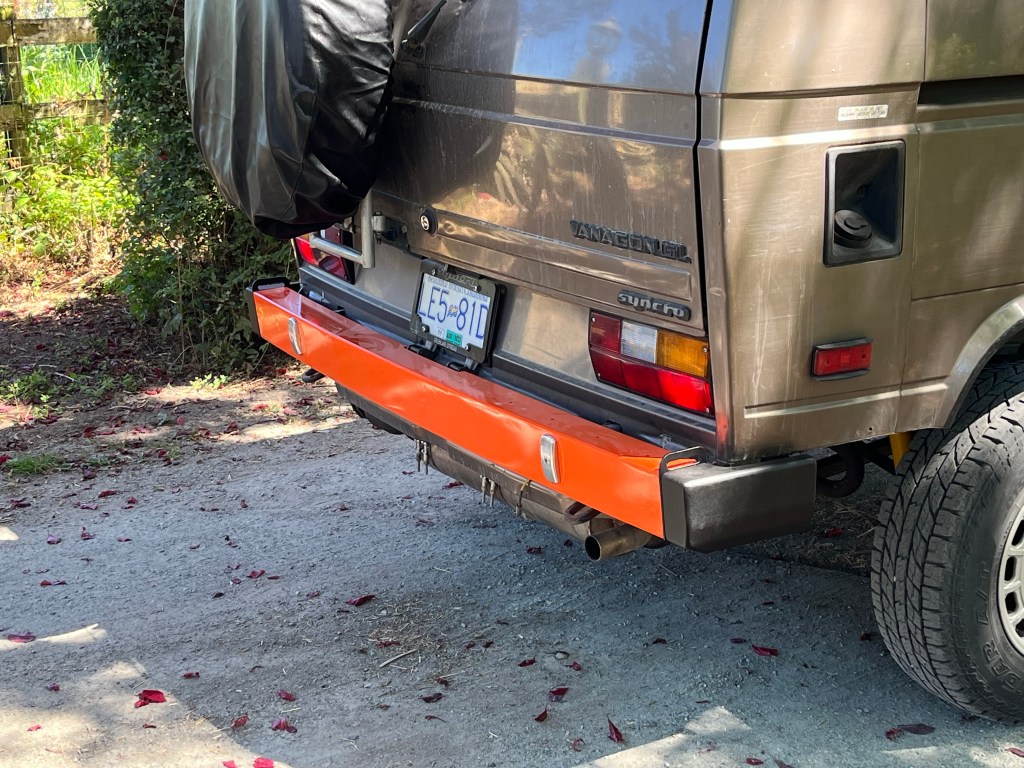
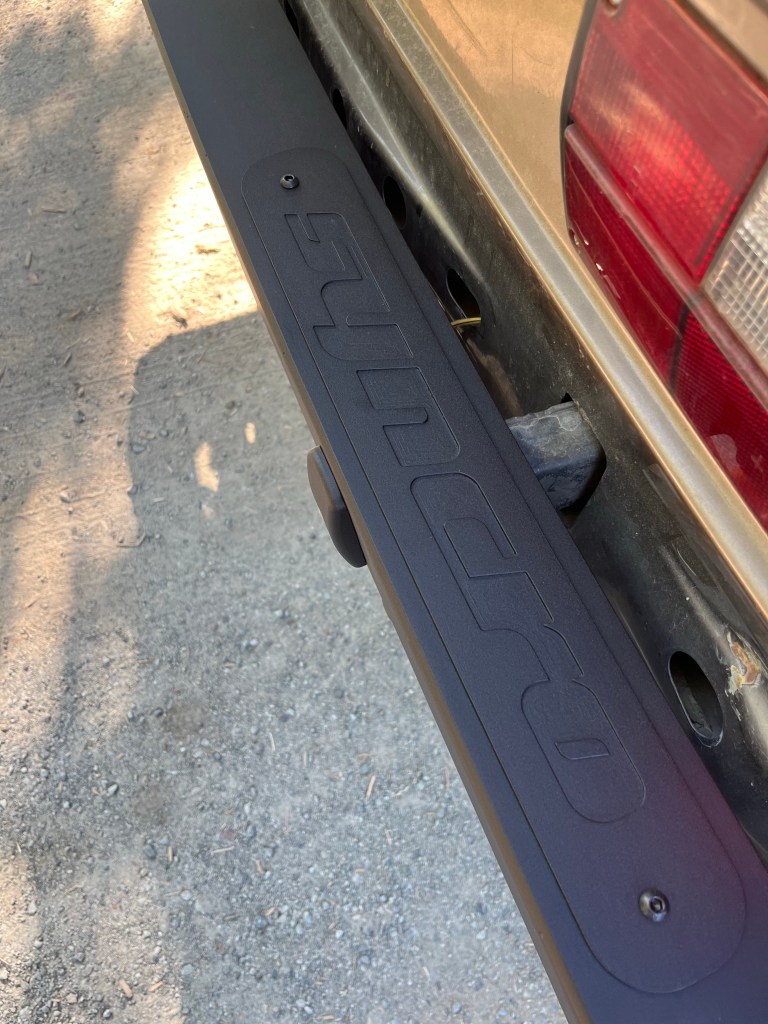
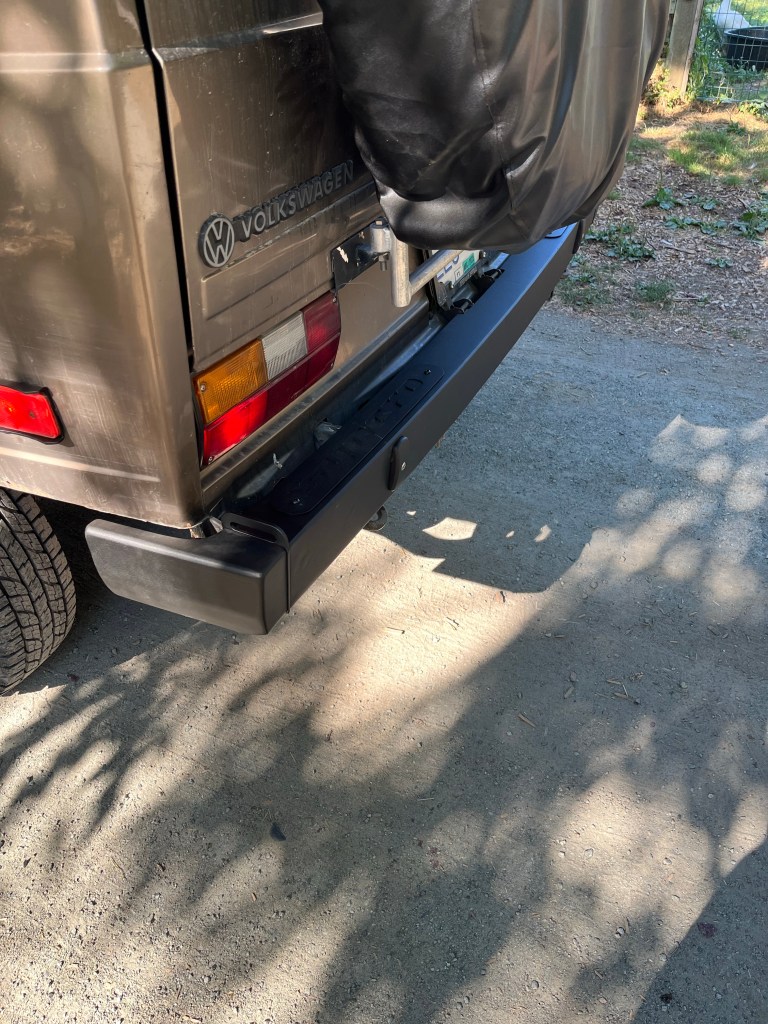
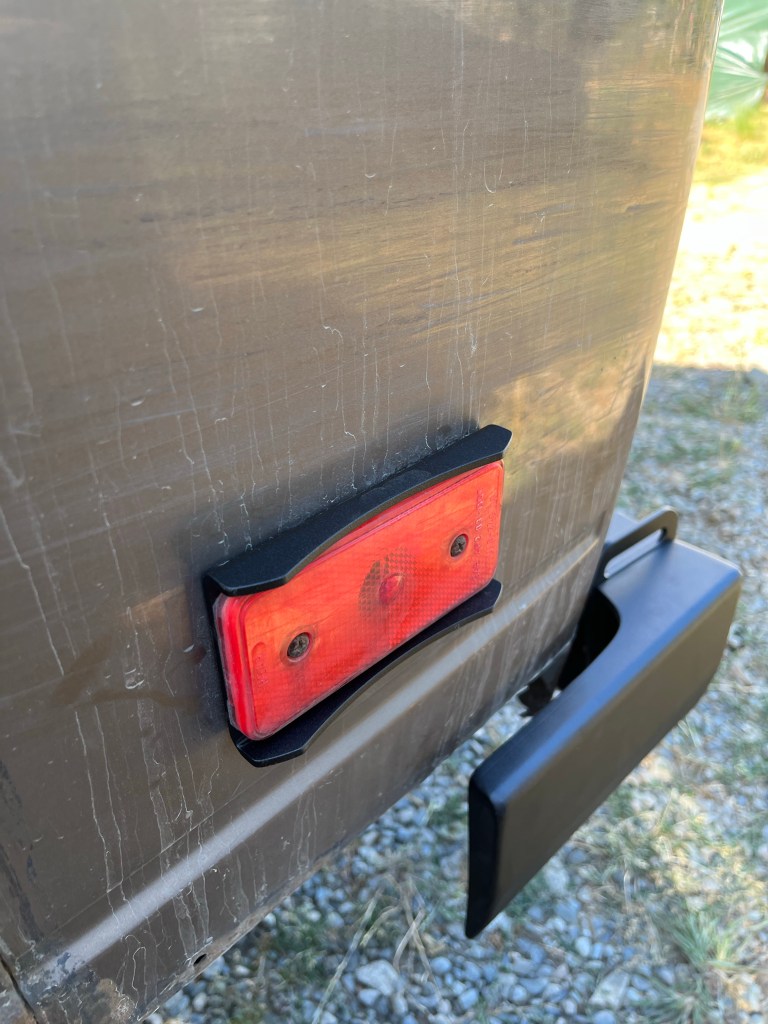
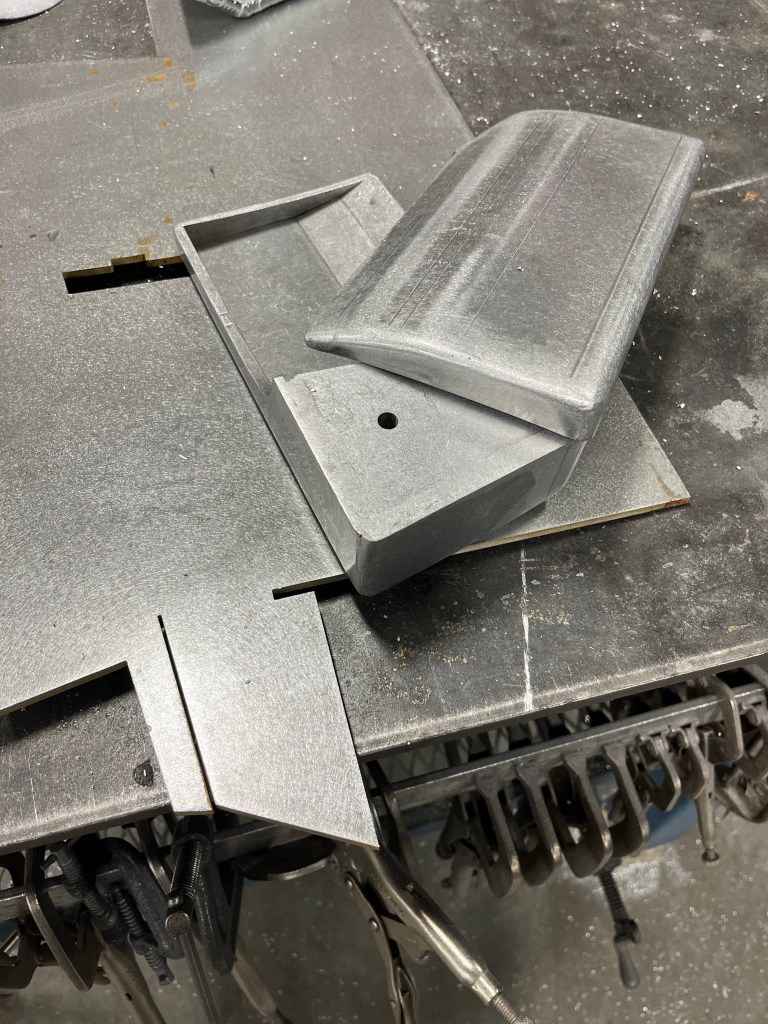
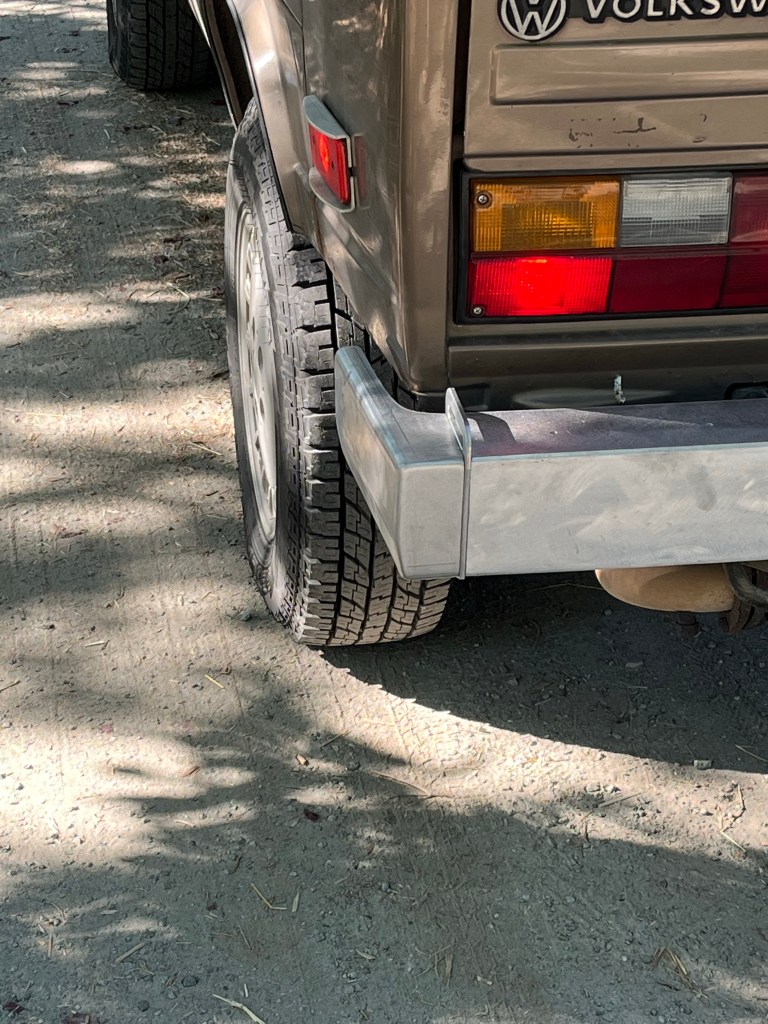
Vanagon – making another aluminum bumper
Posted by albell in vanagon, vanagon mods on August 1, 2022
Rear first, close copy of the stock steel van bumper. This first go round ain’t perfect, but it’s good enough for my own use and next one ( I will be building more ) should be better. It’s 1/4” 5052 aluminum. Having it powder coated this week, slight texture black. You’ll notice I’ve cut some panel from the van , have plans.


Vanagon – dash foil replacement
Posted by albell in vanagon, vanagon mods on July 30, 2022
Good friend Greg has replacement dash foil in the works. Made from better materials than the original, a very nice bit of work. If you are interested , check out this survey form he created to determine numbers to make
https://forms.gle/MYNDQiHYLuG1rZMQ6
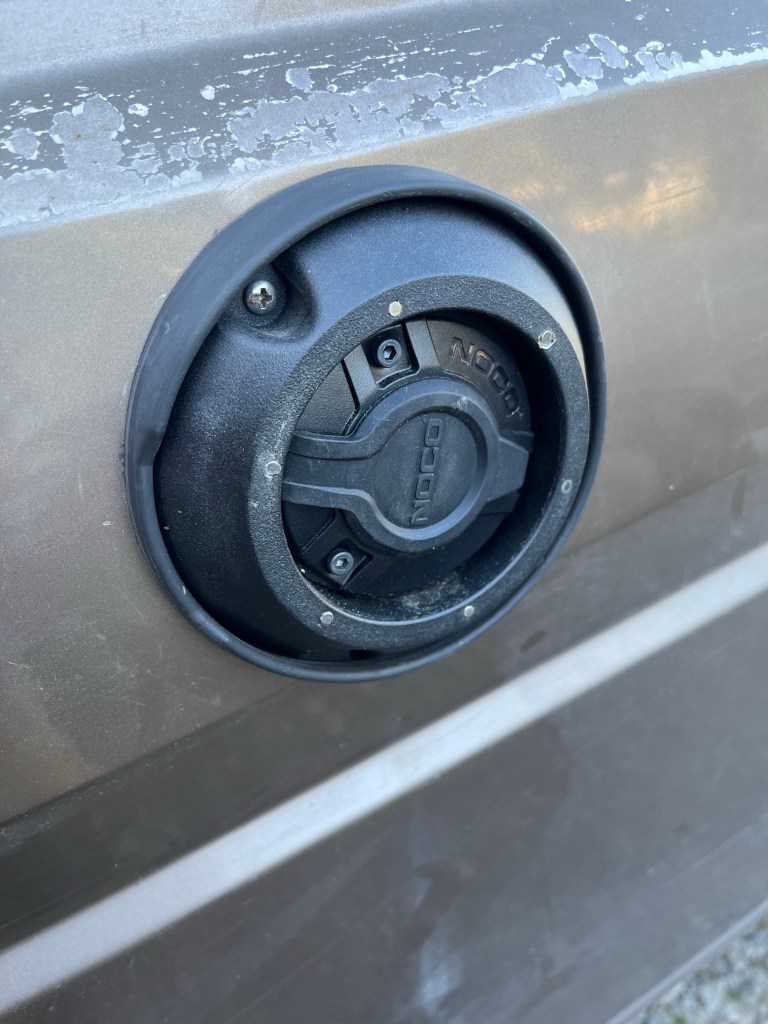
Vanagon – stock fridge vent delete option
Posted by albell in vanagon, vanagon mods on July 23, 2022
I’ve installed a Dometic CRX-50 fridge. Yup I finally let go of the propane fridge I’ve been faithful to for 20 years. The install pics may come later, but the fridge vent replacement is now.
Made an aluminum thing that approximates the stock vent dimensions. Has a lid with magnets that correspond to magnets in main body , north south opposed.
I kinda had issues with the magnet placement, you’ll see the marks, but the concept works, a twist on the lid and it comes off.
Inder the lid is a Noco 120V inlet plug. That goes to the fridge ( has an AC power option). If I were to do it again, and I’m probably going to, I’d use larger and fewer magnets, and try not to screw up on the magnet hole drilling!

.

Vanagon – trailing arm replacement
Posted by albell in syncro, vanagon, vanagon mods on July 23, 2022
Not much to say here. I replaced my trailing arms with a pair I refurbished and modified, I ground off the spring perches and welded up new , thicker, and angled perches. Also made some thicker plastic pads to go on them. Primed and powder coated the arms and installed polyurethane bushings.
Made the angled perch. The lens shaped part,waterjet cut flat, then I just hammered into a roughly circular shape. Welded to top and bottom flat disks. The central boss welded in too. I drilled and tapped the top plate for a 5/16” set screw. That way I could squirt some rust inhibitor into that space after the arms painted. Also put in a couple of M6 riv nuts in arms to hold a clip for the brake hard line.
The blue plastic spacers I made from some mystery plastic that was hanging around. I think it’s nylon. Let me add this…
The reason I made the thick plastic pads for the perch was to be able to machine a recess for the spring end. The stock pad as you know, has a formed recess, with a corresponding thin and formed plastic pad. Those stock pads are hard to get, the replacements from vendors seem only to be plain plastic discs, no recess. I didn’t want to machine the metal for the recess if I couldn’t find a plastic pad to fit… get what I’m saying?


Not shown is new springs and slave cylinders in the brakes, new ( well a used 2wd ) handbrake cable on the passenger side wheel, and new brake flex lines. I did manage to bend the passenger side hardline into an ugly mess when doing that side flex line, but the little blue plastic clips ( yeah I made those) helped pull it back to reason.
The combo of the angled perch and thicker plastic pad has resulted in a height of about 19.88” from fender lip to hub centre. That’s at the limit, I think, of amount of lift for stock axles and joints.
Did the swap in my driveway, on gravel. I’m too old for this type of thing now, I felt every minute of the job.
Ok Simon…
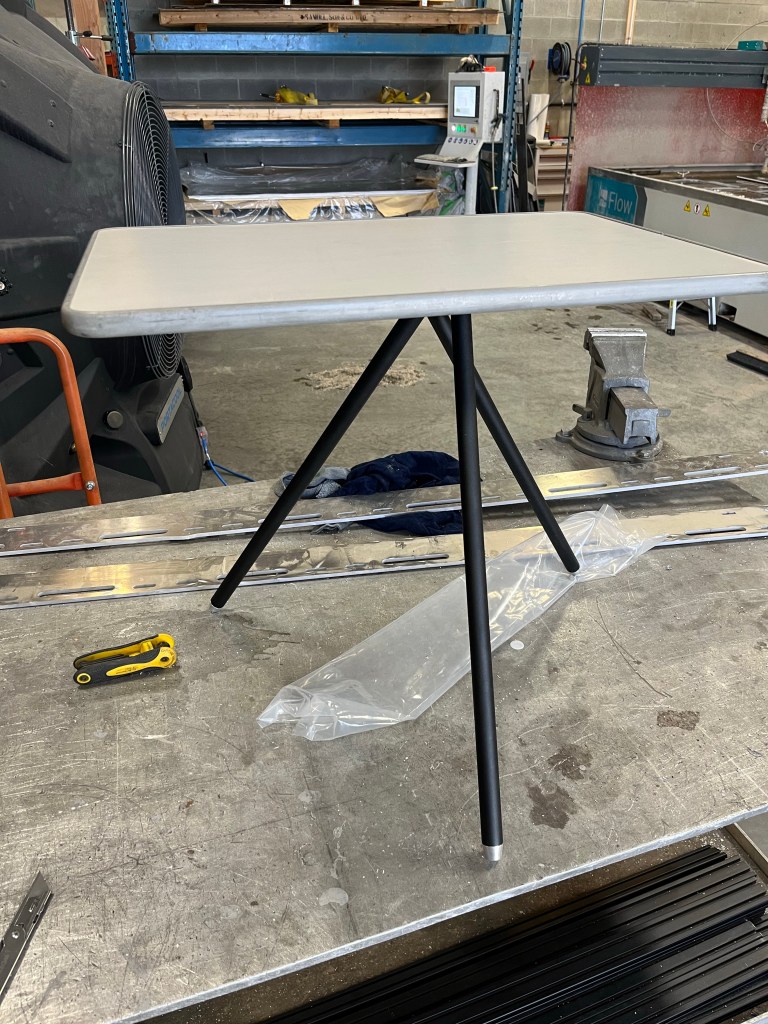
Vanagon – “The Swellegant Junior” sneak peek
Posted by albell in vanagon, vanagon mods on July 20, 2022
Some of you may know I’ve been working a few versions of a table stand that uses the stock westy table, since about 2016. The idea is you can screw on your small or large westy table to the stand and have a place to put nibbles and drinks when sitting at the campsite.
This is the latest iteration. 6061 aluminum, stainless pins and screw, and powder coated black. It is designed for the later westy tables, the ones with the thread hole in metal plate on the underside. The earlier version table with the tube on the bottom…. Well I have a prototype adapter made, but not tested.
Has a rubber gasket that holds the legs together when folded, and when in use , the gasket goes between the table and the stand to give firm adjustability of the leg orientation.
This is a luxury item. It’s expensive to make – cnc machined, quality materials, and living wages.
But it’s excellent , and it works!
And the price…
$150 Canadian
Here are some pics taken in the workshop.


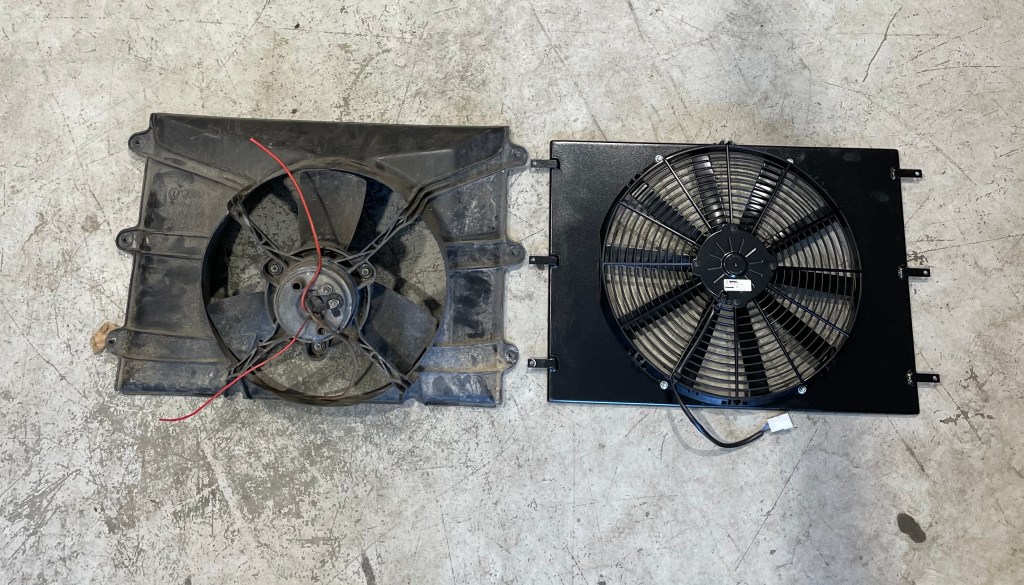
Vanagon – a slim radiator shroud and fan
Posted by albell in vanagon, vanagon mods on July 18, 2022
Made a shroud for Quentin, his design I’m just the fab guy. He has reasons for wanting slimmer.
It’s quite a reduction in thickness.


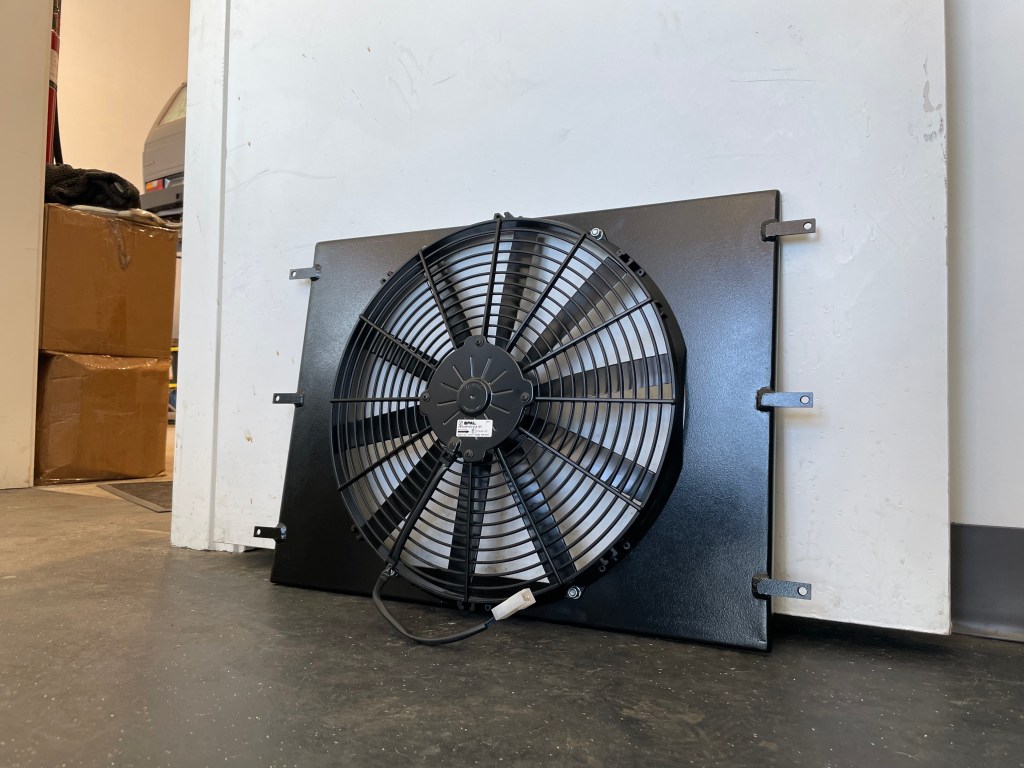

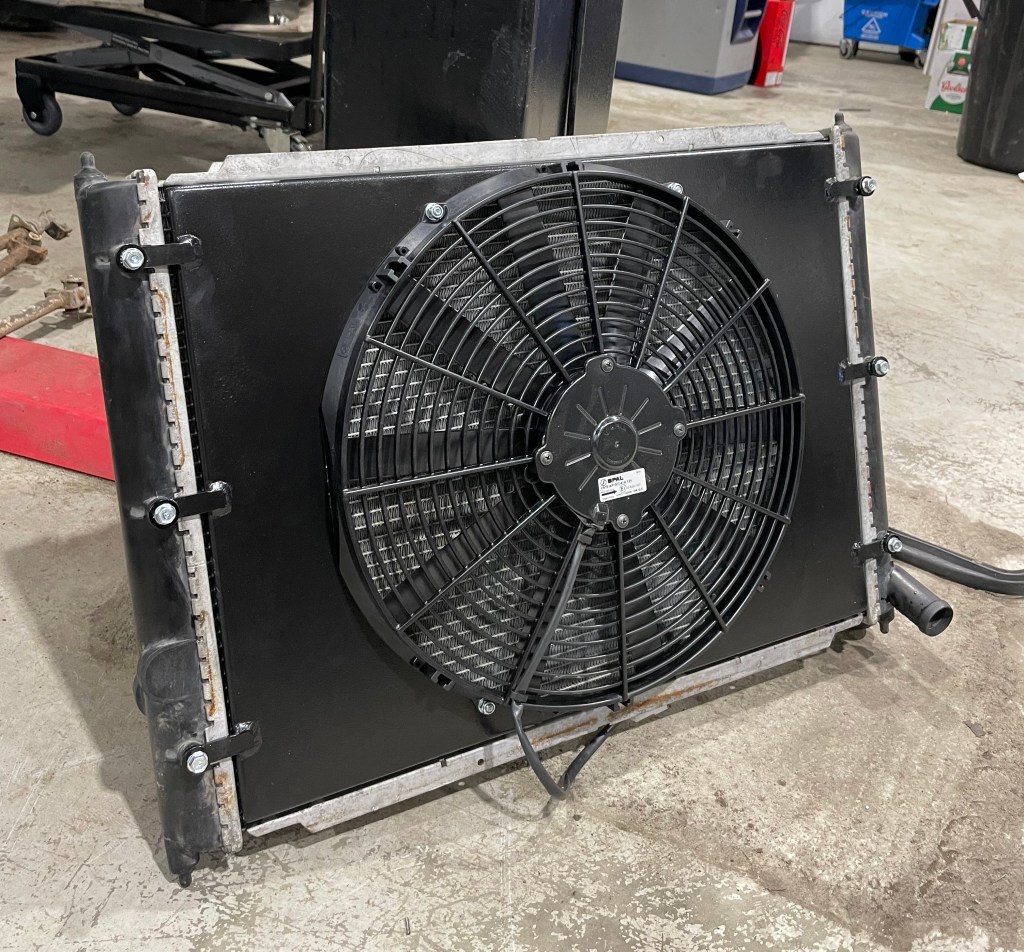
Vanagon – good, better, best
You decide 🙂

Vanagon – stock westy kitchen light improvement
Posted by albell in vanagon, vanagon mods on July 18, 2022
Friend Greg has developed a snap in replacement for the three halogen festoon bulbs in the westy kitchen light.
Led strips and dimmer control integrated on a board that really does just snap into the bulb holders on the stock light unit.


That spring on the left is the dimmer control. It rests in the stock shade and allows touch dimming.
Friend Simon got one and tried it out. He made a wee vid which explains how it installs and works. Have to note there are camera artifacts , you don’t see those in actual use.
I have to say, this unit is superbe. It’s so easy to install and the light quality is excellent. I think it’s a no brainer for those wanting to retain the stock light but move up to lower power draw led, with good light quality.
I think at max brightness the unit draws 1 amp, at lowest setting 70 mA.
Oh and I should add, he’s selling them.
Vanagon – rare pairing
Posted by albell in other cars, vanagon on June 3, 2022
Amazing sight, BMW M1 parked beside my van. Immaculate condition and it’s for sale, around $600k US.


Vanagon – Quentin’s Syncro
I’ve posted about his transmission rebuild, and it all went back into the van with no bits left over. Quentin, from vivid vans, reports that he’s put 700km on the van since, and is super happy about the result. The van has a good look eh?
Vanagon – door cards
Posted by albell in vanagon, vanagon mods on March 22, 2022
It’s been years in the making. I’ve never got around to it until today. 0.090” aluminum. Some mods done too. I’ve cut the stock speaker hole larger and will attempt to fit larger speaker. That does have some challenges but I think I can do it. Also added smaller hole beside that main speaker hole for tweeter. Did the back hatch card too and added cut out for hatch release using the stock front door lever assembly.
I scuffed the cards up after cutting. If you look closely you can the my weight measurement written on one card. Comparison with bone stock 82 vinyl covered card.
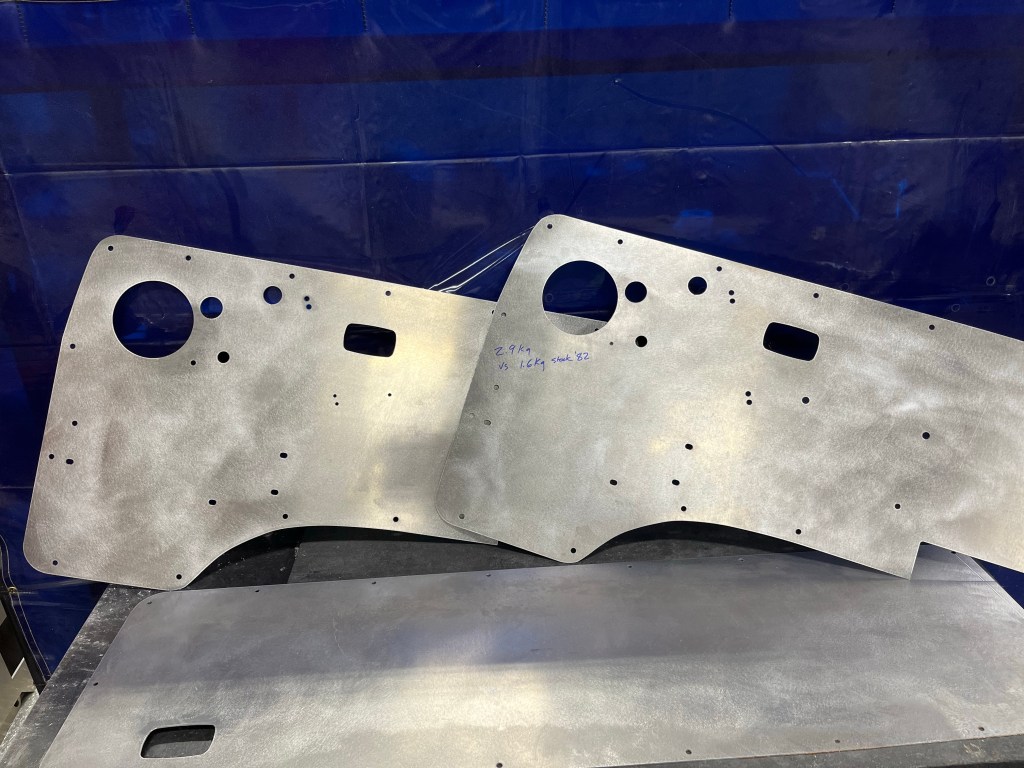
Oh, what I used…
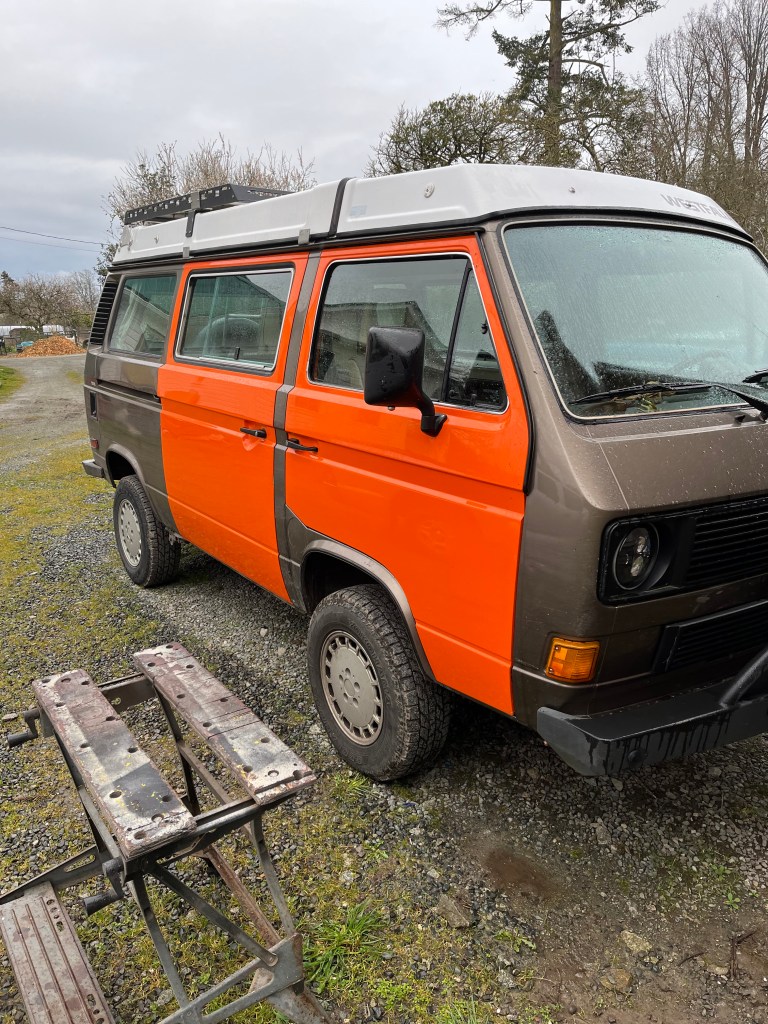
Vanagon – when I’m old I shall wear orange
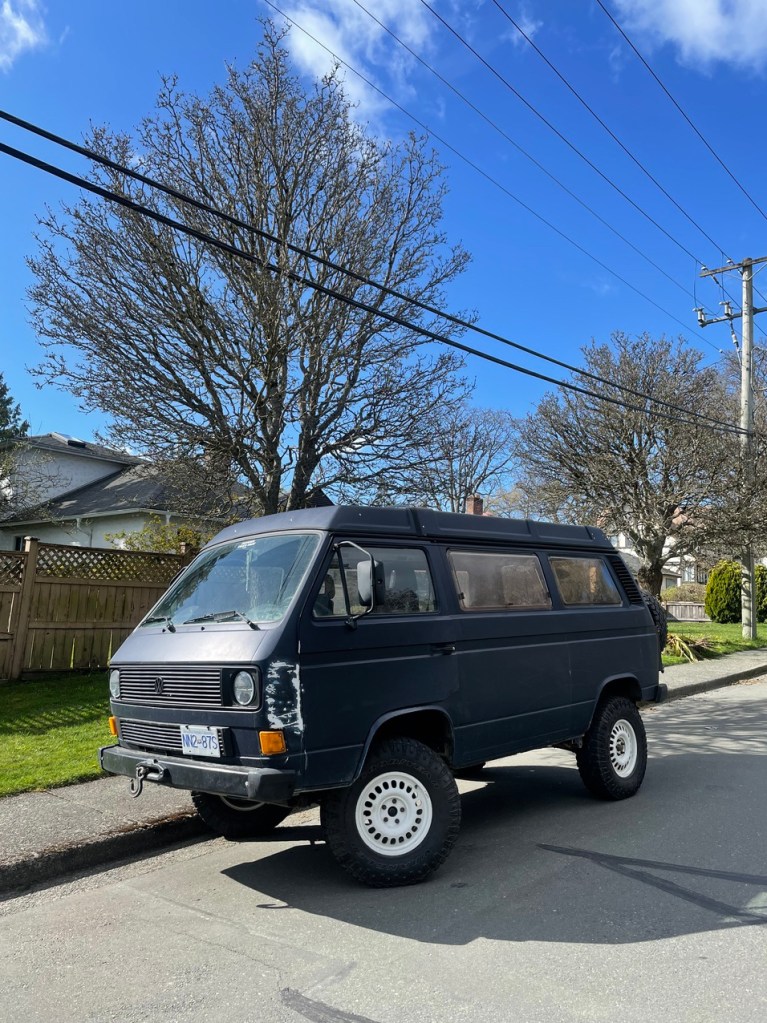
Posted by albell in syncro, vanagon, vanagon mods on March 20, 2022
One of the few *good* things about getting old, you care less and less about what people think 🙂
Vanagon – trailing arm rebuild part two
Posted by albell in vanagon, vanagon mods on March 20, 2022
I had this thought that I’d make modified spring perches. To replace the rusty stock ones I pulled off, and…
This is where I doubt my thinking. The spring perch is really at an awkward angle when the trailing arm at fullest low position. I’m sure it’s more aligned with the upper spring bump stop when fully compressed. But I thought I’d cant the spring perch a little to make it align “better” with spring when trailing arm at a more neutral position.
You probably know that the diesel 16” Syncro had wedge shaped aluminum spacers on the spring perch to do the same thing. But I’m guessing it was more to accommodate the change brought about by the 16” Syncro longer trailing arm.
So it’s very debatable if what I’ve done is wise or needed. But hey ho! Off we go.
Perch made from circles of 3/16” steel. I modelled a tapered spacer from same stock , and made developed shape to cut out. I just hand bent it to slightly smaller than the discs, welding allowance.
Tacked up , you get the idea


Tacked, getting the idea now?
With an extra home made plastic pad, had milled in recess for spring pigtail. That’s about 1.5” at the back. I can make thinner plastic pad if this is too much of a lift. The pad as is, 1/2”.


I put some rust converter on the trailing arms and plug welded the three holes under the perch. I didn’t attempt to fill the divots left from drilling out the spot welds that held on the original perch

And then clumsily mig welded onto arm. I’ll drill a hole in the sandwich and squirt in some waxy stuff for rust protection. Then weld up the hole.

I don’t know if all this is a good idea. But I did it 🙂
Next is to pop in some m6 riv nuts that I’ll use to secure clios for both the brake hydraulic arm, and the e brake cable. I’m thinking about welding closed some of the seam area left open from factory, not sure about that though. And I might shave the seam for more tire clearance, as the kids are doing these days ( I did that on the pair of arms I gave to Simon). Apart from that the next steps are another sandblast then powdercoating .
Vanagon – syncro transmission rebuild
Posted by albell in syncro, vanagon, vanagon mods on March 12, 2022
This is Quentin’s work, he’s at Vivid Vans. A series of pics with his comments interspersed. I’m envious.
Teardown:

You can see the make shift m5x.7 puller I made for all the idler shafts to the left of the housing. An m6 bolt ground down and tapped to m5 haha. You can also see wear from axial movement of the mainshaft bearing in the casting.


I took a photo of each gear with its respective syncro for easy reference at reassembly. You can also just go off the number of teeth but it was easier for a newbie like me.


Nice and clean after being glass bead blasted and thoroughly cleaned.

Test drilling old diff housing for pinion oil squirter. Right on the money first try. (housing was trashed)


My NOS S.A. aluminum diff housing I had modified by Mr. GAS in Colorado for a locker and extra material for the pinion bearing squirter. Yes it would have looked a lot nicer if I had it milled down but I ran out of time.

AN4

4th Gear cool oil bath squirter. Questionable effectiveness but doesnt hurt nonetheless. Bathes 4th gear in cooled oil.

Main bearing oil squirter. Squirts cooled oil directly into the main bearing from the front side.


Main bearing retainer plate. South African style reproduced by Alika Motorsports. Prevents axial play. (I had the wrong thrust bearing pressed into the housing please ignore! Fixed it the next day.)

Cut the oiling groove in the pinion race using my CNC angle grinder. Drilled with 1/8 carbide drill bits.


Setting up the ring and pinion with the help of our head Tech Tony. Didn’t get photos of final pattern but It was spot on. Probably the most difficult part of the rebuild.


gear stacks assembled. I literally spent months labouring over the gearing. Ended up going with:
3.333 First
1.82 Second
1.125 big tooth Third
0.75 Straight cut fourth

Deleted the reverse/granny syncronizer and installed a 2wd slider instead. TDIs have been seen to rattle the syncro assemblies apart and destroy the low/reverse housing.

Fully assembled all aluminum goodness

Painted, torqued, ready to thrash. I just need to plumb the oil cooling circuit and it will be ready for break in.

One last photo of my trans temp gauge I custom built. My oil cooler pump is activated manually by a 2nd defroster switch. I considered doing and automatic cooler set up, but your brain is the best automatic controller money can buy.

Vanagon – start of trailing arm “rebuild”
Posted by albell in vanagon, vanagon mods on March 10, 2022
Years ago I had a pair of trialing arms which I fixed up for good friend Simon. I shaved the wheel side seam and welded in a reinforcing plate in that area. Also welded up the spring pad perimeter. He finally had them installed last summer. His old ones he gave to me.
They were heavily coated in tar like undercoating and had been quickly cut from the van. I burdened off the undercoating using a tiger torch, and also got the bushings out.
Had them sandblasted. Here’s what one looks like after that. You might be able to see the Zip disk cuts in the arm, and the bent tabs. No idea what that tab on the inboard bushing area is for.


I welded up the zip cuts, and then I drilled out the spot welds on the spring perches. Yup, that’s what it’s like under the pads. Even though though the arms were rust free, on the surface, under the pads it’s nasty.


I’ll go out on a limb and say, unless you’re living in a super dry part of the world, your good looking spring pads will have cracked paint and rust under. Just saying, not being a Cassandra 🙂
Vanagon – funny Trucklite headlamp behaviour
Posted by albell in vanagon, vanagon mods on March 6, 2022
Hi, I bought another, yes another, set of cheap led headlamps. Let’s not get into the pros and cons of that just yet. I’ll report on those later.
But I had the chance to compare quickly, the new ones with some older Trucklite headlamps. They differ completely in the led arrangement and number. But when I was doing a quick comparison ( very quick , shining onto a welding curtain) , I noted the Trucklite unit had a delay switching from high beam to low. You can see in this shaky vid. Trucklite on the right
Vanagon – quick autopsy of GW throttle body
Posted by albell in vanagon, vanagon mods on March 6, 2022
It’s from the burned out orange van. Engine fire so you can imagine all of the plastic parts in there are melted or burned up. I did manage to pull the throttle body and it’s a go westy one. Here it is, even after an hour in the ultrasonic cleaner. I’m guessing it was black anodized.

Took it apart. The bearings , sealed, 22mm OD, 8mm ID, 7mm thick, we’re toast of course. And the throttle position switch burned off.


I did my best with scotch Brite pad on the main body and I skimmed a couple thou off one end ( lathe). The small parts I used vibratory tumbler, mix of walnut shells and grit. Put it back together using a a pair of cheap ceramic open bearings that I had. Of course you should use sealed , ti reduce the air bypass along the shaft.
Couple of notes. It’s a well made thing. I’m impressed by the build quality. The shaft has a very small groove where the bearings sit. There was something in the groove but maybe not an o ring, maybe it was some sort of sealant. The butterfly is a simple flat disc, no ramp or bevel as in the stock plate. The fit in the bore is very good, very close.


Good friend Greg has one in his van. He says it’s great. I don’t doubt it, it’s well made.
I’ll keep this one for a spare, yes I’ll swap out the bearings and see about something with that tiny groove in shaft under the bearings. And I need to get a tps either a kit from the usual sources or make one up. I’d did notice GW kit uses a 3D printed cam.
