I noticed some play in right rear wheel (jacking up van and trying to move wheel, 12 and 6 o’clock positions) and a whiny noise when driving which changed in loudness on turns. I figured it was time to replace the bearings. These bearings seem to last a long time but there is a limit I guess. For another good description of this procedure have a look at the English translation of the German IG16 wiki entry. To start here are a couple of exploded diagrams showing all the parts. 
 It makes a lot of sense to take out the axle at same time so that you can re-lube the CV joints and also press the stub axle into the bearing housing on the bench. But I didn’t do that as I was short on time. If you do want to take out the axle, undo the transmission side CV joint when you still have the wheel on the van, unless you are using air tools, so that you can brace the wheel when undoing the CV bolts. First thing is to undo the 46 mm castle nut on the wheel. It’s on there tight (275 – 350 ft/lbs) so you need to do it with the van on the ground and the wheels chocked. Normally I use a 3/4″ drive socket and a long armed drive with some steel pipe as an extension. But this time I tried out one of those “slug wrenches”, I was given one a few months ago. The idea is that (after removing split pin on nut) you attach slug wrench to nut, use a 1/2″ socket wrench drive to apply some force, and at same time whack the slug wrench with a short sledge hammer. Its a bit awkward, the wrench lies close to the wheel so ou have to aim carefully so as to not hit the rim. But it worked, the nut came loose.
  Once the nut is loose, you then loosen wheel nuts, jack up and support van securely, and remove wheel. Then remove nut and the brake drum should come right off easily. Perhaps you might need to back off brake adjuster if the brake shoes hang up on a lip if your drums are old and worn.
 Next step is to undo brake line from the brake cylinder and cap it with a bleeder nipple rubber cap. Then remove the 13 mm bolt that holds the brake cylinder to the bearing housing. Then remove the 2 bolts (15 mm?) from the brake shoe holder at the bottom. I then removed the clip that holds the parking brake line to the underside of the trailing arm so that I could keep the parking brake line attached to the brake mechanism. The brake assembly and backing plate *should* pull off the bearing housing. However, it is located on the housing by one dowel pin on the brake shoe holder at the bottom. The dowel was stuck in there tight and I had to tap it out with a small brass drift and hammer. Don’t use a steel drift to do this, it will mushroom the dowel.
 See the dowel pin below the bolt holes in above pic? Wet area on trailing arm is due to some rust busting liquid I squirted on exposed threads on the 4 bolts holding the bearing housing on to the trailing arm. With the parking brake line detached from trailing arm it is possible to to pull off brake assembly from stub axle and lay to the side on the ground.
  Now remove the 4 bolts (17 mm?) that holds the bearing housing onto the trailing arm, and then the housing should pull right off the stub axle.
  Pretty ugly in there eh? Caked on dirt and some rust. I took the bearing housing to the bench for disassembly.
 The grease seals were stuck in tight, I had to put the housing in the vice and use a longish pry bar to pop them out.
  Above pic shows outboard grease seal removed and the inner race of the outboard bearing removed (it just falls out). On the inboard side, after the grease seal is removed there is a circlip to take care of.
  After circlip is removed the inner bearing can be removed by driving it out with a brass drift from the outboard side. The spaced sleeve in there between the bearings can be shoved to the side so that you can get the drift onto the bearing race. It took a bit of “drifting” to get the bearing out. If you have a press then you know how to do it better. Once that inboard bearing is out, the spacer is removed and then the outboard bearing outer race can be driven out. In my case that bearing was really stuck in tight. I used an old disk brake caliper piston to drive the bearing out, was a lucky good fit.

 There is a spacer in that gob of grease.
  Cleaned up the housing a bit, especially the bearing seats.
 All the parts arranged.
  Inboard bearing greased and carefully tapped in using that plastic headed dead blow mallet. Picture shows bearing started in housing, not fully seated.
  Bearings were tapped in carefully (a press would be better), the circlip inserted in the inboard side, the spacer installed and the grease applied liberally around the spacer, and the grease seals carefully installed. Again, picture shows bearing started, not fully seated.
  Now at this point, with the housing reassembled, if I had taken the stub axle off the van it would be pressed (or carefully tapped) into the bearings. But what I did was take the housing out to the van, slip it onto the stub axle making sure I didn’t damage the grease seals and that the spacer lined up on the shaft, and I pushed the housing onto the stub as far as I could. I bolted the housing to the trailing arm, then I used the brake drum and the big nut to slowly draw the stub axle into place. This method worked well. Oh, before I put the housing back onto the trailing arm I cleaned out the dirt and loose rust from inside the arm and shot a whack of Fluid Film in there.
  Then its a matter of putting the brake assembly back on, re-attaching the brake line (was a pain, I had to loosen the slave cylinder on the backing plate to get the thread started on the union), then the brake drum, big nut snugged up but not torqued, the wheel, and then get the van off the jack stands. Torque the big nut to spec (see diagram at beginning of post for torque specs), split pin installed, lug nuts torqued, and its done. No play in bearing when the wheel was grabbed, and the whine when driving was gone. I’m guessing that most Vanagon owners will only have to do this job once, or maybe twice, in the van’s life.
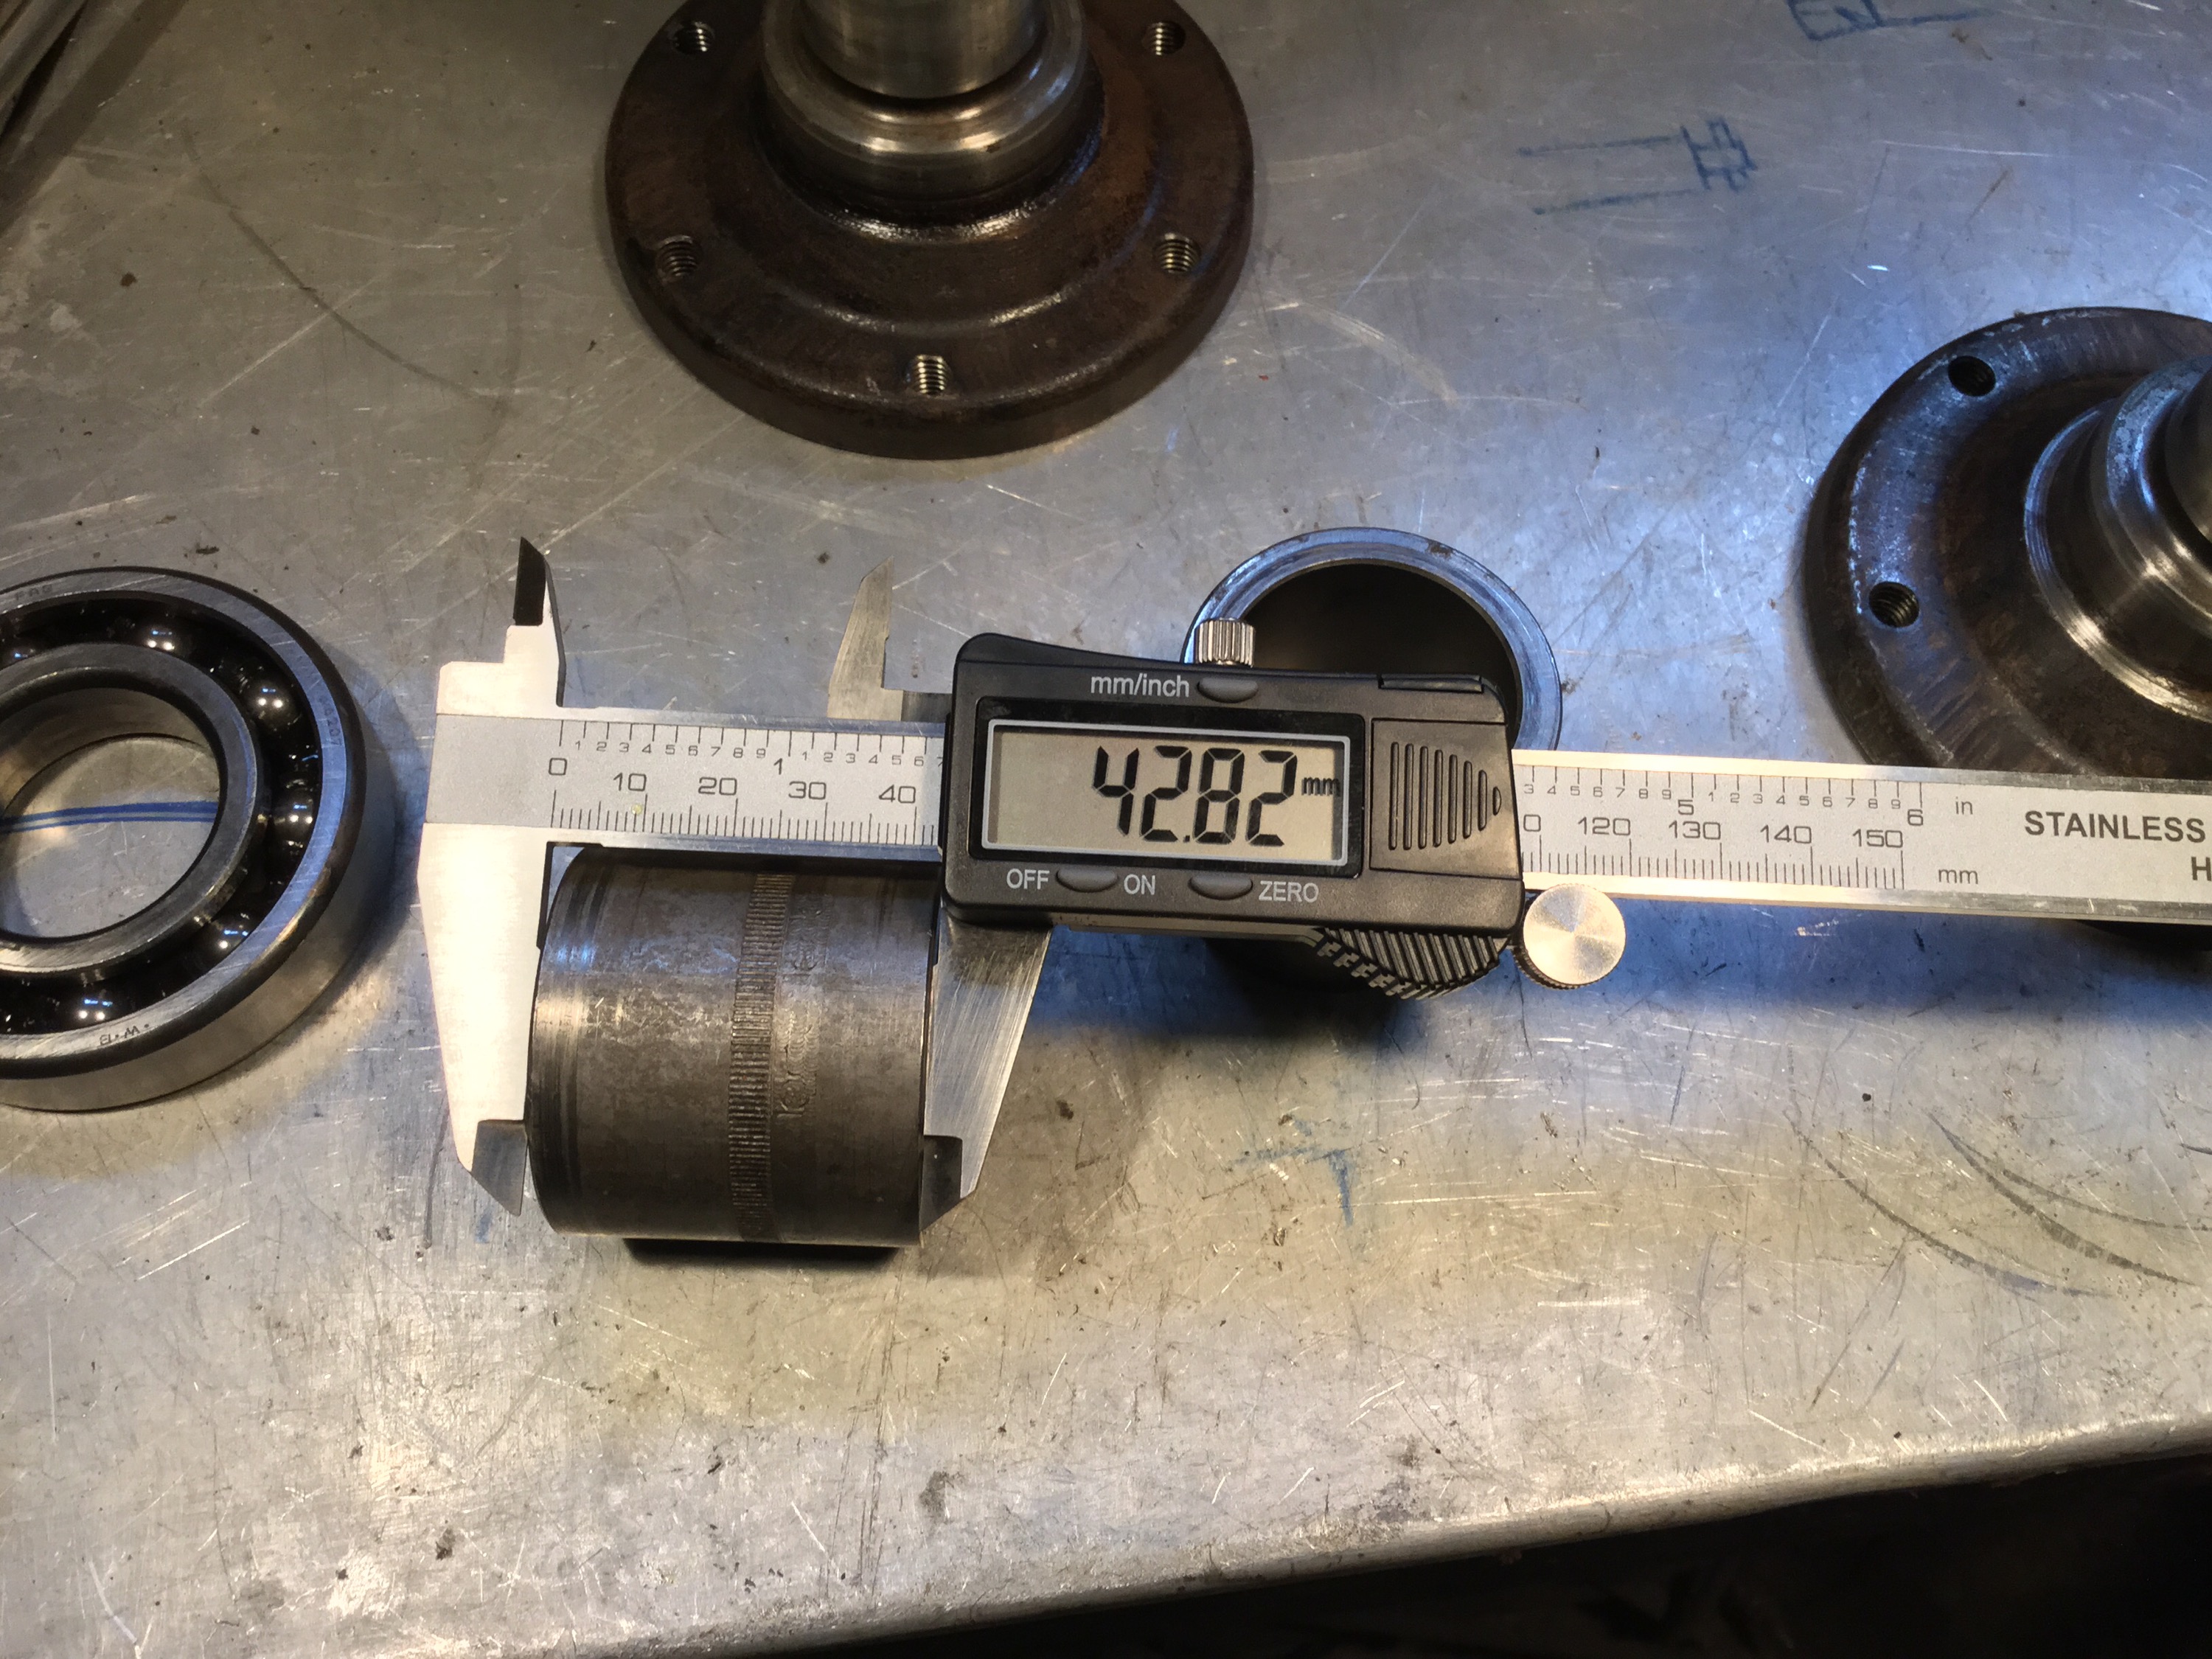
Addendum, April 30 2015, some measurements for Josh 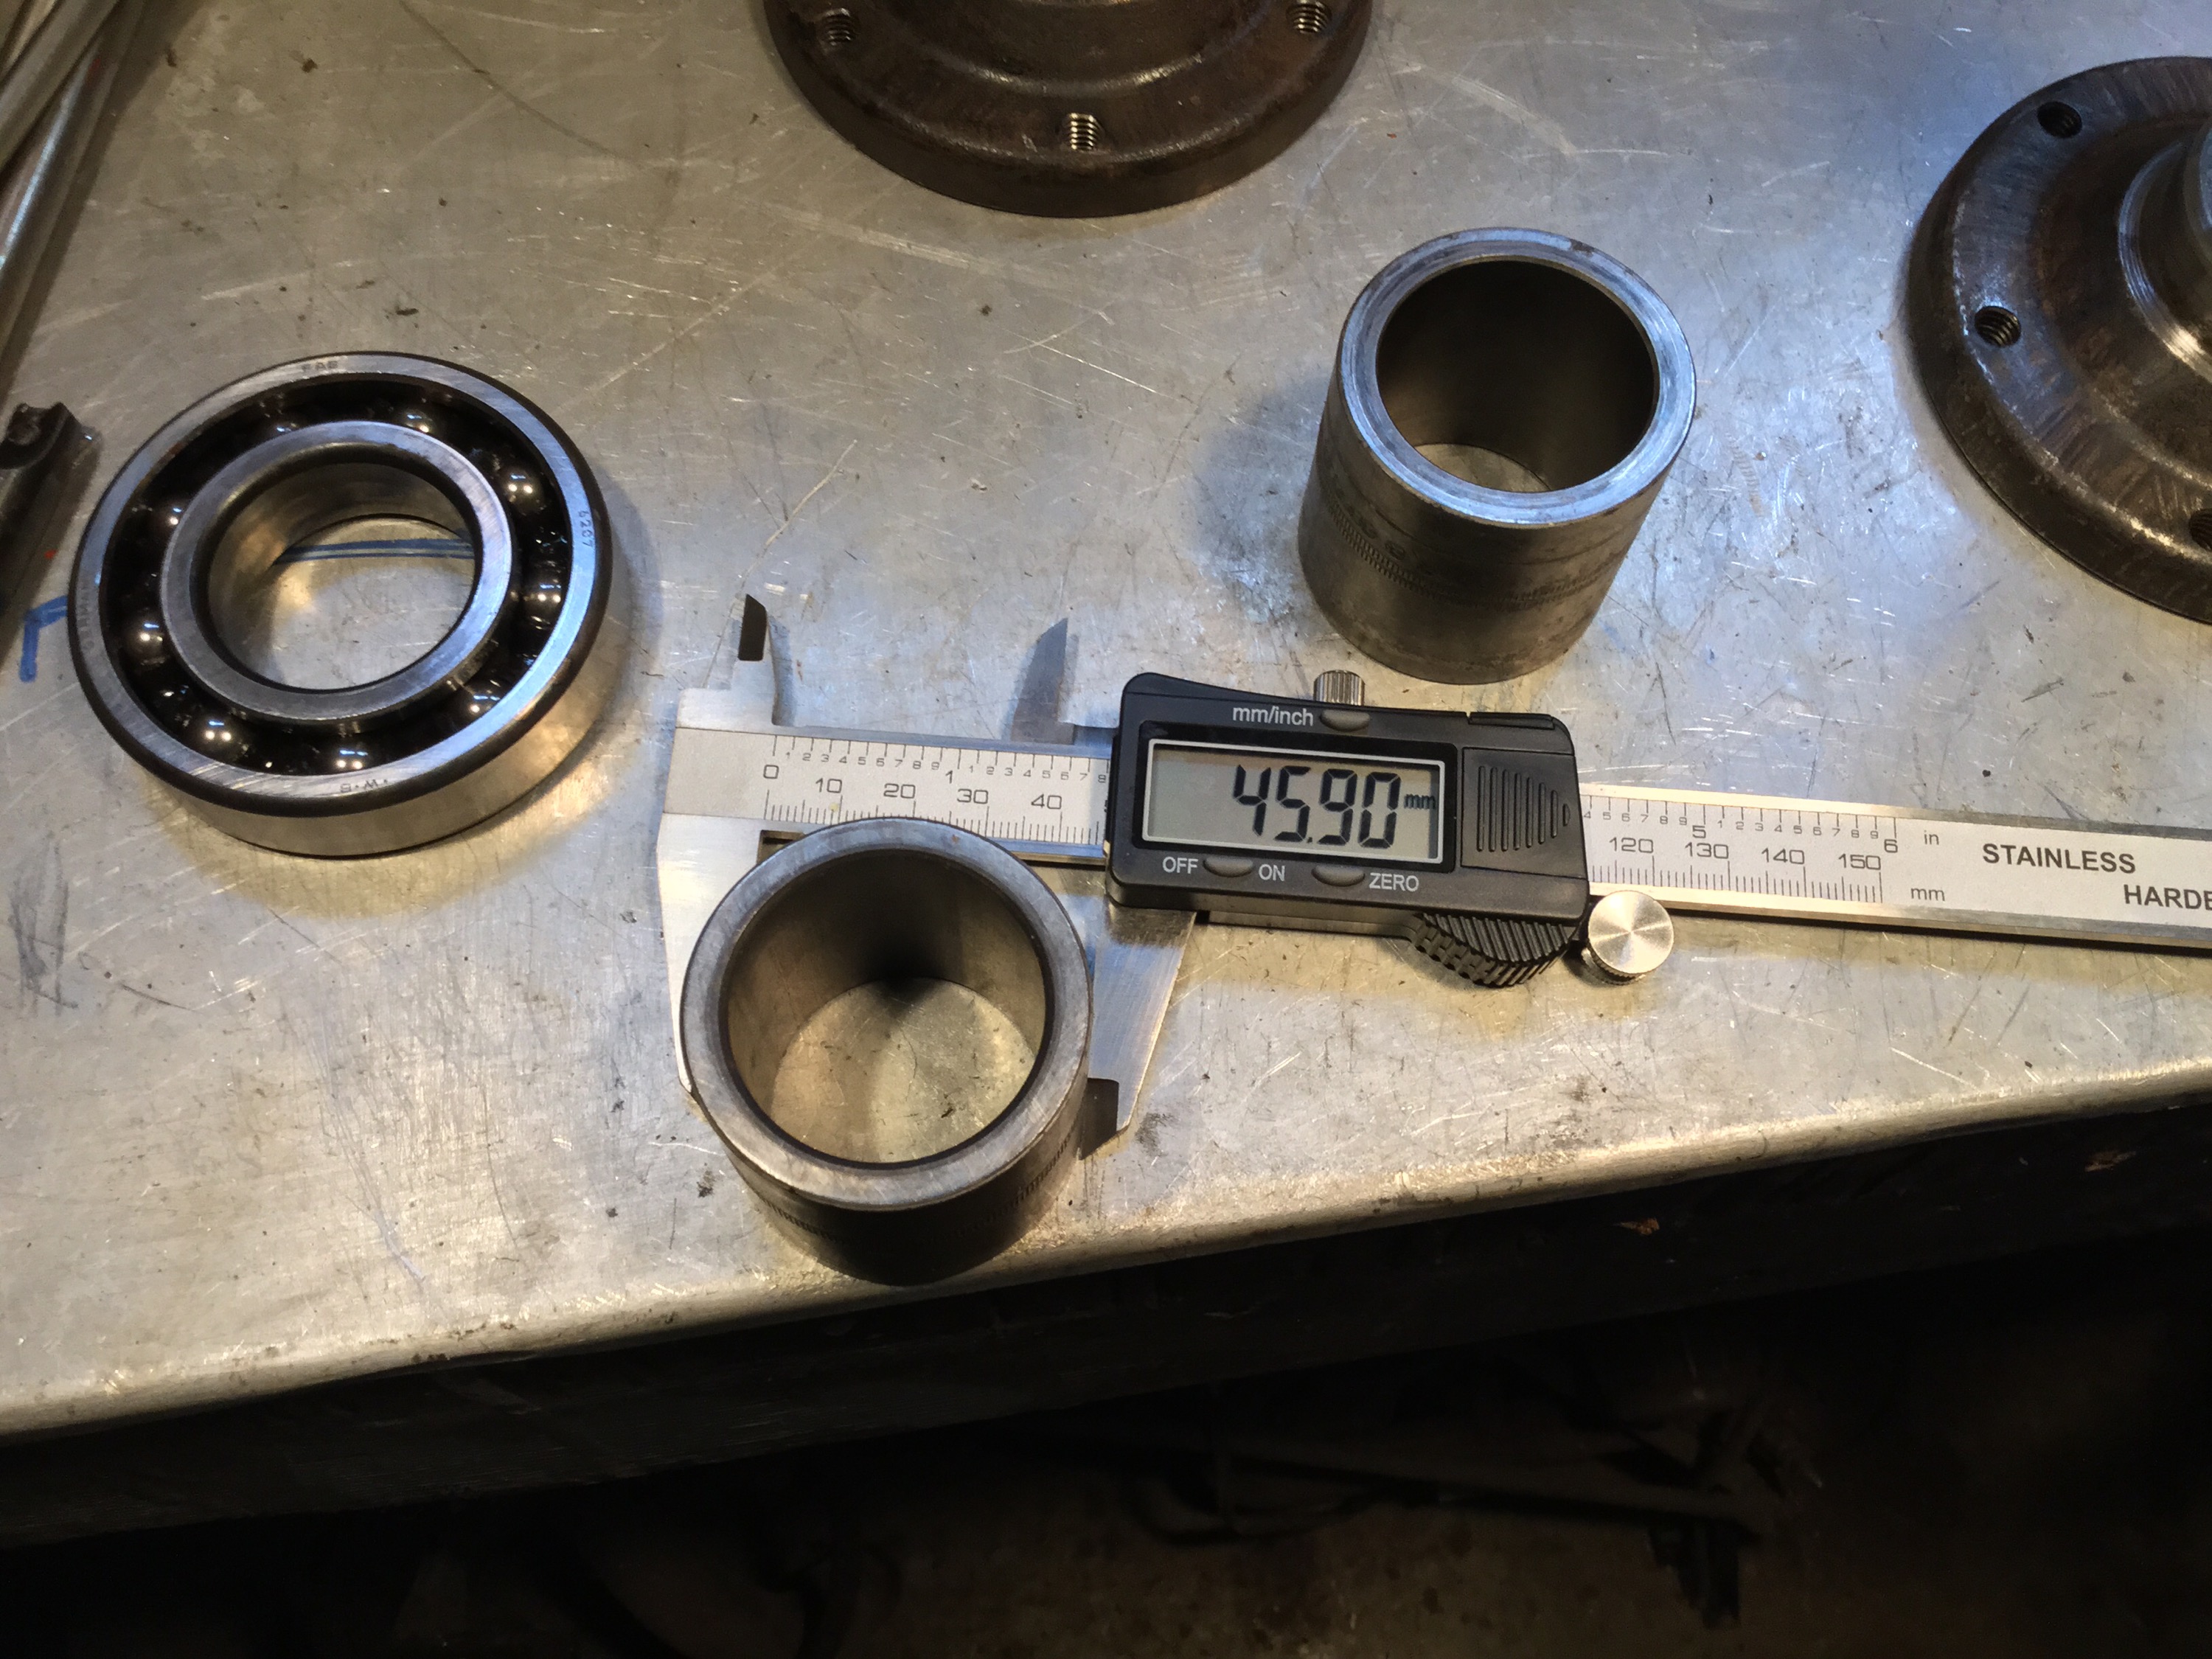


#1 by Simon on April 17, 2011 - 8:50 pm
Nice writeup Alistair. I’d be ionterested in in trying to do this myself too when the need arises. Missing a few tools though.
#2 by albell on April 17, 2011 - 10:22 pm
I think that for most of us we really only have to do it once, the bearings last a long time. That’s not to say one can’t take the housing off and refresh the grease in there, and clean out the trailing arm.
Combine it with a CV joint lube or replacement and you have your afternoon dance card filled.
#3 by Mark on May 3, 2011 - 8:20 am
Yes,great job! And excellent pics,One question…I ordered 2 grease seals,But each wheel takes 2 seals,Are the seals the same part number? #211 501 317 ?? If so I can at least do one side(the side- screaming at me the most.)Thank You,Mark
#4 by albell on May 3, 2011 - 11:49 am
I don’t have the package anymore, but I do believe they are same part numbers. I found the old seals to be hardened and pretty grotty. Be sure to replace both on each axle.
cheers
alistair
#5 by LT on June 22, 2011 - 7:09 am
Cheers! a very informative post! Helped a lot
Greets from Lithuania
#6 by Simon on November 12, 2011 - 6:20 pm
Nice writeup alistair.
I should try that sometime… 😉
#7 by doug favreau on July 13, 2012 - 10:00 am
Excellent post! Where could one get that nice 46 mm slugging tool?
#8 by albell on July 13, 2012 - 10:06 am
hi,
got it from local autoparts store. But I wouldn’t buy one again. So easy to hit wheel rim with hammer/sledge when using it. I’d rather use the 3/4″ drive socket and a long extension.
cheers
alistair
#9 by edbee on March 29, 2014 - 11:56 am
Hi Alistair,
Thanks for this informative post. Doing this exact job now (on the get away van) but think I may need a puller to get the bearing housing off of the stub axle. It seems to be on there pretty good. I am going out to have another look at it now.
#10 by albell on March 29, 2014 - 5:42 pm
Ed,
You have the housing and stub on the bench?
Ab
#11 by edbee on March 30, 2014 - 11:42 am
Hi Alistair,
when I wrote that last comment the housing was unbolted from the trailing arm but the stub axle was still in the housing and neither CV joint was unbolted. I used my 3 jaw puller to ‘pull’ (didn’t take much force) the housing off the stub axle so now the housing is on the bench and the CV shaft and stub axle assembly are still in the van. (same as the way you did things).
I originally planned to unbolt the inner CV from the transaxle but for my current purposes your method (leaving CVs and axle in place) made more sense. Thanks!
#12 by albell on March 30, 2014 - 9:32 pm
How are the bearing seats in the housing? Bearing a tight fit, any sign of galling or corrosion?
Cheers
Ab
>
#13 by edbee on April 8, 2014 - 9:36 pm
Hi Alistair,
bearing seats in the housing were fine, only a bit of corrosion on the seal bores but that not bad. The inboard bearing came out easily with a few taps from a brass drift but I used my press to get the outboard bearing out of the housing as it was somewhat tighter. I used the press to put them both back in place just because that way it was easier to keep them ‘square’ as they went in. Seals are now in place and the bearing housing assembly is ready to go back in the van tomorrow. (I was on Salt Spring for a week so the project got delayed.)
#14 by Marlie on May 19, 2014 - 7:41 am
What is the torque for wheel bearing housing tightening??????
#15 by albell on May 19, 2014 - 8:40 am
Hi, this should answer…
Alistair
#16 by jw on May 8, 2015 - 7:22 am
For the four 22mm bolts attaching the housing to the trailing arm- It’s actually on Bentley 42.2, but this covers a lot of the rest of the specs. It is 101 ft lbs
#17 by albell on May 12, 2015 - 8:29 pm
Thanks josh, I guess the diagram didn’t say it, oops 🙂
Ab
>
#18 by Etienne.Fontan.Free.Fr on July 7, 2014 - 9:36 pm
Great article, thank you for your time in creating it.
#19 by albell on July 13, 2014 - 9:31 am
Etienne,
Thanks, I’m happy that the article helped.
Cheers
Alistair
#20 by jw on April 26, 2015 - 11:02 pm
This job is killing me right now. You said your bearing box slid right off the stub axle, and others have said “tap it off lightly” well I had to pound the HELL out of that axle to get it out of there, and tried to press it in and it took hundreds of pounds to press it in. I’m pretty sure i’ve destroyed my new bearing in the process. I guess this must mean my spacer was crushed at some point and is way too tight around the axle, right? Any ideas you have would be helpful, thank you…
#21 by albell on April 28, 2015 - 8:02 am
Hi josh,
Sorry to hear about the difficulty. I can understand when things go sideways. I have a couple of questions. What were the surfaces of the stub axle, where the bearings sit, like? Discoloured? Pitted? Same thing with the surfaces in the housing.
The fit on both areas is supposed to be tight, a light to medium press fit. Sometimes you find the fit into the housing to be easy, in that case perhaps the housing is distorted or worn.
If you have any doubts about the bearings you installed I would pull the assembly apart and check them. Replacing them is cheap insurance.
The spacer sleeve, well it might be damaged. I’m afraid I don’t know where you buy new ones.
Let me know what happens.
Cheers
Alistair
#22 by jw on April 28, 2015 - 9:57 am
Thanks for the commiseration : ). The stub axle looked pretty good, the inner bearing did look a little blackened but not terrible overall, and the spacer just looked like steel (not discolored). The surfaces didn’t look pitted or rusted. The inner bearing fit into the housing a little oddly, had to tap tap and then it just kind of slid in which was surprising, but hence the circlip I guess. Going to try to get new spacers at the junkyard and see if I can even detect a difference in size with my cheap micrometer, or I might try to bore it out if worse comes to worst. Not sure how exactly…
#23 by albell on April 28, 2015 - 7:53 pm
Hi,
Measure the spacer length and get back to me, I’ll see if I have a spare and measure that, we can compare.
I wouldn’t bore out the housing if I was you. If you can accurately measure it do that. You might find it oval, take readings in various places.
Boring out would mean pressing in a sleeve. Not for the faint of heart josh 🙂
I can’t see the bore shrinking, I can see it being hammered out of round if run with bad bearings. I can also see rust or burrs, or dirt, interfering with fit.
If you can, and your van is not a daily driver, take a breath and step back to consider things. I know how the red mist descends and everything looks bad, but I find taking some time cures that.
Ab
>
#24 by jw on April 28, 2015 - 9:54 pm
Interesting, it seems this is as deeply nested as it will allow me to reply. Anyway, when I said I’d try to bore it out, I was talking about the spacer. But that is a good idea to take measurements of the roundness of the bearing housing — would be interesting if not informative. Looking around your awesome site, it is clear you are way more knowledgeable and mechanically savvy than I am, for what it’s worth. Maybe one day I’ll actually have a garage in which to work : ).
Anyway, I appreciate your help and will probably go to the junkyard this weekend, grab a bunch of spacers (and maybe stub axles) if I can, and just put them side by side to see what I can learn by observation.
And yes, a few days has allowed my head to cool. Thanks for that as well : ).
#25 by albell on April 28, 2015 - 10:15 pm
Hey, you mean the spacer is a bad fit on the stub axle?
Ab
>
#26 by albell on April 28, 2015 - 10:20 pm
Josh,
I will seek out my spacers and measure them. Mind you they are used spacers so take that for what it’s worth.
I’m not the best at taking measurements and that trips me up a lot in my metal working. I tend to be sloppy and careless, wanting to get on with the job. But it really does pay to get good measurements of diameters and bores etc when you run up against a problem like this one.
Alistair
>
#27 by jw on April 29, 2015 - 8:24 am
Either the spacer or the outer bearing is insanely tight, not positive which but I suspect it’s the spacer. I used a ring from a ball-joint press kit to tap in the bearings and it fit the outer races very well, so I feel pretty good about doing that, which means I do the whole job with the exception of pressing the stub axle in. If I could get a shop to do that step maybe I’d be ok.
No wait, the outer bearing’s rollers are solely what are on the other side of the spacer, meaning that’s where all that force goes. Ugh, I’ve looked on the samba and am surprised that no one else seems to have reported this issue. It might be easier to narrow the stub axle than bore out the spacer. Actually, the spacer should have the same inner diameter of the bearings, so maybe that’d be a good barometer of if the spacer is bad. Sorry to think aloud on your site : )
#28 by albell on April 29, 2015 - 9:07 am
Quick comment, on my out…
I’m really surprised the spacer is tight on the stub axle. I can only guess that it is queefed out, peined over.
Please, don’t do anything to the stub axle 🙂
Ab
>
#29 by albell on April 29, 2015 - 7:11 pm
Hi,
Pics attached ( I hope) with measurements made with my disposable digital calipers 🙂
Also note, and I’ll look up Bentley for details, that spacer changed during production to a thicker version. What I have are the thicker ones,
Hope it helps
Ab
>
#30 by albell on April 29, 2015 - 8:00 pm
Well the pics didn’t attach to the comment reply, so I have added them to the blog post.
Ab
>
#31 by jw on May 1, 2015 - 10:09 am
Thank you so much Alistair. I tore down the side I’d put together and played with it a bunch last night and I was wrong about the spacer – It fits over the axle with no problem. It’s the rear bearing that is incredibly tight around the axle both at the outer bearing seat (takes serious tapping) and its own inner bearing seat (take some wailing).
I appreciate your help on this so much but I don’t want to take up any more of your time. I’m going to try again this weekend and I now think I have the experience/understanding to do it. I plan to make a video on it and will post here if/when I do. I will take my caliper to the sleeves and report back for curiosity’s sake.
#32 by jw on May 8, 2015 - 7:29 am
Well it wasn’t the sleeve, it was the inner bearing that was so tight. The other side wasn’t all that bad until i was putting it back in and doing the final seating. In lieu of a press I used 2 vices.
Thanks for all your help Alistair. I’m trying to give back more these days, so i made a really long video about this job that will hopefully help others:
#33 by albell on May 12, 2015 - 8:26 pm
Hey josh,
Watched vid part one. Hats off to you, you’re a pretty resourceful guy. I was a bit leery of the van pressing the hub from the drum but damn it worked fine.
Honestly, if you had more tools and a shop with a concrete floor I bet you would be capable of any vanagon repair. I’m really impressed by how you did what you did with what you had.
Cheers
Alistair
>
#34 by josh on May 16, 2015 - 10:24 am
Thank you! Coming from you I take that as a high compliment. I expected to get a lot of condescension and reprimands from the purists on thesamba but feel compelled to document as much as possible since I’ve received so much help from others’ efforts.
#35 by albell on May 16, 2015 - 10:55 am
Hi,
Hey I’m sincere in what I said.
About the potential negative samba comments, fuck em 🙂
There are folk who sit at the computer and criticize. Small minded people and I bet most of them couldn’t wrench their way out of a wet paper bag.
You rolled up your sleeves and got it done. You did a great job considering it was the first time and you had limited tools.
Plus I’m always in the guy’s corner who has to work on a gravel driveway 🙂
Cheers
Ab
#36 by josh on May 17, 2015 - 10:58 pm
True that. If you ever make it to Austin give me shout!
#37 by Graham Chapman on November 17, 2019 - 8:58 pm
The comment by josh about the correct way to install the outer roller bearing was the most helpful comment on the entire 1,2,3 videos. I suffered the rocking of the bearing when trying to tap into place for many long minutes until I found his videos. He is absolutely correct. Ther is definitely a slight difference in the chamfer on the bearing the more rounded side allowed very easy installation using an old small saw blade and bench vice. Thank you Josh.